1st touch up on the WEP

Hi guys,

Just done my first proper touch up on my Spyderco endurana 4. Started by mounting the Knife as i originally sharpened it, marked the bevels with a marker pen to be sure it was set up correctly.

Last time I finished off with the 800 grit stones for a toothy edge and thats where I started off tonight. A couple of strokes with the 800 stones each side and she was on par again with no marker pen marks remaining either.

It wasnt very blunt tbh but after skinning amd prepping 10 rabbits it just lost it’s magic. Back to spot on now though!

One thing i am thinking though is would a 600 grit toothy edge be even better then the 800 for long lasting and cutting and skinning rabbits etc, whats your thoughts guys?

Vg10 steel BTW

Thanks all

Steve.

Anyone?

An edge finished at a lower grit may last a little longer but you’ll need to use more pressure to cut things. I like to get an edge as sharp as possible then touch it up when need. At least with the higher end steels theres not much of a difference that ive noticed in edge holding ability between a 800 grit edge and a sub micron edge. But since you have the knife, the rabbits and the sharpener why not try it and see if you like it better. Nothing is set in stone as to the angles and finishes. Or use a separate blade to break it up.

Cheer’s thanks mate,

Anyone else have any advise?

Cheers all

Steve.

For field dressing knives I’ve always gone to 1000# diamond and then 5/3.5 strops. It works great on elk so I imagine it would on rabbits too. I can usually get through 4 elk with one knife sharpened that way, provided the steel is decent which your Spyderco VG10 should be.

It is going to depend on how you are cutting.

There are two main ways people using hunting knives. One way is to use the knife in a push cutting motion which has little draw. People who do that like very high polishes and they will get best performance out of them. However there are other people who cut on a draw, using a long slice. They will prefer a much lower grit finish and they will get better performance out of them with that finish.

If for example you look at the ABS guys they will frequently recommend a fine india stone for final sharpening. It is about a 400 grit stone (grit being a fairly loose term) which leaves a very aggressive slicing edge. In fact some ABS guys under harden knives to make it easier to put on that kind of edge, Fisk for example.

If you want to check it just try a little rope cutting with a few edges and you will see if you are slicing then the edge retention will be very high on low grit finishes if you are draw cutting. The trick is to actually get them sharp. Often times people compare a dull coarse edges to a sharp polished one. The coarse edge should still :

-shave
-push cut newsprint

Here is a pretty poor resolution of the kind of minimum sharpness you need to have to properly understand how a coarse edge behaves :

http://www.youtube.com/watch?v=yoLV30_ZfQg

You want to aim to cut a piece of 3/8" hemp with a 2" draw with about 4-5 lbs of maximum down force.

[quote quote=“CliffStamp” post=19045]The trick is to actually get them sharp. Often times people compare a dull coarse edges to a sharp polished one. The coarse edge should still :

-shave
-push cut newsprint[/quote]

I have a lot of trouble getting edges that sharp off of coarse stones. I’ve done in a couple of times but seemingly by chance as I can’t repeat it at will. What is the easiest way to reliably get that result?

Really depends on how broken in your stones are. I agree with Clay on the 1000 as a final toothy finish on a well broken in stone. If your stone is not really broken in, after the 1000 then hit it lightly with a strop at a lower angle just to help sharpen up them teeth a little. Once your 1000 stone is broken in real well I doubt you would even need the strop. if at all..just a little stropping so you do not remove much of the teeth. I also had great luck with this method on Elk this year. I can not imagine your 10 rabbits would be harder on it than a few Elk!

[quote quote=“Mr Wizard” post=19999][quote quote=“CliffStamp” post=19045]The trick is to actually get them sharp. Often times people compare a dull coarse edges to a sharp polished one. The coarse edge should still :

-shave
-push cut newsprint[/quote]

I have a lot of trouble getting edges that sharp off of coarse stones. I’ve done in a couple of times but seemingly by chance as I can’t repeat it at will. What is the easiest way to reliably get that result?[/quote]

Thanks for that video Cliff!! what grit is that stone?

Keep in mind that Cliff is using a water stone, which reacts completely different than a diamond stone. You should still be able to get a shaving sharp edge, however off of the 400-600 grit range (after they are broken in) but it is pretty difficult. With water stones one of the benefits is that you have slurry/mud that you can work with and actually use to produce a higher finish than what the stone actually is if you know what you are doing.

[quote quote=“razoredgeknives” post=20002]
what grit is that stone? [/quote]

That is a Naniwa Superstone 400 but the grit ratings on those are a bit misleading hence why you always hear the same two things about them - they cut very slow and they produce a very high finish. This is not because of the abrasive specifically but what I assume is the binder because the stone breaks down to form a very thick mud which is like a colloid in that it doesn’t settle (or does it very slowly). It thus produces a very different scratch pattern if you use it dry or if you use it with just enough water to build up a thick slurry. The difference is very dramatic compared to something like a Bester 700 which doesn’t have this kind of behavior unless you really force it by using say a diamond stone to grind down the stone and generate a mud, the Naniwa will do it as you sharpen.

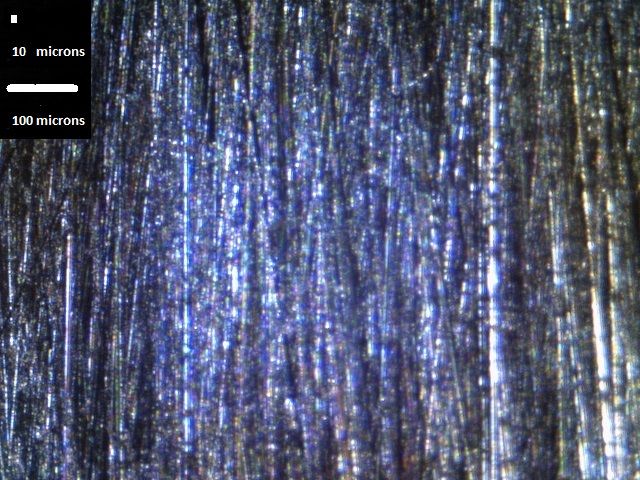
That is the Naniwa 400 and this is the Bester 700 :

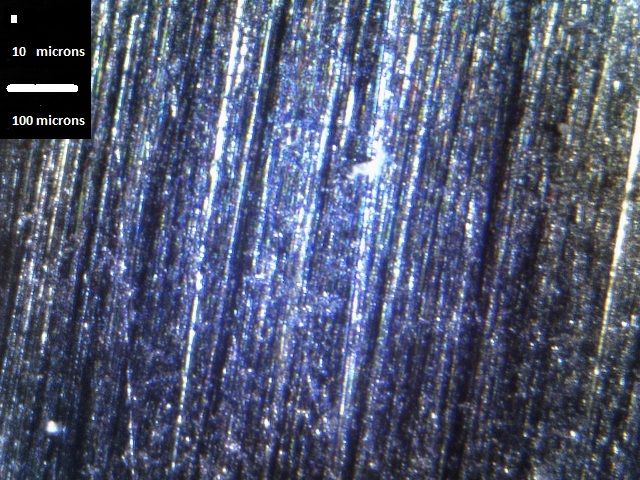
They look similar and when use freshly surfaced and clean they produce very similar scratch patterns. Here are 50 passes done on a mirror polished piece of 1095 (the black background is the mirror polish, the white lines are the scratches from the abrasive) :

vs

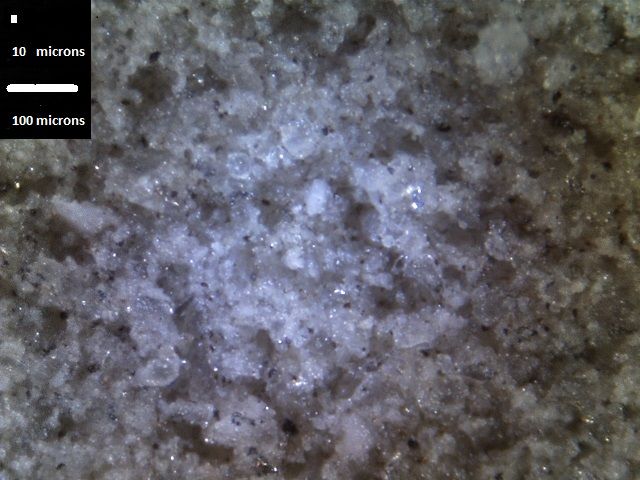
However if you just use the Naniwa a little the surface looks like this :

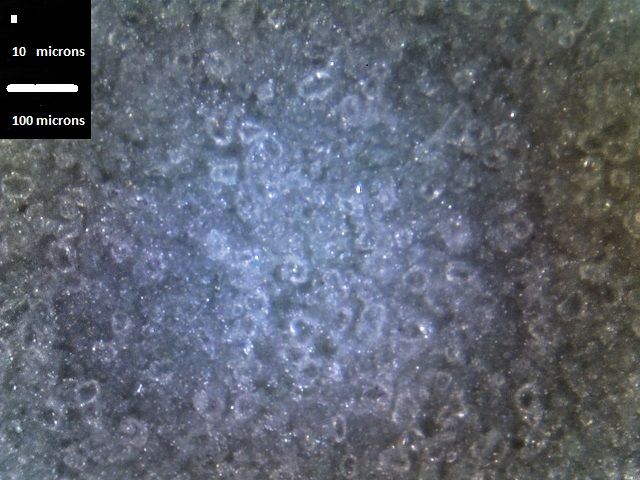
Note how the abrasive is starting to get masked. This produces a dramatically different type of finish :

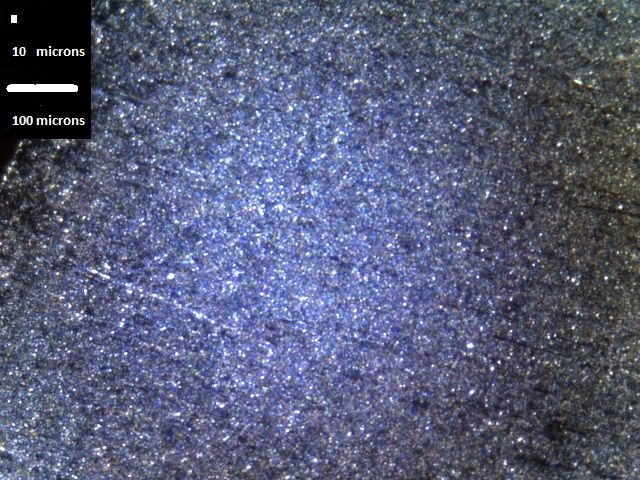
I assume this is because of the random honing action of the very thick/consistent slurry mud. This is why that type of stone is really praised by the guys who do Japanese style sharpening as even in low grits it produces a very smooth almost satin like feel to the large and wide grinds they use and it is a non-reflective, very subdued surface, no harsh glares.

When I am shaping I can and often do use the stone with a thick slurry/mud to prevent burr formation as I approach the apex, or to simply generate a smoother primary grind. But when I am setting the apex I flush the slurry off. It is possible to set the apex with a thick slurry but you have to play a game of grinding down the sides of it at the same time the apex is ploughing through that slurry which is dulling it. It can be done, edge trailing is one way, but I prefer to just flush the slurry off when I am working on the apex itself.

It can be done with some pretty coarse grits, this is one of the more involved ones :

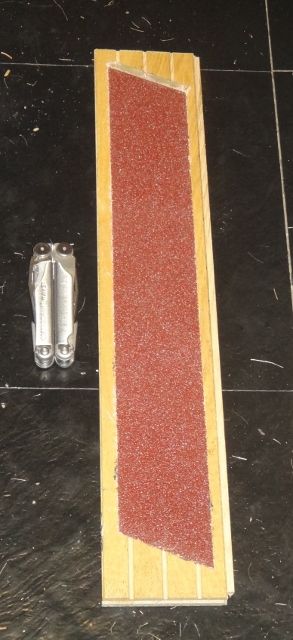
That is a 36 grit aluminum oxide grinding belt, the abrasive is so large I can’t even get it in focus at 50X magnification. It should not be much of an issue once you go above that. By the time you get to finishes like x-coarse DMT, coarse India, etc. it should easily be possible.

[quote quote=“Mr Wizard” post=19999]
[…]
What is the easiest way to reliably get that result?[/quote]

There are two main issues, aside from rare issues such as problems with the steel or obvious problems such as the stones are loaded/damaged :

-the apex isn’t formed

-it is formed but is damaged and/or irregular

It is pretty easy to know if the first is true or not as the edge will reflect light, depending on your eyesight, at a thickness of 10-20 microns. If you can’t see any light reflecting you have either formed the apex or are very close to it, a little more work will ensure it in any case.

The most common problem is that the apex is formed but it is irregular and/or damaged. On steels which are hard to form a clean apex, I resort to focusing on burr minimization which includes things like :

-forming the edge in shaping with a very muddy stone, this ensures the micro-bevel has an ideal platform to start from

-alternate passes

-flush the stone

-go very light (as in down to 5-10 grams of force being applied)

-very sort strokes (as in an inch of travel)

-cross the scratch patten/strokes

-increase the angle dramatically (double it) to cut off any damage

It is only in rare cases that you would have to do all of these and quite frankly when you do it likely isn’t practical because if you have to do that to form an edge which is really sharp it is likely it won’t hold it anyway.

The biggest thing though, which sounds silly, is just accepting it can be done. If you think it can’t, or if you think it is very difficult, then it is very likely your brain will make exactly that happen.

Earlier you said it is hard to set the apex with thick slurry (mud) because “the apex is ploughing through that slurry which is dulling it” but here “shaping with a very muddy stone … ensures the micro-bevel has an ideal platform to start from.” Why doesn’t the very muddy stone result in a rounded or widened apex, or if it does why is that an ideal platform?

How do you keep the blade in even contact with only 5-10gf on a coarse stone? Is this where the difficulty lies? It also seems quite difficult to use so little force unless things are vertical like the WEPS or Sharpmaker as otherwise the weight of the blade is far more than that, yet you did this on a water stone.

Referring to “when you do it likely isn’t practical because … it is likely it won’t hold it anyway” Is it the case for such a steel that it will not hold a truly sharp edge no matter what grit it is formed on? What is the most practical way to finish such a knife?

Good question, I didn’t actually discover that intentionally, it was more or less an accident. I often experiment with stones that do something poorly to try to understand what they can do well. I was working with stones like the Naniwa Aotoshi which is a very muddy 2000X stone :

and while it produced a very nice finish to look at and was very smooth to touch, actually getting the apex to form sharp was not at all trivial. I ended up retreating to just flushing the stone, removing the mud and running it almost like a DMT plate. However in a few cases, where I was not fooling around and was actually sharpening for practical purposes I was using the Naniwa to bring the edge bevel up a set in polish from say a Bester 700 so get it ready for a micro-bevel with a Spyderco plate. I started to notice that the micro-bevel was setting much cleaner, meaning that few passes produced a higher sharpness. I then started looking at the prep edges from the muddy stones and they would go from this (Bester 700) :

to this :

That is a < 10 dps bevel on Maxamet, 250 pps on the Naniwa. But here is the curious thing, the Naniwa bevel is significantly duller, thus the apex is thicker -but- it is much more consistent. I then started to realize that the ideal platform I would want to set a micro-bevel would be one which was perfectly consistent and ideally just a few microns-thick at the apex.

Now at this point you could ask - well would it not be easier to set the micro-bevel if the apex was perfectly consistent and 1 micron thick (which would actually be sharp) vs 10 microns thick (which is fairly dull). Well yes, but practically that is very difficult to do, especially when you are trying to be efficient. I thus developed a slight modification to the normal three step method I use :

  1. cut the apex off

  2. do all necessary shaping, form an apex

  3. micro-bevel

to

  1. cut the apex off

  2. do all necessary shaping, almost form an apex (light starts to disappear from the apex in reflection)

2.5) apex on a very muddy stone

What this does is prevent a burr from forming, keeps the apex from being damaged, and makes a small flat, ideally < 10 microns thick which is then ground away by the next step which is :

  1. micro-bevel

Now to be clear here the micro-bevel I am setting is semi-coarse meaning it is typically in the ~5-10 micron range. If you want to produce a very high finish micro-bevel with ~1 micron style hones this won't work because it would take forever to actually set a micro-bevel with a 8k stone if the apex was ~10 microns thick. If I want to end up with a very high polish I use a slightly more complicated process again :

  1. cut the apex off

  2. do all necessary shaping, almost form an apex (light starts to disappear from the apex in reflection)

2.5) apex on a very muddy stone

2.5a) bring the sharpness up to ideally just below push cutting newsprint with a only sightly muddy stone

  1. micro-bevel

For example I have some very nice semi-hard waterstones in the 2-4k range which work well for that and allow a micro-bevel with an 8k stone. How much/involved you have to be here really depends on the steel. Doing this with AEB-l/62 HRC can be trivial, 70 HRC MaxaMet, not nearly so as it is MUCH harder to grind and thus you have to have a much thinner apex to allow the micro-bevel to form.

[quote]
How do you keep the blade in even contact with only 5-10gf on a coarse stone? [/quote]

Easy, I just did it a million times.

Initially as you drop down in force it is hard to make constant passes because you are used to feedback from the stone/knife. If you jump from ~1 lbs to five grams it will likely make the passes very erratic, just keep reducing them gradually.

If they are slicing soft materials (cardboard, ropes, foods, etc.) it isn't hard, just do this (low angle, low grit) :

The apex is so coarse that it takes tremendous amounts of material to wear it down and the "teeth" are so big they are strong enough not to deform/break. This is the same edge after 1000 slices through 1/2" hemp at ~10 lbs of load :

I did ~1750 slices and could not get it to stop slicing newsprint. This was on a $1 "surgical stainless" kitchen knife.

If they want high push cutting performance then you can apply a very high apex angle (still need a low edge angle) but even that will only go so far because the steel will simply be too weak and the apex will both deform/wear/fracture on poor steels.

The only real option you have is to try to optomize the primary grind to reduce cutting loads and try to expand the life of the edge both directly (reduced loads = less strain on the apex) and indirectly (the knife will cut better when duller if it simply cuts more efficiently due to geometry).

Thanks for the explanations cliff!

Why would the steel be too weak at a high grit higher angle micro bevel thanks low grit lower angle? Sorry… Maybe I followed wrong

  • Josh

[quote quote=“razoredgeknives” post=20022]

Why would the steel be too weak at a high grit higher angle micro bevel thanks low grit lower angle? [/quote]

A low grit finish will generate a much thicker apex than a high grit edge which is one reason why a low grit apex will be stronger (resist lateral deformation) more than a high grit edge at the same micro-bevel angle. However the main issue is the type of cutting which is why I started with “If they are slicing soft materials (cardboard, ropes, foods, etc.) …” . In this case the apex will typically not be under high loads to deform it, it will dull mainly from slow abrasion. To combat that, use a low grit edge to make an irregular surface which will take a lot of abrasion before it is worn smooth and stops cutting and use a low angle apex to both enhance the roughness and maximize the amount of wear required. Because the loads are small the angle you can use can be very low and there is no real risk of deformation.

However if they are push cutting hard materials this type of finish won’t work because the apex will come under heavy loads to try to deform it and if you use a low angle and finish the apex with a low grit finish it is very likely to collapse almost immediately. For example that finish in the above which easily slices though ~2000 piece of 1/2" hemp will fail dramatically in less than 10 cuts if you try to push cut because the forces will be so high that the apex will just deform and can crack right off. In order to make the apex perform well under cutting that type of material you have to raise the polish and then increase the angle to prevent it from deforming. Now of course continuing to increase the angle past the point it stops deforming doesn’t help. It is just that this point will be a lot higher in push cutting a hard material vs slicing a soft one.

Now there is a sort of semi-trick you can use which is to pre-dull the edge, this creates a not-sharp edge which stays not-sharp for a long time. What you do is sharpen as normal to a high polish, this will form an apex of < 1 micron and be very sharp. You then take the knife and very carefully, grind the apex back to a small flat. This can be done by making a small pass against a very fine stone, cutting light sandpaper etc. . The critical part is you want to grind the apex into a small flat. This flat is very durable and resistant to deformation and fracture and will just dull by slow wear. Now it won't be super sharp, but it will stay not-sharp for a long time before it gets super dull. What you are trying to do here is avoid the early fast lost of sharpness as that < 1 micron apex will deform/fracture and turn into an irregular surface. Another way to approach this is to apply an extremely high micro-bevel which is very light, say 1-2 pps only at say 45 dps.

If you sharpen knives for yourself, if you have decent steels, well you are not going to want not-sharp knives which are semi-dull for a long time, you want actually sharp knives which cut very well for a long time. But if you look at knives a lot of people use they are mainly used in extremely dull states and thus how to sharpen them for optimal performance for them is a bit of a different process.

The pre-dulled edge sounds like what Ben Dale recommends for steak knives that are going to be used on a plate. Have you made a comparison of the performance between the flat (perpendicular) grind and the steep micro-bevel?

Thanks for the explanation it really helps. Totally understandable!

My only two questions are:

  • What documentation has shown that a low grit finish creates a thicker apex (when done correctly) vs. a high grit polish? I know this has been theorized about but I haven't really seen any data other than Verhoeven who shows it to vary slightly on a razor done w/ a true hone & tormek (nothing by hand like you do)

  • Why would you want to grind it into a small flat and not just let this happen naturally? Then it would be just as dull. I am picturing the picture you comprised that had the thick and thin apex and a red line and you asked which one would take longer to get to the red line…

thanks for your time and explanations.

[quote quote=“razoredgeknives” post=20034]

  • Why would you want to grind it into a small flat and not just let this happen naturally? Then it would be just as dull. I am picturing the picture you comprised that had the thick and thin apex and a red line and you asked which one would take longer to get to the red line…[/quote]

Pardon me for butting in again but I think I know this one. If the edge were to be used in a way that it would wear into a flat it would be highly preferable to let it do so as that entire time it would be cutting better than the flat state. However if the edge were to be used in a way that it would fail it would not produce a flat, but (assuming plasticity) something like this:

Dulling on GlassThat is from the Science of Sharp blog post . That is what we do not want to happen when the knife hits a plate in the case of the steak knife I mentioned above. Note that the rolled edge forms a surface much wider than the base that supports it therefore cutting off that folded part would actually make the edge sharper.

Excellent point and the picture is worth a thousand words!! Thanks for posting that and the explanation, I understand what Cliff was trying to say and the reason for the increased microbevel now, it would prevent that type of folding. But I would still like to see evidence for the thickness/thinness of and edge depending on grit finish…

** update **Check it out found what i was looking for! !! This is great!

ok another question… lol

Based upon this reasoning, could we not say that, when it comes to push cutting through hard objects, a 17 dps mirror finished edge would theoretically have the same edge retention as a 15 dps coarse edge? Basically what I’m saying is that, due to the lower grit finish having a thicker edge apex it will be more stable, and therefore you can actually lower the edge angle somewhat without sacrificing lateral strength, correct?

Man… You guys are so incredibly awesome! So much fantastic information. Thank you for devoting your time to provide it. I often wonder if I’ll ever come close to being as knowledgeable as most of you are. I can only hope that some day I will, and that’s because of you fellas.