Securing the knife in the clamp
Recent › Forums › Main Forum › Getting Started › Securing the knife in the clamp
- This topic has 44 replies, 13 voices, and was last updated 06/18/2014 at 9:57 pm by
 wickededge.
-
AuthorPosts
-
05/13/2014 at 2:36 am #18692
Thanks a lot Josh. That worked perfect!!
Sent from my iPhone using Tapatalk
05/13/2014 at 2:47 am #18693
Sent from my iPhone using Tapatalk
05/13/2014 at 2:50 am #18694exactly! sweet… glad you figured it out! makes a nice even bevel =)
05/13/2014 at 2:53 am #18695It sure does.

Sent from my iPhone using Tapatalk
05/20/2014 at 12:10 am #18808Just stumbled across this post and the one by cbwx34. Fantastic idea! Would have helped me a couple of times.
One question that came to mind, though, is how do you measure the angle with the blade tilted like that? If you’re following an established bevel, it doesn’t seem like it’d be an issue, but if you’re trying for an exact angle (reprofiling) seem like it would be hard to measure.
Also, per this post, I’m assuming the angle on the straight part will remain constant for the same reason it does if the straight part is mounted normally in the vice?
Thanks,
Dan05/20/2014 at 12:29 am #18809Well, I suppose you could do this to check the angle:

Or is there an easier way that I’m missing? Seems like the above way would be difficult to replicate repeatedly.
~Dan
05/20/2014 at 4:21 am #18811Well, I suppose you could do this to check the angle:

Or is there an easier way that I’m missing? Seems like the above way would be difficult to replicate repeatedly.
~Dan
that’s it exactly! so when you have your para2 clamped in the vise tipped downward, you just bump your stone up against the choil and use the same technique…
05/20/2014 at 5:12 am #18812Thanks, Josh. I tried this on an old folder from a friend this evening and it worked fantastically! I thought it was going to be a real chore too (before reading all this) as the tip is almost level with the spine, which usually requires clamping very close to the tip. I’ve never had a more even bevel! On this particular knife, I was able to clamp far enough up the blade to take the reading as normal, stone parallel to the clamp, but I hear what you are saying about anchoring against the choil to be consistent.
I think it’s safe to say this post (and cbwx34’s) has fundamentally changed how I will sharpen with the Wicked Edge in the future. It was actually easier to forgo the depth key and alignment guide and just worry about getting a firm clamp and good angle on the blade.
I snugged the top screw up with the blade a reasonable depth in the clamp and angled down ~20-30 degrees. I then applied a piece of painter’s tape to a stone, pushed it firm against the bottom of the arm and at a point on the blade where it was perpendicular to the edge and marked a line with a pencil. I then brought the stone (still firmly held down against the bottom of the arm) to the tip area and found where the line sat. I wiggled the blade up or down until the line was the same at the tip and that perpendicular spot on the blade. Used the angle cube to set my angles and was good to go.
~Dan
05/20/2014 at 6:33 am #18813Sweet! Glad to help you out!
05/20/2014 at 7:13 pm #18814Thanks, Josh. I tried this on an old folder from a friend this evening and it worked fantastically! ….
I think it’s safe to say this post (and cbwx34’s) has fundamentally changed how I will sharpen with the Wicked Edge in the future. …..
I snugged the top screw up with the blade a reasonable depth in the clamp and angled down ~20-30 degrees. I then applied a piece of painter’s tape to a stone, pushed it firm against the bottom of the arm and at a point on the blade where it was perpendicular to the edge and marked a line with a pencil. I then brought the stone (still firmly held down against the bottom of the arm) to the tip area and found where the line sat. I wiggled the blade up or down until the line was the same at the tip and that perpendicular spot on the blade. Used the angle cube to set my angles and was good to go.
~Dan
Dan, I agree. And, I’m not even sure how yet. But, the concept of simply tilting the blade broke open some windows and down some doors in my thinking process.
The fact that Wicked Edge included a depth key and a horizontal gauge somehow I took as inherently meaning that it was the ONLY way to use the vise!! What an interesting short-cut rather than me actually thinking things through for myself!!
Yes, it’s an amazingly fine way to repeatedly lock a knife for optimum sharpening, I think, in a large percentage of situations. It’s just not the ONLY way. And WE certainly didn’t mean for me to put a lock on my thinking!!
Thanks, guys, for the increased freedom and flexibility in thought…. now to bring that down to a point and an edge.
Josh & Dan, while I go out to my bench and get some practice trying this for myself, could you please post some photos of this process?
~~~~
For Now,Gib
Φ
"Everyday edge for the bevel headed"
"Things work out best for those who make the best out of the way things work out."
05/20/2014 at 10:21 pm #18816I’m happy to try and demonstrate what I did last night. (Click on the photos for larger versions).
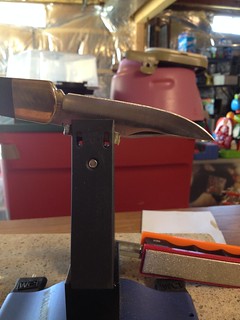
- Firstly, I inserted the knife into the vise where it seemed like a good place to clamp (more towards the handle), putting it at roughly a 20-30 degree downward angle, and snugged up the top screw.
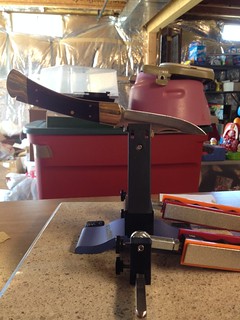
- Then I placed a piece of painter’s tape on a stone.
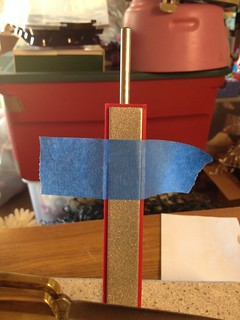
- I placed the stone at a point on the blade where it was approximately perpendicular to the edge and marked a line with a pencil.
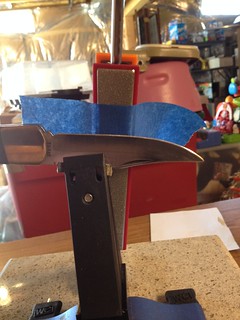
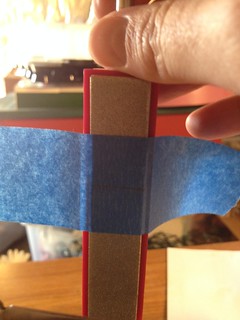
- I then moved the stone (while still pressed firmly down against the arm at the base) to the tip and wiggled the knife up and down gently until the tip was hitting the line.
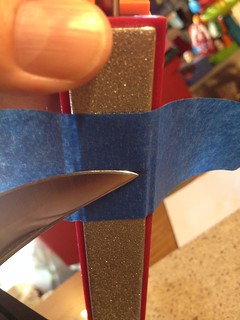
- I moved the stone back and forth between those two points and continued gently wiggling the knife until the line was hitting dead on in both places. I then snugged up the bottom bolt to finish clamping.
- In this case, there was still plenty of blade directly over the clamp that I took my reading as normal for the angle with the stone right in line up and down with the clamp, but in the case you are too close to the handle, I would use Josh’s suggestion of holding the stone at the rearmost point on the blade edge which will probably be butting up against the choil/handle, put the angle cube in line with the clamp as in the picture a few posts back, and take my reading there.
I’m still working on this one as it needed quite a bit of reprofiling, so the edge doesn’t look great, but it looks so even!
Hope that helps!
~Dan
05/20/2014 at 10:31 pm #18817Here are a few pics too


 05/20/2014 at 11:21 pm #18818
Sweet.
Thanks you guys.
~~~~
For Now,Gib
Φ
"Everyday edge for the bevel headed"
"Things work out best for those who make the best out of the way things work out."
05/22/2014 at 12:13 am #18824I’m happy to try and demonstrate what I did last night…
.
.
.~Dan
Perfect!!!!
05/23/2014 at 8:23 am #18828Pretty happy with my first attempt at this setup.
Perhaps you can see it. At the exact distance from the heel of the blade as the width of the WE stones is a “wave” in the light reflection pattern. It’s in almost all the knives I sharpen.
Been trying to figure out how/why. I move slow; caress the blades with the stones. In my way of thinking….
Perhaps I’m still slightly leaning the stones on the forward edge at the beginning of the stroke rather than letting the stone slide flat & smooth across the blade.
“Despite” the wave in reflection pattern the blade is razor sharp. I tried to get a little video captured of the hairs popping on my forearm…. alas my career as a film maker may be over before it started.
Thanks again all….
Attachments:~~~~
For Now,Gib
Φ
"Everyday edge for the bevel headed"
"Things work out best for those who make the best out of the way things work out."
- Firstly, I inserted the knife into the vise where it seemed like a good place to clamp (more towards the handle), putting it at roughly a 20-30 degree downward angle, and snugged up the top screw.
-
AuthorPosts
- You must be logged in to reply to this topic.

