Extended Depth of Field Image Stacking
Recent › Forums › Main Forum › Welcome Mat › Extended Depth of Field Image Stacking
- This topic has 104 replies, 11 voices, and was last updated 05/23/2016 at 12:44 am by
 M1rrorEdge.
-
AuthorPosts
-
04/30/2016 at 12:57 am #33835
Outstanding go for it! Can’t wait to see some of your images. I find that their is always more than one way to reach your desired result. Thats why I love the collaboration that this forum offers. We can observe many different methods and Taylor our own based on others results.
Eddie Kinlen
M1rror Edge Sharpening Service, LLC
+1(682)777-162204/30/2016 at 9:01 am #33841Not sure about going for it bit ? I really don’t need level of magnification scope like this offers, and getting it just to see how it works doesn’t make too much sense. Adapter itself is not that expensive, but these scopes are quite pricey. On the other hand, if there’s WEPS user in Northern California that already has the scope, I’m willing to get the adapter so we could get together and try it.
05/05/2016 at 10:24 am #33916I’m thinking you mean something like these:
Clay-you had mentioned on a old post (2012- WE Pastes and burnishing) that you figured out how to get back to the same spot on the blade surface between sharpening passes and photographing but you never stated how. Is the angle guide in this quoted post a part of the process or did you come up with something else?
I realize you went back to marking the edge of a blade with a “ding” to the edge on some of your recent photos, however, some of the images you have provided you returned right back to the same spot with great accuracy.
This is something I am having difficulty with especially now at higher magnifications. How are you doing it these days?
 Thanks for you reply in advance.
Eddie Kinlen
M1rror Edge Sharpening Service, LLC
+1(682)777-162205/06/2016 at 10:06 am #33924I’d think you can either mark blade with a sharpie, or put blade on a paper sheet and mark spot on paper (you’ll need to outline blade profile on that paper). Or something along these lines
1 user thanked author for this post.
05/08/2016 at 7:39 am #33933Well my Radical India Metallurgical microscope has arrived, now I am just waiting for my Dino Lite Eye Piece Camera. My first impressions are pretty good. I am able to clearly view the “edge of the edge” and the full micro bevel and all the scratches on it. The halogen lamp is adjustable which provides great contrast on the surface of the reflective blade. I would recommend that if you look into this microscope, that you also look to replace the 100x Oil lens with a 100x optical dry lens (See Recommendation below). I replaced my previous Dino Lite AM4815ZTL with both a AM4113ZTL (USB Microscope up to 90x) and a AM4023XC (Standard Microscope Eyepiece Camera for the Radical India Metallurgical microscope). I plan to use the Helicon Focus 6 to improve Extend the Depth of Field (EDOF) in my images digitally. I will release some photos as soon as my camera comes in. Thanks everyone for your input and suggestions. They all led to me assembling this optical kit for personal and professional blade edge observation and evaluation.


Eddie Kinlen
M1rror Edge Sharpening Service, LLC
+1(682)777-16221 user thanked author for this post.
05/08/2016 at 6:35 pm #33938Thank you for the details of your setup. Im following in your footsteps so to speak so this is very helpful!
I am happy with my own scope but the 2mp camera that came with it which is supposed to be good/expensive I have not been able to get functioning well. I also haven’t spent much time with the digital imaging aspect yet.Ill post pics and parts descriptions when I have something to put together worth showing for starters.
05/09/2016 at 8:34 am #33941MirrorEdge – Thanks for posting all the details. Have you tried the dry 100x lens yet? I didn’t realize that they even made those. The immersion lenses are a bit of a pain and I’d love to have a dry lens if it works well. I’m really curious how your results will be with the Helicon software. I’ve been eyeballing it for a long time, haven’t been sure if it’s enough of an improvement over image stacking in Photoshop to warrant the expense.
-Clay
1 user thanked author for this post.
05/09/2016 at 9:01 am #33942Hi MirrorEdge, that looks interesting. Sorry for my ignorance, but what do the dry objective and the separate eyepiece do? And why did you also opt for the 90X USB microscope in addition to the metallurgical microscope that looks a lot more advanced to me?
Molecule Polishing: my blog about sharpening with the Wicked Edge
05/09/2016 at 10:06 am #33943Great questions! As you can see by the price of this metallurgical microscope it’s not too expensive compared to the others I have found at Amazon at $325.00. The reason is, that the cost is directly related to the quality and type of the optical objective lenses. The lenses are critical to achieving great images. This Microscope from India is actually built very well, in fact, it is much better than I thought it would be for the price. When you can find 2000x metallurgical microscopes advertised for three or four “grand” and up.
The “trick” in the advertisement is… the lens is a 100x “Oil” immersion lens and not a Dry optical lens used for physical sciences and metallurgy. In a “Nut Shell”, an oil lens must be submersed in oil between the object and the lens in order for it to work properly. This is normally done on a cover slip on top of a microscope slide. This isn’t very practical in our application of blade observation for several reasons. One, you basically would have to lube up the blade edge and two, the lens will have to physically touch the blade or in my recent experimentation, a diamond plate. This would end up scratching the blade or in the case of the diamond plate the lens of the microscope. So, for the observations of scratches, we need a dry lens that is 100X with a 20X eyepiece which brings us to the “magic” number of 2000X. If you tried to use the oil lens, you will have great difficulty and I suspect it would not work at all. By the way, I am seeing amazing images with the stock objective lenses except for the Oil lens. Also, one other “key point” is that this dry lens is a Long Working Distance objective lens. This means that you can work 2mm away from the object you are observing which is huge for a 100x objective lens. We are taking images of objects that are really, really, small and at the sub-micron level. 2mm might as well be a mile to the objective lens especially when you are trying to focus on a microchip that is less than a micron in size on a micro bevel.
As for the Dinolite USB microscope- I discovered two things. One, the microscope I had the AM4815ZTL was built with EDOF and HDR features and as a result was real expensive and in our application too expensive for only 140x. It provided magnification up to 140x which was perfect for bevel observation and a long working distance which was also a great benefit. However, once I observed the EDOF and HDR under the microscope and used it for a few weeks on the computer, I was less than impressed with the result. So, I consulted the Dino Lite technicians and through my own observations discovered that this magnification was way too low for what I want to see. Perfect for observation of the bevel of a knife but not to see the edge and micro diamonds (the end goal). I could not tell from the photos I had observed if the fuzziness of the edge was due to lack of magnification alone or depth of field. My final conclusion was it is both. As Clay discovered when he first used the Thermoplastic a high magnification microscope has too much magnification to observe the impression clearly. So, I traded in the AM4815ZTL for one dinolite microscope and a DinoEye Camera (That’s how expensive it was at almost $ 900.00). Sunrise Dino gave me a credit and when I returned my original microscope I traded for the two devices at no additional cost. In fact, I also got $100 back. The dinocapture 2.0 software is the primary reason that I am sticking with dinolite. This software is easy to use and perfect for measurement. I can observe,measure, and record edge impressions easily and do quick blade inspections during sharpening and when I need to look close (Like a Loupe). I can now use the Metallurgical microscope with the same measuring software when I need to get really up close (2000X). Aaaah, I forgot to add… The dino eye camera is only made in 20X, so the lowest magnification I can get with the above microscope is 80X which is way too much. We need like 50x to see and measure the thermoplastic edge impressions well (Found Here). That is why I needed two microscopes. One for lower magnification and image capture and one for high magnification. This is the primary reason why dinolite can’t provide a microscope that covers all the ranges. The USB microscopes we are all using only have one objective lens. Their is no way around it, in order to see what we are trying to see you need to compromise, have two microscopes or pay $4K and up. I needed to add that the “Stock” objective lens that come with the Radical India microscope are really nice. On the WE 50 coarse diamond plate, I can easily see the details on a single diamond and the spaces between them. (20X (Eye Piece) times 40x (objective) for a total of 800X).
All things considered, this is a really good deal. It fits into a small “foot print” and doesn’t have anything I don’t need (Two eyepieces) . Especially since I plan to view the images on a computer and not use the eye piece at all . You may have noticed it only has one eye piece. With the dino eye camera, I only need one which brings down the cost significantly. Hopefully, I have answered your question thoroughly. Let me know if you need to know something else. I plan to post photos as soon as my camera comes in.

Eddie Kinlen
M1rror Edge Sharpening Service, LLC
+1(682)777-162205/09/2016 at 11:18 am #33945Will do Clay, I didn’t see that you posted until I finished the novel above LOL.
I now know what I was seeing in the images. “OIL” Wow, this is huge! Yes the 100x dry objective will work great! I had to order it separately after speaking with the Radical India folks. I’m surprised you are getting any images with the 100x immersion objective. I don’t have any oil or I would have tried it already. I would contact AMScope directly and they should be able to line you up with the right objective for your microscope.Eddie Kinlen
M1rror Edge Sharpening Service, LLC
+1(682)777-162205/09/2016 at 12:03 pm #33946Will do Clay, I didn’t see that you posted until I finished the novel above LOL.
I now know what I was seeing in the images. “OIL” Wow, this is huge! Yes the 100x dry objective will work great! I had to order it separately after speaking with the Radical India folks. I’m surprised you are getting any images with the 100x immersion objective. I don’t have any oil or I would have tied it already. I would contact AMScope directly and they should be able to line you up with the right objective for your microscope. I am able to get good images with the oil lens though it’s messy and a pain to work with when I’m trying to image the very edge at a steep angle. My understanding of the purpose of the oil is to aid in light transmission. I’m excited to see your results with the dry lens to see if it would be a good fit for my setup. I think the lens you’ve gotten would work on my scope, they seem pretty interchangeable.
-Clay
05/09/2016 at 12:35 pm #33950As you all can see, I have been pretty busy lately. I also found this product from Carson.com that I just had to share. Anyone that has used a microscope or a pair of binoculars would love this. It’s awesome! For our application, we can use the HD camera on our IPhone to take amazing photos without the need for a computer or upgraded microscope camera. With Free ImageJ software, we can measure our blades edges or impressions too. $38.07 on Amazon
Eddie Kinlen
M1rror Edge Sharpening Service, LLC
+1(682)777-1622Attachments:
You must be logged in to access attached files.
1 user thanked author for this post.
05/09/2016 at 4:14 pm #33955Sweet! I have some great optics leftover from my outfitting days including a couple pairs of Swarovski binoculars and a 60x Swarovski spotting scope. I’d love to be able to hook up my camera to the scope. I used to take photos by manually holding my point and shoot cameras to the optics but it was very awkward.
-Clay
05/10/2016 at 1:24 am #33958Extended depth of field observations with Adobe Photo shop and Helicon Focus 6- My observations to date. The center point of the image must remain the same for it to work properly. When we are working at the microscopic level this can mean the difference between success and failure to produce clear images. This is why I have found that a sturdy and “Solid” stand is required for a USB Microscope and on a standard microscope the adjustment knobs must be smooth to allow for minor adjustments without any movement of the subject or the microscope stage.
I have also found that capturing images with Video and then extracting individual shots from the video seems to work well (I showed this on Dr. Matts Video but didn’t explain why I did it). I suspect that this is because my movement is more fluid from depth to depth and the center-point stays more consistent at (30 frames per second).
Wow, I have opened up a whole new world of possibilities when I started down this road. I can’t find anyone else trying to do what we are doing and reporting their results either. I am sure someone is, however, they probably are not sharpening blades and as “OCD” as we are, LOL.
Helicon Focus 6 seems to be just as easy to use as Adobe photo shop, however, I end up having to trim the images to remove what appear as aberrations around the edge of the photos. In most cases, this loss of data doesn’t affect the intent of the image so for our application it is not a loss. Thank God for digital photography could you imagine trying to do this with film? Helicon 6 has three different algorithms it uses to complete the photo merge (I prefer Method B). Each method in Helicon Focus has strengths and weaknesses but they all produce pretty good images. Please see the below video which shows these differences well. Helicon in my opinion is faster and easier to use. Once again, I am finding answer (D. All the Above). None of these tools is perfect but together they are amazing.
Helicon Focus 6
Adobe Photoshop CC and Light Room
To summarize my observations to date;
- Center Point of the image is critical!
- Blade angle must be as parallel to the objective lens as we can get. (Limits the number of photos needed to produce a clear image)
- Because we are imaging depth and width of scratches on a colorless blade use gray scale images and not color.
- Use hands off shutter control to eliminate “Shake”
- Consistent photo capture required to fill in the gaps in Depth
- Video image extraction may produce better result at 30 frames per second. (“Resolve a still image from a video clip”)
- Aberrations around the image in Helicon 6 may not be an issue for our application because we can delete and take as many photos as we need.
- Adobe photo shop does exactly what Helicon 6 does but automatically dumps the aberrations (I would rather cut the image myself). Adobe photo shop is very slow.
- We must remember we are producing images for the Web primary. If we were producing images for print everything, including our tolerance needs, would change.
How to extract video frames using Adobe Photoshop. This is one of the advantages of the Dinocapture 2.0 software. It captures video, and now I can capture it on my metallurgical microscope and the bench USB Scope. Extract the images and then composite them into a clean focus stack. This one step was a huge leap for me. I can’t wait for my camera to arrive to show you the difference it will make.
Eddie Kinlen
M1rror Edge Sharpening Service, LLC
+1(682)777-162205/10/2016 at 4:10 am #33960So I officially have my metallurgical scope up and running and boy Clay wasnt kidding, they can be fiddly to work with! I remember hearing you voice something to that effect more then once but it really is a whole nother level. Now I see why the absolute need for an angled mounting jig to hold the knife still!!!
Swear I spent half hour just positioning the blade and getting the light good enough to even capture a shot. Then another half hour with the camera and software to pull it all together and I still wasnt impressed(with camera…or software for that matter).
Im sure some of it is just the learning curve and not having user manuals(yet), but also fear the “high end” camera from a few years ago maybe a bit outdated. Is it normal for the imaging software to lag a fraction behind and be jerky when displaying movement?
The scope is a MT1000 http://www.viewsolutionsinc.com/products/MT1000T.asp?did=593
The camera is a Moticam2000 http://www.reichertms.com/brochures/MC1000-2000.pdfI picked them up as a combo deal from Ebay for $400 and for what I received do not regret it a minute. Unit came in like new condition from Penn State labs and last I looked there was an identical scope without the cam going for $250 on Ebay as well from the same seller.
Heres a few shots of a laser etched Spyderco logo I shot a few days ago just with my cell phone held up to the eyepiece. This is actually what Im seeing when I look through the eyepiece, so pretty darn happy about that and it bodes very well for the scope itself.
x400
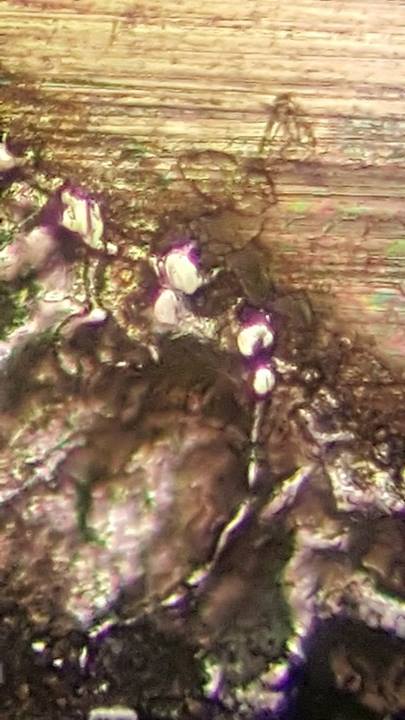
x800
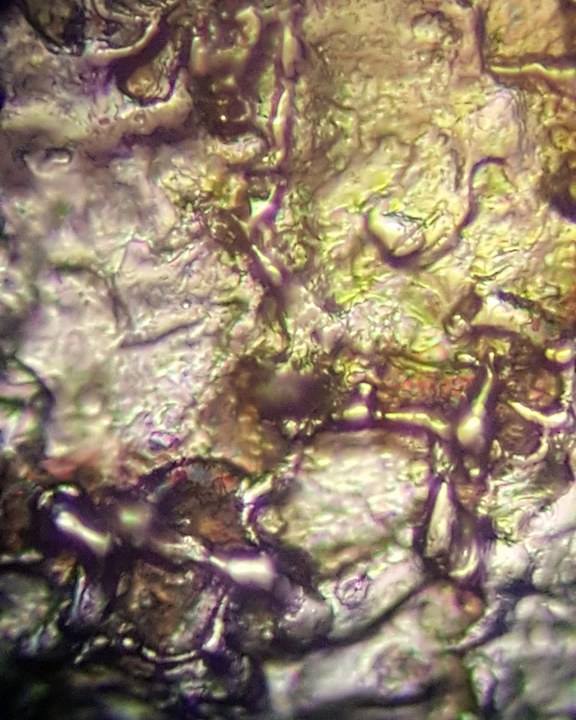
And heres the best Helicon Focus stacked images I was able to generate tonight with the 2mp camera and computer. Keeping in mind the cam software is complicated(think University science lab complicated) and again, I am waiting on instruction manuals for both the scope and cam soooo this is what I got.
x400
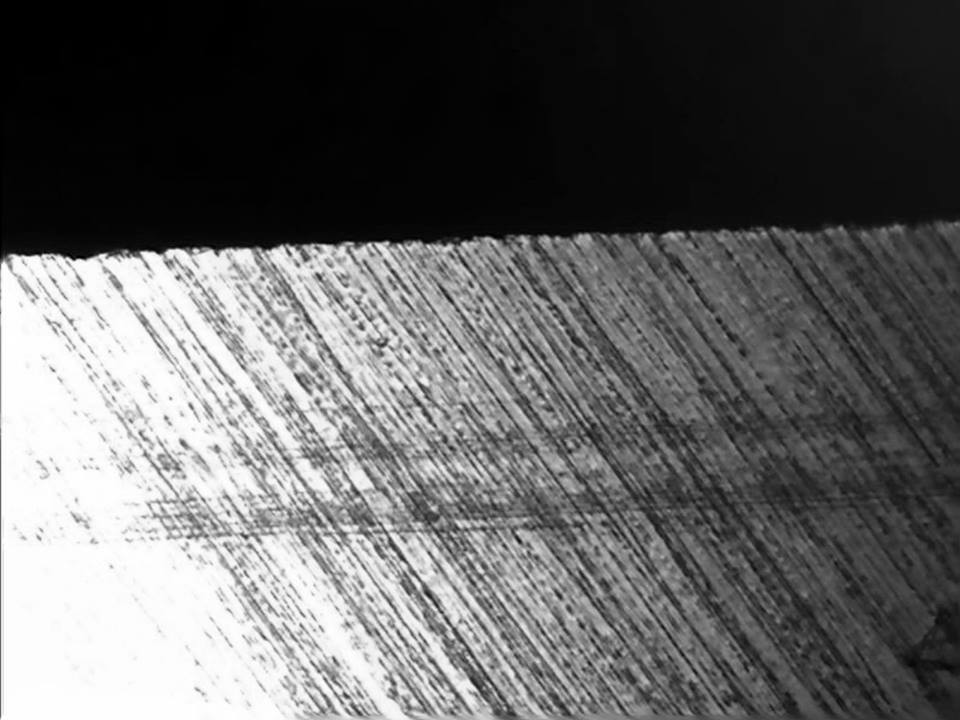
x800
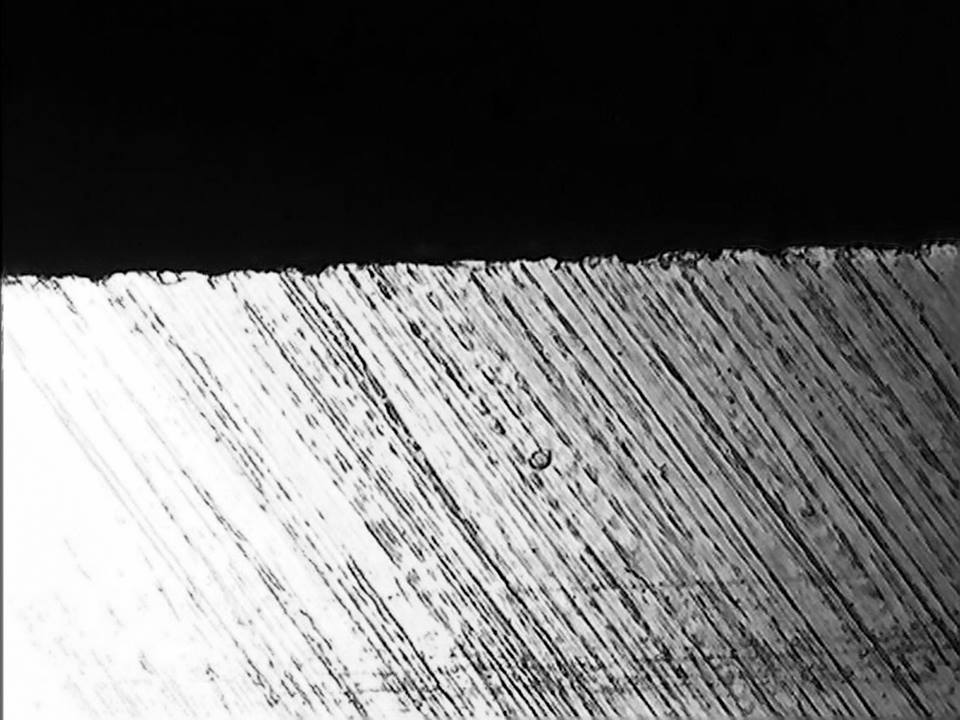
Taking the stacked images was by far the easiest and most enjoyable part of the process!

Attachments:
You must be logged in to access attached files.
2 users thanked author for this post.
-
AuthorPosts
- You must be logged in to reply to this topic.