Drill collar variation
Recent › Forums › Main Forum › Product Announcements › Drill collar variation
- This topic has 49 replies, 6 voices, and was last updated 03/13/2013 at 2:54 am by
Mikedoh.
-
AuthorPosts
-
12/06/2012 at 12:26 pm #7887
OOHHHH!!!! you’re thinking of using the collar just like on the EP. I thought you were wanting a reference to change the arms quickly, such as only one or 2 thicknesses….Gotcha.
12/06/2012 at 12:33 pm #7888OOHHHH!!!! you’re thinking of using the collar just like on the EP. I thought you were wanting a reference to change the arms quickly, such as only one or 2 thicknesses….Gotcha.
I think cbw is, I was thinking like you.
I haven’t used an EP yet, might investigate some.There is a big thread on them in a forum where I haunt, seem popular in Aussie land.
12/06/2012 at 1:17 pm #7890Yep Billy, the Aussies, or at least one is fond of the EP (Madrookie).
I had trouble, depending on how the knife blade is structured, keeping the knife “flat” so that the angle was consistent .I’ve been able to get arm hair shaving results for a long time free hand, but was looking for the ultimate way to get quick, repeatable results. Place OCD diagnosis here.
12/07/2012 at 2:35 pm #7907It works on the inside just as easily:
and is small enough to allow you to hit the 13 degree setting on the PP2.
I’ll bite, are these going to be the new screws? 😉
12/11/2012 at 5:13 am #8129Hey Mike,
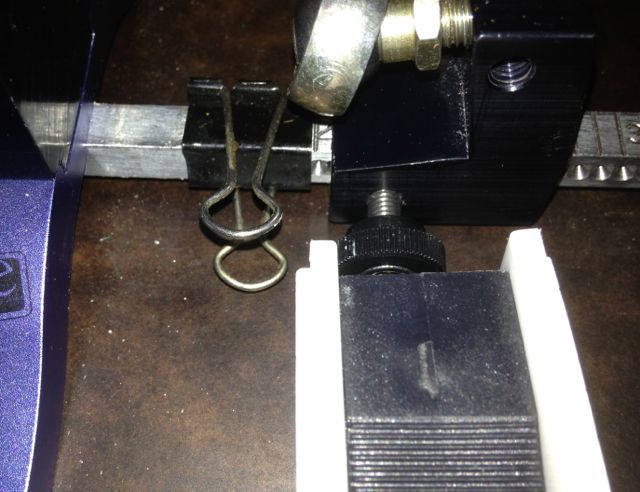
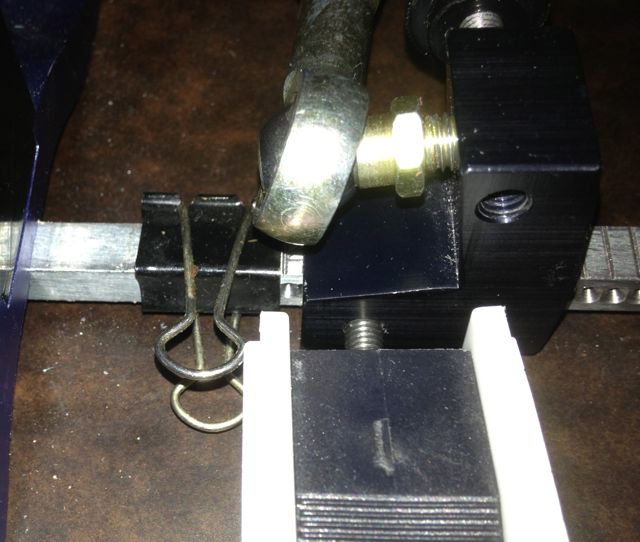
I haven’t forgotten about this. One idea I had is to move the space to the side, so there was room to maneuver the stone. I just flipped the clip sideways, and used the space between the clip and the adjustment knob. If you play with it a bit you can find a couple of points that are consistent. At least maybe a new idea to work from?
I’ve added a couple of pics… the first one to show what I’m talking about, the 2nd to show a sample with the stone in place. Hope it makes sense!
Let me know what you think.
Attachments:12/11/2012 at 5:46 am #8132I was starting to wonder if I’d asked something that would have required my killing should I be told 🙂
So, static points are knob edge and pincer edge? Maybe add a removable piece to slide over the shaft of the screw to eliminate any twisting ?
Am I on track here?
Let me know (unless of course, my demise is required, then fogedabboudit)
12/11/2012 at 6:19 am #8136I think you’re on track… I’m not sure I understand the removable piece… but if you come up with something, snap a pic. You can actually set the stone on the base, and slide it into position if that makes sense.
Not nearly a perfect solution… but have to start somewhere. 🙂
12/11/2012 at 6:32 am #8138Do the ends of the platens actually touch the “L” arm?
It didn’t look like they did in the pic. The -slide over piece- was just to assure the stone would be perpendicular to the “L”arm so that the measurement would be accurate.
12/11/2012 at 6:44 am #8140The way I did it, (since you only want to measure one side of the paddle) is I slid the paddle “over” the adjustment knob so that the inside (back)of the paddle rests against the knob. Then the front side of the stone would rest against the clip. So for the first stone, you’d move the clip to set the distance, then for the rest of the stones, you’d have to loosen the knob, slide the stone in, move the braket in or out until the stone hit the clip, then pull out the stone and tighten the knob. (I don’t think it’s free enough to slide around on its own, it should stay until tightened).
Don’t know how much since that makes (my fault), but if you understand how it works on the EP, and play around with this, I think the light bulb will come on.
12/11/2012 at 7:34 am #8145I get what you’re saying, just want to make sure the stone isn’t tilted one way or the other which would give a false stone thickness.
For me, the divots in the degree bar always move the “L” bracket from where I’d like it to stay. Maybe if I just use a screw on the smooth side of the bracket, things will stay put. I use a screw on both sides now to try and keep them from loosening during sharpening.12/12/2012 at 4:55 am #8193For me, the divots in the degree bar always move the “L” bracket from where I’d like it to stay. Maybe if I just use a screw on the smooth side of the bracket, things will stay put. I use a screw on both sides now to try and keep them from loosening during sharpening.
Good point, you’d probably have to use the screw on the smooth side, otherwise it would try and slide into the nearest divot.
03/11/2013 at 10:57 pm #10133I used the Stop Collar trick with the WE this weekend and had great results. Since I have the EP Pro and some Shapton Glass stones I decided to see if I could get some additional use out of the Shaptons and use the Stop Collar trick on the WE. Since my WE is mounted on a Bessey Vacuum Base I have ample room to fit the plastic base and Shapton between the Collar and the L shaped arm mount. Since the 4k Shapton was the final stone I would use I simply mounted the knife, got my 20 degree established, slid the collar to the point where the Shapton stone and plastic mounting plate were touching between the Stop Collar and L shaped arm mount, tightened the Stop Collar which established the “reference point”. Started with the WE 100 so I simply loosened the L shaped arm mount and slid it over till the WE 100 and the plastic base plate were touching both the Stop Collar and L shaped arm mount, tightened the L shaped mount, checked my angle to make sure it was 20 degrees and started my sharpening. Followed this procedure using the WE 100 through 600, jumped to the 1,000 then 4,000 Shaptons (they’re mounted on blank paddles with velcro)and ended up with a nice arm hair shaving blade. Using this technique made my process so much faster than trying to rely on the Cube after each stone change and having to “fiddle” with the L shaped mount till I got exactly 20 degrees. Since this was my first attempt and just to make sure I was always at 20 degrees I rechecked at each stone change to make sure it was working as I expeceted. It always was exactly at 20 degrees. Exact same process I use on the EP.
03/11/2013 at 11:05 pm #10134Thanks for posting, this is great to read! :woohoo:
Can you perhaps post a picture or two how you did it? (And a pic. of your EP mounted stones?) I think it helps give a better understanding of how this actually works.
Thanks!
03/11/2013 at 11:40 pm #10135I’ll see if I can use my cell phone camera to get some pics and descriptions mounted tonight. Since my only other camera is older than many members here the cell is my only option!!
03/12/2013 at 3:56 am #10141Very interested to see your stone mounting to paddle technique. I have Choseras from my EP and would like to use them on the WE.
-
AuthorPosts
- You must be logged in to reply to this topic.