Advanced alignment guide
Recent › Forums › Main Forum › Product Announcements › Advanced alignment guide
- This topic has 189 replies, 22 voices, and was last updated 05/24/2016 at 3:13 am by
 M1rrorEdge.
-
AuthorPosts
-
01/07/2016 at 2:16 pm #30429
We’re getting close to being able to make the Advanced Alignment Guide (AAG). I’m hoping for feedback before we finalize the design. The basic concept is a clear plastic card with a printed grid featuring slots to slide over the Depth Key. The user would plug the Depth Key into the holes in the Vise as usual and then go about finding the sweet spot. Once the user has found the sweet spot, they would slide the AAG onto the pins along the outside of the Vise and then read the coordinate on the grid where the tip of their knife is e.g. A7, B4 etc…. The card thickness is 30 mil (like a credit card) and flexible.
I’d like to hear back what people would like to see in terms of dimensions and design e.g. extending forward 4″ from the front of the vise, extending upward 2″ from the top of the vise and also 2″ downward from the top of the vise with 1/4″ grid spacing. Any feedback would be very helpful before we finalize and go to press.
-Clay
1 user thanked author for this post.
01/07/2016 at 2:40 pm #30430Anonymous
Inactive- Topics: 14
- Replies: 427
This is how I feel, which I know is not what anyone wants to hear. All these peripheral aides go right out the window after the newness wears off. I don’t want to be a Boo Bird, but you can’t be any newer than I am as a WE customer, yet I feel I could sharpen any knife I’m presented, without the use of a profile card or a data base of someone else’s data.
I can put any knife in the vice and after a sweep of the rods ( with a reference point on the rod ) know exactly where the sweet spot is.. and adjust the position front to rear and angularly (Tip up or down ). both linearly and radially.
Bill aka ET
01/07/2016 at 2:57 pm #30431Inactive- Topics: 14
- Replies: 427
When I was in the Military the term T O & E was a common term. it means Table of organization and equipment.. The T O & E Issue we were given was for the occupational specialty ( Search and Destroy, Patrol, Recon, Strategic intelligence, etc. ) of our unit. and our MOS military occupational specialty… when we hit the bush, half of our T O & E never left the base camp. I think having all of these peripherals are nice, and may help in the sales process and advertising..etc. But in reality, most wont be used once you are a seasoned veteran. I Know.,.. IM a Boo Bird.

2 users thanked author for this post.
01/07/2016 at 3:36 pm #30432That is the big question for me – how large to make it. I would say as large as possible as long as you can use it and adjust the knife or at least it won’t get in the way. I may or may not use it the first time I sharpen to set up the knife, but I would use it after finding the sweet spot to record the settings then use it next time to quickly set it up the same way.
You know you got it right if its made from plastic, cheaper to make than the metal ruler we have now and can replace the metal ruler with new WE’s and work the same or better for any type of knife.
I would ask for 1/4″ tick marks, even if they are very small. On my metal ruler I put them in myself.
I can setup any knife pretty well without the gage, but where the gage really comes in handy is being able to quickly set up the same knife again for touch ups. To keep things simple I usually keep something parallel (flat edge or spine) to make repeat setups easy. I have some knifes I know I need to tilt to get a better sweet spot and haven’t done that yet. I will definitely use this for recording tilt setups.
2 users thanked author for this post.
01/07/2016 at 3:55 pm #30433I think the main benefit would be for tilted settings.
-Clay
1 user thanked author for this post.
01/07/2016 at 4:14 pm #30434Here’s a quick sketch in 2d:
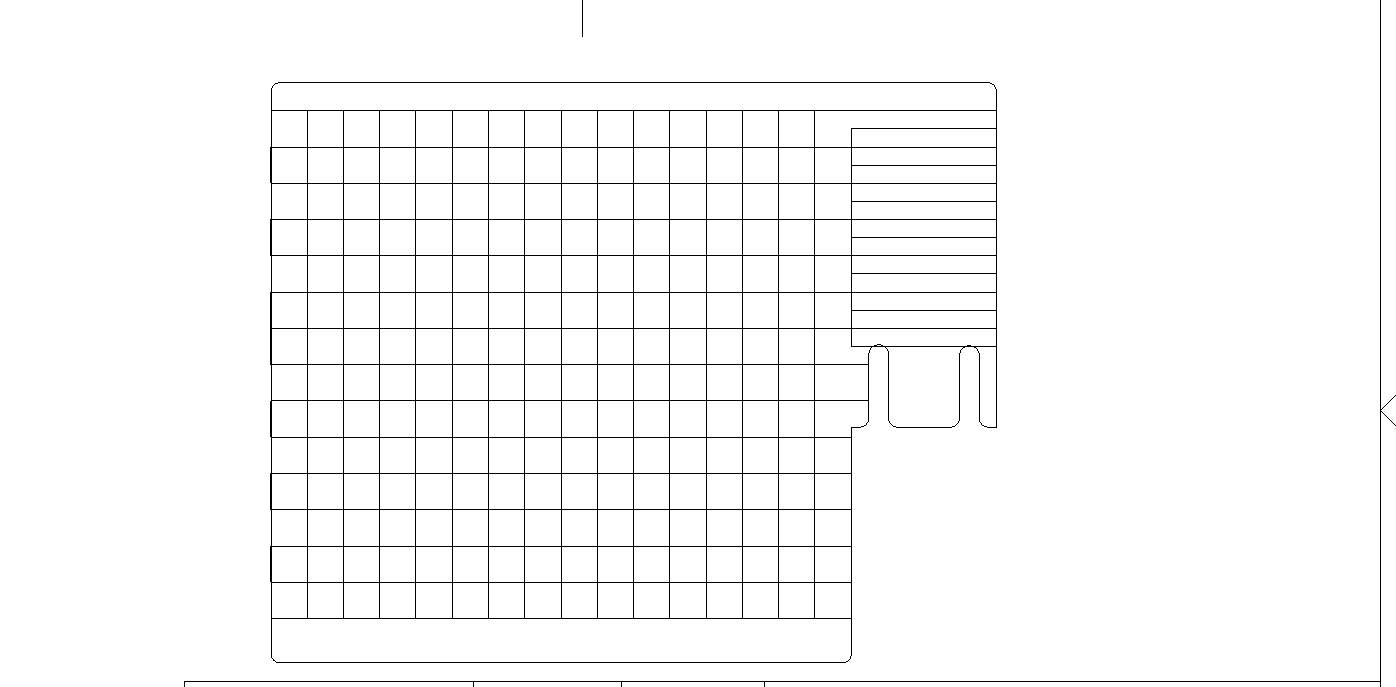
I haven’t added the numbers and letters, but you can see how it would slide down onto the Depth Key. The horizontal bars above the pin slots would be for aligning a blade edge if you want to make it parallel to the top of the Vise. The grid squares are 1/4″ x 1/4″.
-Clay
Attachments:
You must be logged in to access attached files.
4 users thanked author for this post.
01/07/2016 at 4:57 pm #30436Being able to look at the sketch, I like it. I think this would help alot with a few knives that I tilt when it comes time for touch ups. The card being clear with the markings colored is a great thing. Count me in on this one. I think size wise what you have sketched is pretty much there, but thats just me.
Geocyclist; I did the same marking of the ruller that came with mine.
01/07/2016 at 5:32 pm #30438I’ve resharpened many knives with a “clamp n go” mentality, finding the sweet spot etc and starting at a somewhat lower grit(say 400/600) Ive been able to resharpen without the aid of the pins or scale ruler.
One area where I think this would be most indispensable is in regards to a mirror polished edge that has been taken down down thru the various stages and a large amount of time has been invested.
My experience with trying to redo a mirror edge without having a accurate recording system was sad and disheartening to say the least. I quickly realized I would have to basically start over from low grit because precise angle RE-matching wasnt possible. I believe this device or sharpening aid would allow for much less backtracking to get to final re-polish…….in theory.

Edit: Another powerful area where this would be beneficial is in sharing the exact coordinates that were used to get a particular bevel shape. Someone asks how to sharpen a difficult knife, and a confident response can be given to place the tip at coordinates 5d etc…
01/07/2016 at 5:35 pm #30439Inactive- Topics: 14
- Replies: 427
I can give you all a very simple way to find the sweet spot..
measure a straight line ( put a ruler on the tip of the edge and then run a straight line to the heel. measure that distance, divide the distance in half and that’s the center line of the edge, ( not to be confused with the length of the blade.
the line from the tip to the heel is say 6 inches. that makes the center line @ 3 inches, if you put a piece of tape on the side of the knife, and place a dot exactly 1/2 of the distance, that’s your center line and where the knife sits within the vice.
To set the angle properly, draw a straight line front the tip to the heel and draw it on the masking tape,,placed on the side of the knife all you have to do now is put the knife in the vice and locate then center line dot exactly in the center of the jaws… then tile the blade until the line from tip to heel is parallel with the base. .
01/07/2016 at 6:02 pm #30440I like it! Not to be used every time but as a tool to ensure consistency this should work fairly well. Good luck!
01/07/2016 at 6:15 pm #30441Inactive- Topics: 14
- Replies: 427
Ill try to give you a visual
Here is my ZT 350.. the actual edge from tip to serrations is exactly 2 and 1/4 inches. the center line of the edge is then 1 and 1/8th inch if you put a straight edge fro tip to serrations.. make a straight line using a piece of masking tape that runs down the sideof the blade and place a dot 1 and 1/8th from the tip. this is the center line.
this is where you set the knife in the vice.
all you have to do now is tilt the blade until the straight line on the side of the blade is parallel with the base..


these photos could be uploaded into a data base for your personal knife collection. but any knife can be set for te sweet spot using this method. Its sets the edge in the center of the stroke, and the blade angle to effect the correct sweep angle. if this knife did not have serrations, the masking tape would go from tip to heel. the increased length will change the center line and the angle.. but the set up would be much easier .. just make the straight edge parallel with the base.. If people have questions? fire away.
01/07/2016 at 6:40 pm #30442Inactive- Topics: 14
- Replies: 427
not to compromise this thread, these are just some quickies photod.. it took me less than a minute to set up a knife for center line and sweet spot angle. I can do this with any knife… this is an 8 ” straight edge measuring the tape line from tip to heel.


1 user thanked author for this post.
01/07/2016 at 6:43 pm #30443Inactive- Topics: 14
- Replies: 427
Sorry these photos were very quick and from my cell.. and out of focus.. I just tried to get them as a visual aide, not as photographic excellence.
1 user thanked author for this post.
01/08/2016 at 12:04 am #30461Bill, you should realize the current ruler or the new plastic card are not so much about finding the sweet spot, but about repeatability. Whether or not you have found the sweet spot and are sharpening with it, the ruler and card make it possible to re-clamp your knife and resharpen your knife in exactly the same position as before. That makes resharpening a breeze with the WEPS.
That said, I like your method of finding the sweet spot. It probably works very well with the pocket knife on your photos. However, to complicate matters (they are never as simple as they seem at first sight
), there is no “the” sweet spot. I wrote a blog post on this: Angle changes on the Wicked Edge. When sharpening a knife, the angle along the dotted lines in the following figure remains constant:
These dotted lines are the horizontal line and the circle.
Assume you have a knife with a long straight edge and then a tip with an acute curve. Your method of finding the sweet spot will result in some angle changes along the straight edge. As an alternative you could choose clamp the knife horizontally and move the knife backward (to the right in the picture), so that there are only angle changes along the tip. Using this alternative method there are in the above example even no angle changes along the tip either.
So the question is: where and how much do you want to minimize angle changes.
Molecule Polishing: my blog about sharpening with the Wicked Edge
3 users thanked author for this post.
01/08/2016 at 12:04 am #30462ET, how do you set the angle? Is the center line mark on the tape perpendicular to the top of of the vice?
-
AuthorPosts
- You must be logged in to reply to this topic.