Why aren't my knives razorsharp?
Recent › Forums › Main Forum › Getting Started › Why aren't my knives razorsharp?
- This topic has 14 replies, 2 voices, and was last updated 01/18/2020 at 4:05 pm by
 Richard.
-
AuthorPosts
-
08/30/2019 at 12:34 am #51724
Hello there!
I’m would like to know if I do something wrong when sharpening my knives. I’ve often seen pictures or videos where people could use their sharpened knives like a razor, but even with my best knife I don’t get there. My stones are broken in as far as I can feel. After 7 knives at least the higher numbered stone (600 and higher) glide over the knife very easy.
I try to describe you my sharpening process – perhaps you can tell my why my expectations aren’t fulfilled (yet).
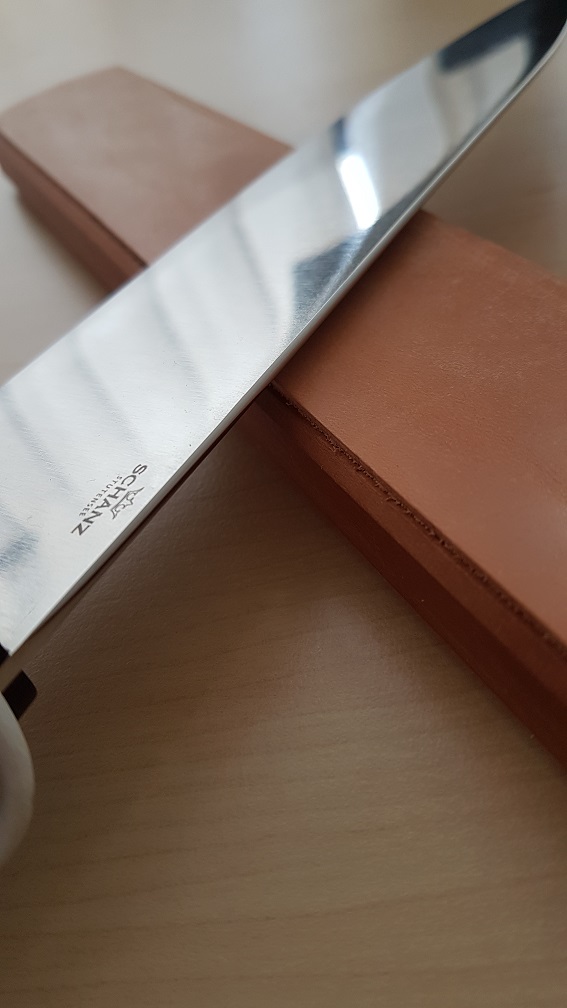
Here you can see the profile of the knife I’ve sharpended:
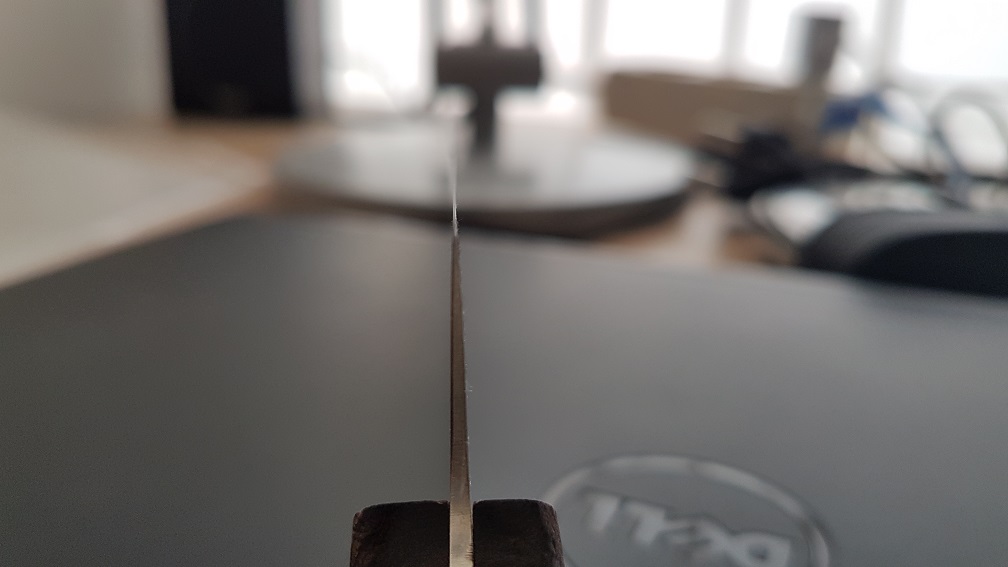
The knife is made out of SB1 (also called Niolox or 1.4153.03) and has a “hardness” of 61hrc.
The following steps were taken to sharpen the knife:
- Determine the Sweet Spot
- Setting the angle with a angle-cube to 19 degress (checked this for EVERY stone)
- started with 800 diamond stone
- created a burr on the right side with edge trailing and edge leading strokes over the whole bevel
- created a burr on the left side with edge trailing and edge leading strokes over the whole bevel
- did 100 strokes (alternating left and right, 50 strokes on each side) edge leading with very low pressure on the stone while checking the bevel with the microscope and with a newspaper
- changed to the 1000 stone and repeated steps 4-6
- changed to the 1500 stone and repeated steps 4-6
- used a strop (without paste)
- done
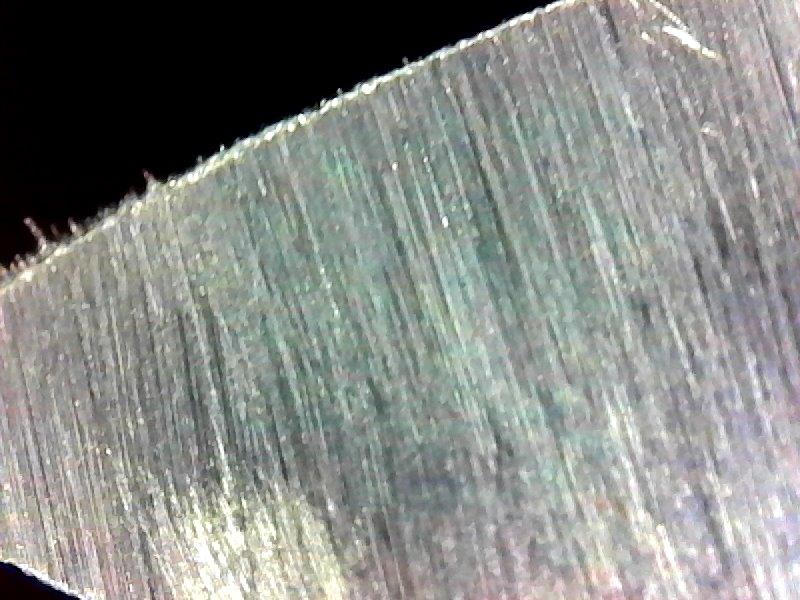
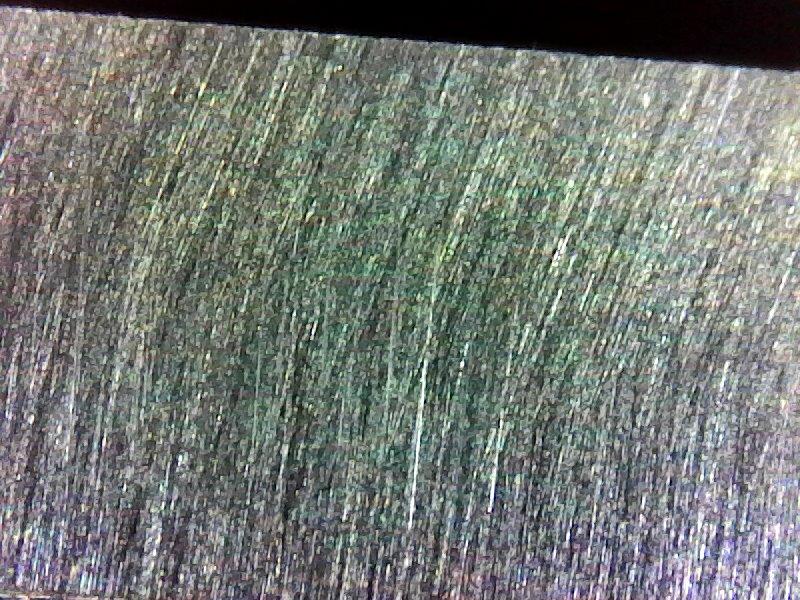
Here you see the result:
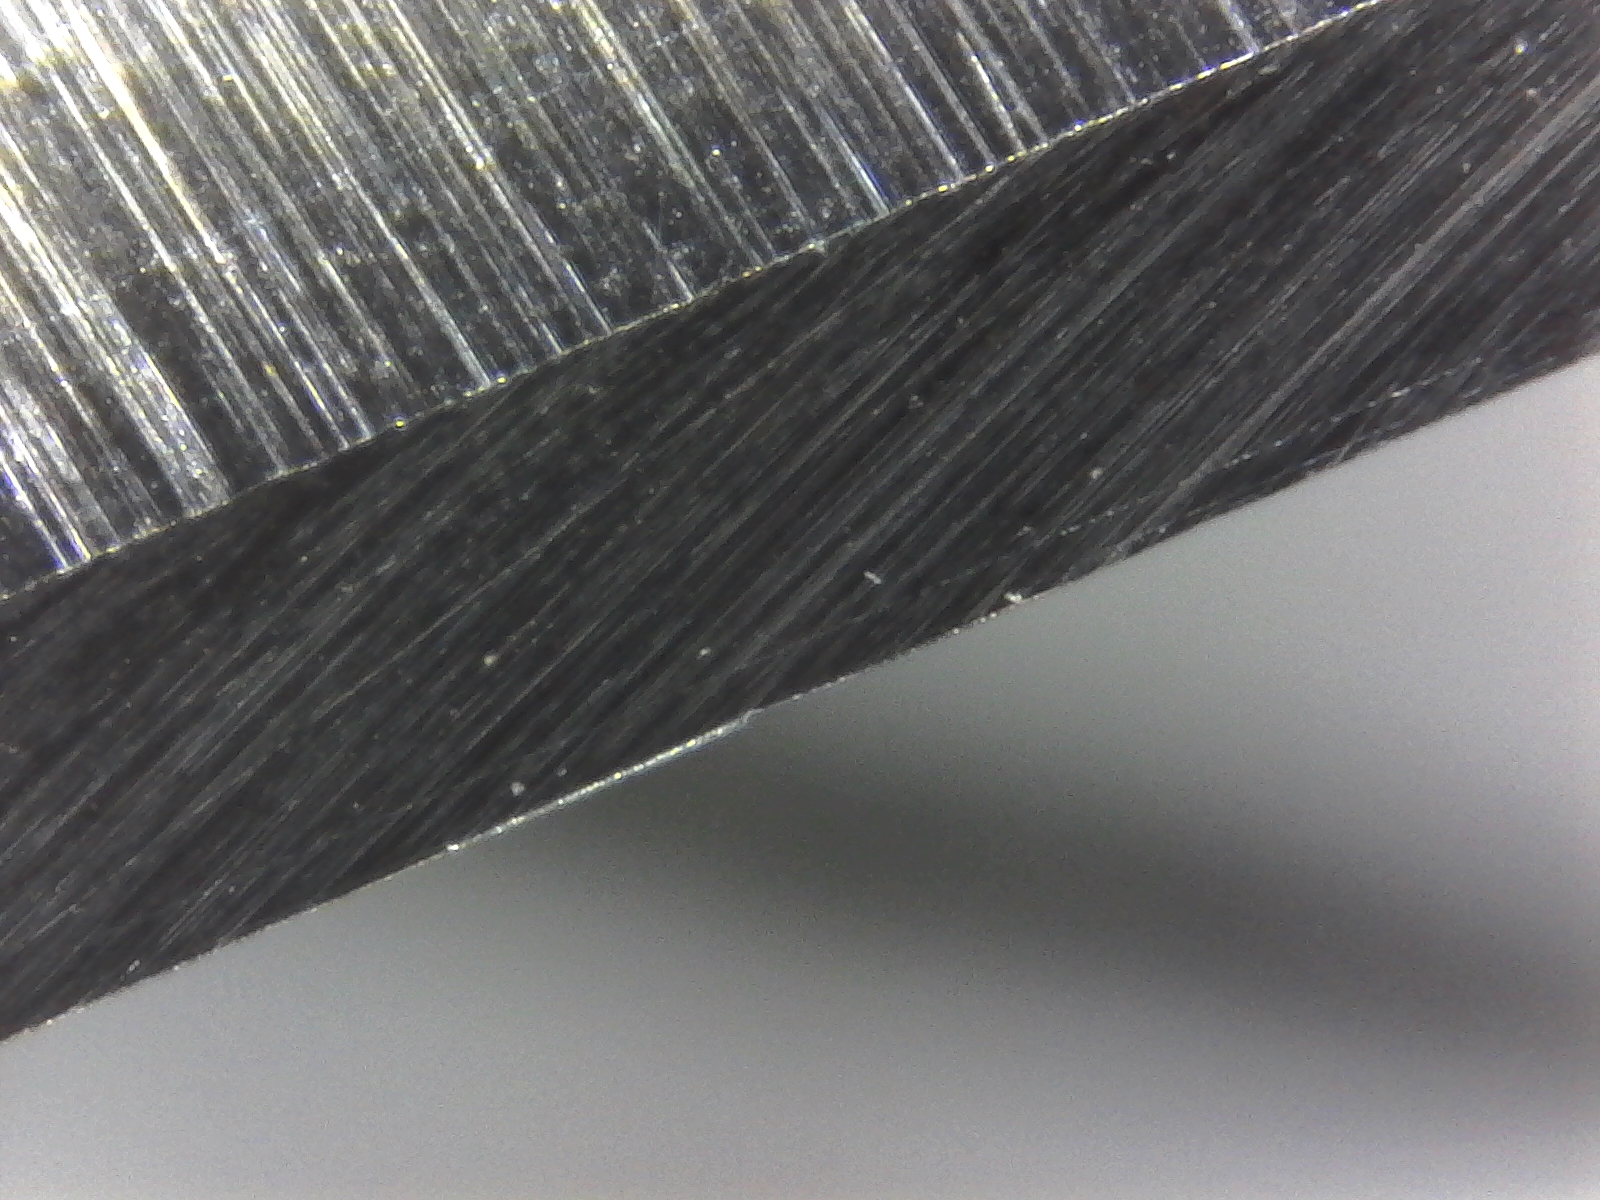

Yes, the knife is sharper than before. But not as sharp as I expectated.
So, am I doing something wrong? Or aren’t the stones broken in yet? Or is the steel not good enough to get razor sharp? Or doesn’t it work because of the profile? Or the angle of the bevel?
Thank you very much,
Thomas
Attachments:
You must be logged in to access attached files.
08/30/2019 at 4:36 am #51731The light reflecting off of the apex in your photos says something isn’t quite right. Except for the procedure you describe, my first guess would have been that you are leaving a burr on the edge, or you’re not really achieving an apex. I would hold a light directly over the edge and look straight down on the edge, looking for reflected light. A clean apex should reflect no light.
I’m guessing that there’s a possibility that you are rounding over the edge with your strops. For leather strops, you should reduce the angle by 1 – 2 degrees. The compliance (softness) of cow leather can tend to conform to the sectional profile of the edge, undoing a good bit of the effort you’ve put into it up to that point. A simple test is to check the edge’s sharpness before and after the stropping step.
6 users thanked author for this post.
09/01/2019 at 3:15 am #51751The light reflecting off of the apex in your photos says something isn’t quite right. Except for the procedure you describe, my first guess would have been that you are leaving a burr on the edge, or you’re not really achieving an apex. I would hold a light directly over the edge and look straight down on the edge, looking for reflected light. A clean apex should reflect no light. I’m guessing that there’s a possibility that you are rounding over the edge with your strops. For leather strops, you should reduce the angle by 1 – 2 degrees. The compliance (softness) of cow leather can tend to conform to the sectional profile of the edge, undoing a good bit of the effort you’ve put into it up to that point. A simple test is to check the edge’s sharpness before and after the stropping step.
Hi there,
thank you for your answer. At least it’s good to know that there is something wrong. The question is now: what I’m doing wrong?
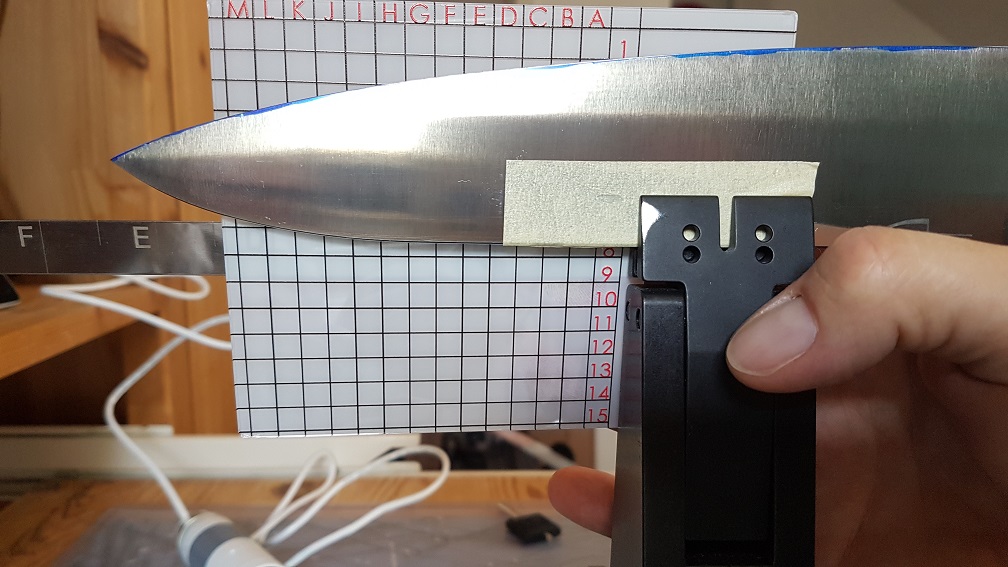
It may be the stropping but I don’t think it’s because of the angle. I don’t use the leather strops delivered with the WE but this one:
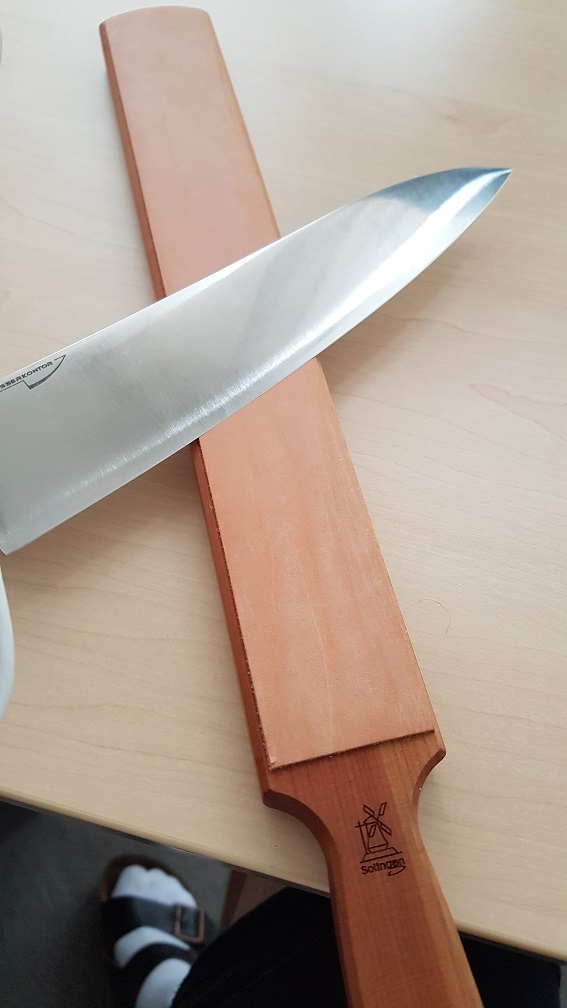
The angle I use looks like this:
I use only two strokes for each side of the knife (alternating). But I will test what you suggested and control the sharpness before and after stropping.
So, there are two possibilities left:
First, if I leave a burr on the edge though I do 50 edge leading strokes on each side with the diamond stone then how much more do I need? Or should I switch to edge trailing? Or are there even other ways to remove a burr?
The second possibility is that I don’t achieve an apex. I can feel the burr with my fingers and I see it when I use a piece of cloth or cotton. What can go wrong then? Are there different types of burrs? Do there exist false burrs? Or do I have to do more strokes even after I feel the burr?
Thank you very much,
Thomas
-
This reply was modified 4 years, 7 months ago by
Thomas.
-
This reply was modified 4 years, 7 months ago by
Attachments:
You must be logged in to access attached files.
09/01/2019 at 4:17 am #51756My comment about the stropping was based on the assumption that you were using the WE strops. I’ll assume now that you’ve determined that the strop is not dulling your edge. A couple of comments then…
After you’ve achieved an apex, you shouldn’t necessarily require a lot of strokes with each grit, although that can contribute to sharpness, up to a point.
If with your first grit you have not achieved a true apex along the entire length of the blade, it’s highly unlikely that you’ll ever make up for that error with subsequent grits. The lower the grit, the lesser the amount of steel removed.
Unless there is damage on the blade’s edge, or if you wish to reprofile the edge, you usually do not need to use the very low end of the grits. Low grit stones will leave deep scratches and a rough edge which will need to be completely removed by subsequent grits. This is most problematic with new stones which have not been fully broken-in. The break-outs at the apex can be much deeper than the scratches. Hence you can remove all the scratches from the bevels facets, but leave a rough edge. Knives with such rough edges can appear to have fully formed apexes, but when finished, you’ll notice that the edge doesn’t have the “feel” of a refined edge. Most knives I sharpen are started at 400 grit. I tend to wear out my 400-grit stones more quickly, but I don’t have to deal with the roughness left by coarser stones. By the way, the roughness I’m talking about is not very noticeable with lower magnifications. When you increase the magnification, you’ll be surprised by the roughness at the edge.
From your strop photos, I don’t see evidence of a polishing compound. Several places I’ve read on the internet suggest using green polishing compound. This is the dry stick compound, not the paste or spray emulsions. Rockstead (a Japanese maker of very high-end knives) recommends using a strop made of denim cloth loaded with the green compound. I use the denim, as well as a 10″ diameter polishing wheel, loaded with 1 micron diamond compound and in addition to my WE leather strops.
I normally inspect edges with my USB microscope throughout the sharpening process. If at any point I see evidence of a burr, I immediately remove it using alternating light strokes of the current grit. This is usually 3 – 5 strokes per side – left, right, left, right etc.. Burrs are useful if you are using them to tell you that you’ve achieved an apex, but once you’ve done so, they simply obscure your view. It’s difficult to discriminate between burrs, dents and dull edges- they all reflect light, and where depth of field is compressed, they tend to look alike.
Whatever path you take to solve your problem, I’d suggest that you focus first on why you have the light reflected off of the edge. It simply shouldn’t be there.
Good luck!
4 users thanked author for this post.
09/01/2019 at 8:31 am #51757The W.E. lends the angle control ability to your stropping that you can’t get with hand stropping. I don’t believe you’re rolling the edge stropping as lightly and as few times as you’re describing even with the plain leather hand strop with out the compound. I’d look back at the early steps to be sure you are apexing the knife edge with each and every grit.
I draw a burr with each and every grit I employ. It’s not by intention it just is by the nature of my technique. I don’t look to avoid the burr formation. I simple work with it and remove it each and every grit. I use the burr formation to assure I have apexed the edge. I remove this burr each and every grit with alternating side, left-right-left-right, edge leading strokes, that is down and onto the edge, to exposed the apex. I do not count strokes. I do what number of strokes which is necessary to achieve the results I’m looking for. Whether it’s 10 or 50 or 20 or 5 strokes. Just what’s necessary to see, with the high power scope, the edge I’m looking for. When I see the scratches transitioning up and off the edge on both knife sides, evenly along the entire knife’s length, heel to tip, only then do I move on to the next grit.
The scratch pattern at the very apex of the knife edge is a very fine toothy looking edge. The scratches make little grooves in the apex as then transition up and off through the thin steel of the apex. Even with 3000 grit, this very fine toothy edge is lightly yet barley visible with the high power scope. Still it’s there and can be felt with a finger fell or a paper cut test.
The subsequent stropping smooths this toothiness some for me to give the final smooth gliding cut I’m seeking.
Marc
(MarcH's Rack-Its)09/01/2019 at 11:05 am #51758I wanted to add these photos to illustrate what I wrote above. This shows a knife edge of a clamped knife, (in the W.E.), that was sharpened with the W.E. 3000 grit Diamond Stones.
First is a photo of the Burr formed at the knife tip, when I first started with the 3000 grit diamond stone. The subsequent alternating side edge leading strokes knocks the burr down and/or off.
This photo taken with USB scope at high power. (Same knife). You can see the jagged tooth apex showing where the scratches trail up and off the edge. This scratch pattern is from alternating side edge leading strokes.
Marc
(MarcH's Rack-Its)Attachments:
You must be logged in to access attached files.
5 users thanked author for this post.
09/02/2019 at 7:39 am #51771Marc,
Great explanation and pictures of the burr and the burr removal.
Might be too late, but could you shoot a picture straight down on the edge to show how much reflected light a truly keen edge should have?
Ed K.
1 user thanked author for this post.
09/02/2019 at 9:01 am #51782Yes, That’s tcmeyer’s method, also. Thanks
Marc
(MarcH's Rack-Its)1 user thanked author for this post.
09/02/2019 at 7:37 pm #51802Thomas –
I have learned to not trust the videos available on YouTube that people have posted regarding the number of strokes necessary to move onto the next stone. As Marc was saying, once a burr is achieved, your knife only might require 10 strokes in order to move onto the next stone or it might require 200. The main thing you are looking for is the example he provided in the two pictures, to create that perfect bevel with no previous scratches visible. So if you’re scrubbing vertically to create the burr, use as many leading edge strokes as required in order to achieve that goal.
09/02/2019 at 11:33 pm #51808Hi there,
thank you for all the answers.
I normally inspect edges with my USB microscope throughout the sharpening process. If at any point I see evidence of a burr, I immediately remove it using alternating light strokes of the current grit. This is usually 3 – 5 strokes per side – left, right, left, right etc.. Burrs are useful if you are using them to tell you that you’ve achieved an apex, but once you’ve done so, they simply obscure your view. It’s difficult to discriminate between burrs, dents and dull edges- they all reflect light, and where depth of field is compressed, they tend to look alike. Whatever path you take to solve your problem, I’d suggest that you focus first on why you have the light reflected off of the edge. It simply shouldn’t be there.
I think that’s what I have to do, though I don’t know how yet.
Marc seems to execute exact the same steps as me, but for him it works. Strange …
The main thing you are looking for is the example he provided in the two pictures, to create that perfect bevel with no previous scratches visible. So if you’re scrubbing vertically to create the burr, use as many leading edge strokes as required in order to achieve that goal.
Hi Richard,
I don’t want to use vertically scrubbing because I’m afraid that the bevel may get uneven because unconsciously I scrub at one part a little bit more than at the other. But I’ll take care of the reflections and see what I can do.
I’ll report back with pictures when I sharpened the next knife.
Bye,
Thomas
09/03/2019 at 6:12 am #51810Hi Thomas! If you have not seen this video, it shows the 3 types of strokes including the very important vertical scrubbing that you are not doing. It’s main focus is not this in particular but it is explained and shown rather well. It helped me considerable.
https://www.youtube.com/watch?v=-RrvnZRVc-I
-
This reply was modified 4 years, 7 months ago by
airscapes.
09/03/2019 at 7:16 am #51812Hi Thomas! If you have not seen this video, it shows the 3 types of strokes including the very important vertical scrubbing that you are not doing. It’s main focus is not this in particular but it is explained and shown rather well. It helped me considerable. https://www.youtube.com/watch?v=-RrvnZRVc-I
Hi!
Thank you for the link, indeed I didn’t know the video yet.
But does it really matter with what kind of stroke the burr is created?
For me the only purpose of using vertical strokes to create a burr was the possibility to check the scatches in the next step.
It’s interesting that the person in the video creates a burr three times with the same stone and different strokes – but I’ve never heard or read of this method before.
What do the experts say? Is this necessary? Is it that what I’m doing wrong?
09/03/2019 at 9:05 am #51814Thomas, for me the burr formation is the knives steel edge indicating I have done my job correctly and apexed the edge. That is I have brought the bevel angle, as I set it, up and then off the knife edge. When I have accomplished that on both sides of the knife properly, completely and thoroughly the results is the burr where the two bevel planes from either side of the knife intersect. The burr is the only only true physical indicator we get that the bevels have been apexed properly.
The vertical up down strokes employed are done on small portions of the knife edge, in an alternating, side to side method, to keep the amount of effort balanced, on both sides, in order to maintain even height bevels. I work one side section for a littler bit, then switch to the same section on the other side for the same amount of time. This attempt to balance my work is verified visually with a lighted magnifying visual aid. I choose to employ a USB microscope and a laptop computer.
I do the sectionalized, scrubbing walking the sections forward and backward along the knife edge till the scrubbing is complete and thorough. While walking the scrubbing it’s blending the scrubbed portions together to create a continuous scratch pattern across the entire knife length on both sides of the knife.
The appearance of a parallel scratch pattern laying side by side and uniform in appearance and angular direction, along the entire bevels on both sides of the knife, from shoulder, up across the bevel and off the apex, indicates my efforts are thorough and complete and it’s time to move on to another stroke or the next grit, (depending on where I am in my sharpening progression). The sequential scratches, grit after grit, are a visual indicator that our physical efforts are being performed correctly and consistently. The bur, in addition to these scratches, indicates the scratches have apex the knife edge.
The burr formation comes and goes. It is flipping back and forth side to opposite side as I do the scrubbing, alternating the knife sides. As the burr is formed, it works it way with my up and down scrubbing along the edge from side to side indicating my effort is thorough.
Is this necessary? All I can say is it’s the results of my properly executed method, this one particular stroke, of my multi-stroke sharpening technique.
IMO, I feel like too much negativity suggests to sharpeners that burr formation is a bad thing. That it is something that we should strive for just once and only once. Then all subsequent sharpening till the very finish should be done to the point just short of drawing the burr. In reality the lesson I believe has been twisted and misunderstood. The burr doesn’t need to be avoided. It just needs to removed, if it’s formed, so the remnants don’t remain on the sharpened knife edge.
Many sharpeners form the burr and continue to form the burr again and again with subsequent grit work, never removing it and allowing it to pile up and build. This results in what appears as a well sharpened knife and a well polished bevel that isn’t very sharp because the burr is intact on the very tip of the knife edge.
Sharpening is a sequential repetition of consistent activity grit after grit, over and over, to take the initial edge profile, the angle we choose for the bevel, and smooth it so the intersection of these two opposite side flat bevel planes intersect precisely and keenly to a thin line, the pointed sharpened knife edge. It can be done any way you like. Any way you can figure out how to accomplish that. The more effective and efficient your method is, the sharper, quicker and better polished appearing results your technique will yield.
In summary: I employ a scrubbing stroke, first, with each and every grit, to establish or re-establish the bevel angle profile. The burr forms as a result that this is done thoroughly. I follow the scrubbing stroke with an alternating side edge leading stroke to remove the formed burr and to smoothly shape the apex. Then I repeat this again and again, grit after grit, with attention to the results in a consistent manner. After the last grit in my sharpening progression, I strop the sharpened knife edge.
Everybody can achieve similarly sharp results as those of us that have figured it out and have been able to put our personal techniques together. You can do it any number of ways, that you choose. I really prefer you do it differently then I do. That way, as you struggle to learn how to do it you won’t blame your learning difficulties on me. The bottom line is it takes time with consistent repetitious efforts with attention to detail.
Marc
(MarcH's Rack-Its)4 users thanked author for this post.
01/18/2020 at 12:15 pm #5316701/18/2020 at 4:05 pm #53170I’ve just started, beginning to up-grade my stuff and all this new knowledge is just killing me. Information overload.Thank you everyone!!
Ha ha, lots to learn!
-
AuthorPosts
- You must be logged in to reply to this topic.