What kind of knife is this?
Recent › Forums › Main Forum › Techniques and Sharpening Strategies › Basic Techniques and Sharpening Strategies › What kind of knife is this?
- This topic has 10 replies, 3 voices, and was last updated 05/01/2014 at 6:24 pm by
Leo Barr.
-
AuthorPosts
-
04/29/2014 at 7:04 pm #18471
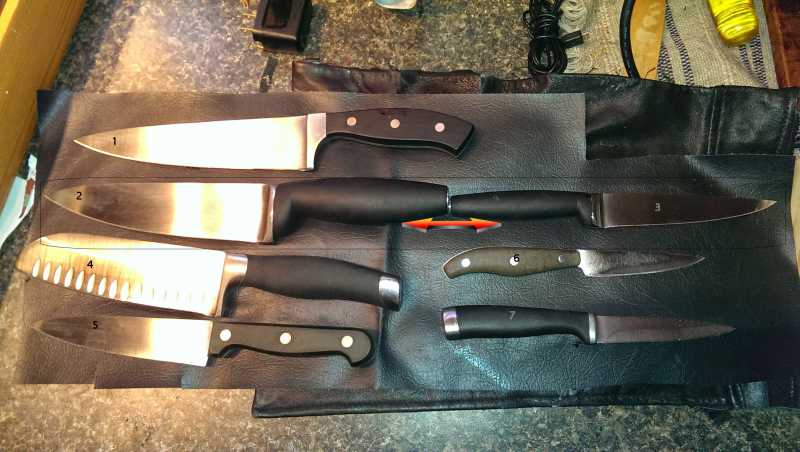
I mentioned getting 7 knives in for sharpening.
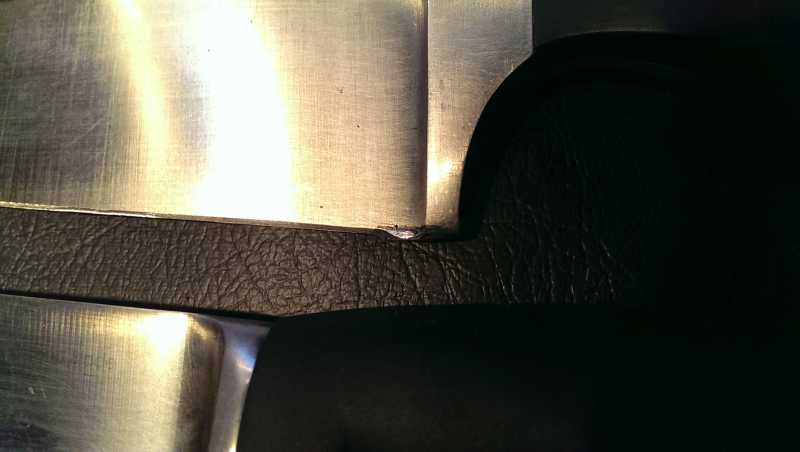
#’s 1,2 & 4 have some work grinding down at the heel/bolster where too much metal has been removed from the blade over the years — so some re-profiling and some grinding. Nothing too serious so far.
Knives 5, 6 & 7 have no identifying marks that I have found.
Knives #2 & #3 are a set and, really, why I’m writing.
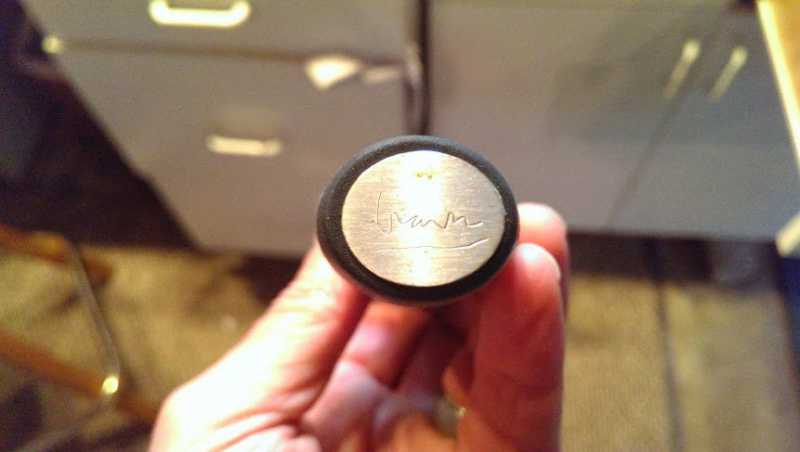
On the side of the blade I have been able to make out:
Taper Ground Blade
X50 Cr15And on the end is this “logo” signature.
I’ve searched Google with all the information and haven’t found anything. (It was interesting to Google “kitchen knife logos”)
Anyone recognize it?
Thanks, in advance, for any help…..
Attachments:~~~~
For Now,Gib
Φ
"Everyday edge for the bevel headed"
"Things work out best for those who make the best out of the way things work out."
04/30/2014 at 5:12 pm #18480Very interesting Gib! I’m sorry I can’t help you on the maker part…
So how are you going to attack the bolster/return issue? I have fixed a bunch unfortunately… it happens a lot when they get their blades sharpened over time. I am interested on your methodology =)
04/30/2014 at 6:59 pm #18482Very interesting Gib! I’m sorry I can’t help you on the maker part…
So how are you going to attack the bolster/return issue? I have fixed a bunch unfortunately… it happens a lot when they get their blades sharpened over time. I am interested on your methodology =)
Why are you asking me? We should ask someone here who knows what they are doing to tell me what I should do!! 🙂
I’m not going to make much money per hour!!
~~~~
I don’t know if I’ve admitted this so it’s time to come out of the closet. When I bought my WE, I also bought a WorkSharp 3000.
I will incorporate it into my strategy.
According to Murray Carter’s method, I’m already wrong! I’ve begun sharpening before cleaning.
But, I did do the full inspection. I found three blades of seven bent. Two were easy; just a quick, light counter-pressure or two over the edge of my bench and they passed my eye and straight-edge tests.
The third one is more complicated. It was also the one with the most chip damage to the edge. It’s pretty good and some might not see the remaining wavey twist because the spine looks good down the whole length. Turn it over and about three inches from the tip there is a very slight wavey bend in the edge that isn’t in the spine.
I will disclose it to the owner when I return the knife. It’s better than it was and very usable.
~~~~
After that, I’m coarsely and gently shaving the heel/bolster down so the full length of the sharpened edge will touch down into the cutting board. Then, smooth and blend the edges into the surrounding bolster and make it all look right.
~~~~
According to Murray’s I’m supposed to be cleaning now/next….
I’ve got a combination of six polishing compounds on micro-fiber rags as well as a selection of sandpapers in many refined grits. I’ve got Flitz. And others.
But, I’m such a neophyte at this I feel a bit nervous about this part. Any suggestions and/or courses of action would be greatly appreciated.
~~~~
Then, to the sharpening.
If I have to shave the bolster down then, obviously, the edges have been ground away and are in desperate need of re-profiling.
I picked up a set of 50/80, but I’m thinking I still will be taking off more metal than I want to by hand.
The WorkSharp 3000 has a nice add-on belt knife-sharpener. I can use it to thin the edges.
Then, I’ll put them in the WE.
The WorkSharp will make easier work of it; then I can give them a really good edge.
I’m still gaining experience with the WS3000 and am having some issues with the way it handles both the tip and the heel. The guided edge can block some blades from getting the belt all the way to the heel.
And, on the other end, the tip has a tendency to “flip” off the guide. Have to be very careful to keep bevel even around the curve. I even noticed this in the official demo on their website. I’m learning to allow for that.
Ultimately, the WE will be the real goto sharpener.
I think I will keep these simple. I’ll need to polish up and finish the thinned 17 dps edge from the WS3000, then begin a new bevel at 20 dps.
In talking with the owner, these knives are going to be his hand-me-downs to his kids. They are not aficionados but will recognize sharp. He is also giving them a little fixed angle hand-held sharpener for touch-ups instead of a regular steel. Much simpler for the average user and most or all are set at 20 dps.
It shouldn’t take me too long to run through the grits to finish what I started with the WS3000. I’ll take that 17 dps edge to 1000. Then, I’ll switch to 20 dps at 800. I’ll do the 1000 and then strop.
~~~~
At least, that’s my plan!! There’s still time to stop me if I’m making any mistakes in my thinking!!
Seriously, any input would be most welcome.
When I first got my Wicked Edge, I thought I might never use the WorkSharp. But, power grinders certainly have their place.
Previous to both the WS and the WE, I had purchased the handheld WorkSharp. I am seriously considering upgrading to the Ken Onion upgraded version — just to have around.
More later….
~~~~
For Now,Gib
Φ
"Everyday edge for the bevel headed"
"Things work out best for those who make the best out of the way things work out."
04/30/2014 at 8:39 pm #18483Thanks for the post Gib!
A few notes: you will have a difficult time grinding down the bolster/return of the knife on a WS or with the diamond stones… if you have any other kind of sander it may work better?
be careful that, after you have fixed the geometry, you don’t accidentally put the “hollow spot” in front of the bolster again with the WS as it is very easy to do! After every pass on the WS I would look at the very edge directly under light and get it to where it is barely reflecting light. Then I would transition to the WEPS. keep us posted!
04/30/2014 at 10:36 pm #18485Another question Gib… what is Carter’s procedure for cleaning up the blade? Is this after you sharpen due to it getting scratched while thinning? I am curious about this…
05/01/2014 at 3:26 am #18488Josh these are Murray Carter’s Procedures
His six steps are as follows
1 Rust removal & cleaning (this is the cleaning up the blade -prior to sharpening)
2 Checking for straightness & correcting
3 Profile adjustments
4 Blade thickness adjustment – attention to secondary edge
5 Grinding an edge – primary edge
6 HoningLeo Nav
05/01/2014 at 7:48 am #18491Josh these are Murray Carter’s Procedures
His six steps are as follows
1 Rust removal & cleaning (this is the cleaning up the blade -prior to sharpening)
2 Checking for straightness & correcting
3 Profile adjustments
4 Blade thickness adjustment – attention to secondary edge
5 Grinding an edge – primary edge
6 HoningLeo Nav
Thanks for posting that…
I’ll try his method next knife…
This time I did 2, then 3, then some 4 and a little 5. Now I have to 1; then 5 some more, then 6 And I’ll have to 1 and some 2 & 3 with a sharp blade.
~~~~
For Now,Gib
Φ
"Everyday edge for the bevel headed"
"Things work out best for those who make the best out of the way things work out."
05/01/2014 at 7:59 am #18492Thanks for the post Gib!
A few notes: you will have a difficult time grinding down the bolster/return of the knife on a WS or with the diamond stones… if you have any other kind of sander it may work better?
I will be able to do it, but, you’re right, it’s not easy.
be careful that, after you have fixed the geometry, you don’t accidentally put the “hollow spot” in front of the bolster again with the WS as it is very easy to do! After every pass on the WS I would look at the very edge directly under light and get it to where it is barely reflecting light. Then I would transition to the WEPS. keep us posted!
I practiced a while back on some throw-away knives. And I did exactly what you’re saying. It was easier than easy to re-grind that hollow spot/ dip.
I like the idea of doing some of the heavier metal removal/re-profiling with the WS and transition to the WEPS.
~~~~
For Now,Gib
Φ
"Everyday edge for the bevel headed"
"Things work out best for those who make the best out of the way things work out."
05/01/2014 at 11:09 am #18494Some thing I came across in Murray’s advanced sharpening techniques that could also be used on the WE is to angle your strokes for the micro serrations on the blade so a slicer for instance that is going to be used in draw cutting the serrations are best angled back towards the handle that is from the top of the primary bevel so on the WE your movement would be back towards the handle at about 45˚ . Other knives you may want vertical micro serrations or even forward facing serrations depending on the cutting application .
It does make a difference !Leo Nav
05/01/2014 at 5:17 pm #18495Some thing I came across in Murray’s advanced sharpening techniques that could also be used on the WE is to angle your strokes for the micro serrations on the blade so a slicer for instance that is going to be used in draw cutting the serrations are best angled back towards the handle that is from the top of the primary bevel so on the WE your movement would be back towards the handle at about 45˚ . Other knives you may want vertical micro serrations or even forward facing serrations depending on the cutting application .
It does make a difference !Leo Nav
One nagging disappointment from the Seattle Knife Show weekend. I heard that on Friday at the Forge there was an hour long seminar for the knife makers about sharpening — I missed it…. a lot of people did. There was no schedule of events posted so no one knew…..
Anyway, I mentioned a conversation regarding what is sharp I had with Andy & Haley DesRosiers and Murray Carter.
Evidently, your point, LeoNav, was one that Andy & Haley hadn’t considered and found to be very exciting.
They said at the Friday sharpening seminar they were shown how once the beautiful, mirrored convex edge is done that just a few final directional strokes can really “set” the sharpness to purpose — as you described.
(Sidebar: Andy & Haley talked about keeping a chuck of moose antler laying around their shop. When they’ve finished a knife, they hack & stab it. Moose antler is hard!! They said when they stab the antler they twist and bend a knife — if the point breaks off it’s a bad design. If the edge collapses it’s a bad design.)
They are very excited to apply this “new” information to their final sharpenings…
~~~~
For Now,Gib
Φ
"Everyday edge for the bevel headed"
"Things work out best for those who make the best out of the way things work out."
05/01/2014 at 6:24 pm #18496One of Murray’s tests to see the quality of the steel is to dry cutting brass rod , stainless steel & cast iron a soft steel will not bite into these materials .
i think also when you tap the steel with your finger nail there is a different sound to the denser quality steels from a poor steel.Leo Nav
-
AuthorPosts
- You must be logged in to reply to this topic.