WEPS Low Angle Adapter or Tormek Jig?
Recent › Forums › Main Forum › Techniques and Sharpening Strategies › Basic Techniques and Sharpening Strategies › WEPS Low Angle Adapter or Tormek Jig?
- This topic has 30 replies, 9 voices, and was last updated 03/21/2015 at 9:46 pm by
 tcmeyer.
-
AuthorPosts
-
02/28/2015 at 12:55 am #23938
Here’s another one! Do you need extended arms to use the WEPS LAA with the upgraded arms and riser? I was thinking with the extra height from the riser and the LAA….you will need em
02/28/2015 at 12:57 am #23939Hey sorry if I offended, you’re not getting any guff from me victorf !- input from others here is what we’re all after. The written word can be a fickle beast me thinks :blink:
I love both my Tormek and WE and they have their place, but if I can get a small knife to work on the small knife jig clamped into the WE – that’s where the game ends.
I even scabbed together a temporary WE setup so that I could do Ulus on it, and another temporary setup to successfully but a WE edge on a Fiskar hatchet (crazy crazy sharp) – when I get time that one will be redone as a permanent jig. If I can figure out a way to strap it into the WE- that’s where it goes.
02/28/2015 at 2:53 am #23942Here’s another one! Do you need extended arms to use the WEPS LAA with the upgraded arms and riser? I was thinking with the extra height from the riser and the LAA….you will need em
I’ve done everything on the LAA with Gen.2 arms. so I’m not sure beyond that. But one of these days I’ll make extended arms for better travel. Since you’re trying to get a feel for the LAA, let me drift a bit please…
The one thing I learned (through fire) about the LAA is that you expose knives to scratching of the primary bevel if you bring the top of the stone too low (below the plane of the secondary edge) and by accident brush it against the primary or thinned part of the blade… this can’t happen with the normal vice, only the LAA vice. It happened once and I threw a full-on brush fit when I finished the job and noticed the scratches and realized what had happened… had to start all over by first polishing out all the scratches and than redoing the edge. Luckily this particular custom knife was screaming for a nice 100% polished blade.
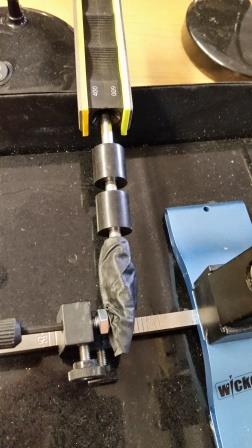
What I do now when using the LAA is slide one plastic bushing down each arm, sometimes two bushings depending on the knife, then slide on the stones. The bushings act as stoppers so that stones can’t go too low on the arms. They’re my failsafe.
With the bushings in place it is impossible to lower the handles too far and scratch the blades in the primary area.
I suppose maybe this has already been thought up and is buried in a previous post somewhere – not sure.
Hear’s a pic of two bushings slid down as stoppers for a taller knife
.
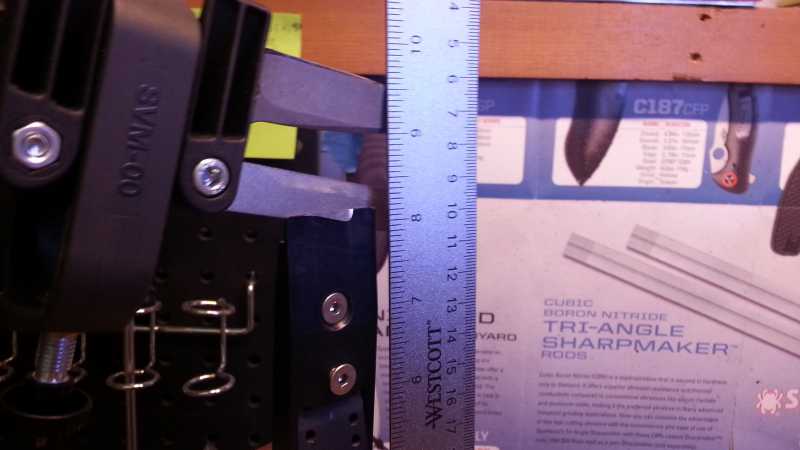
Attachments:02/28/2015 at 3:04 am #23945Iwaller, I use the 12in rods and it’s a good fit for me, but I’m also using an extra riser as well…
Here’s a couple photos with measurements. You should be able to determine for yourself with this but keep in mind the extra inch I’ve added at the bottom with the double riser:
Attachments:02/28/2015 at 3:12 am #23946Montana you aint the only one brother! I may have seen it mentioned before, but it bares repeating as you have that the longer rods and higher you go, the stones CAN scratch down the face without a bushing or travel stop of some sort in place at the bottom like you’ve shown!
Its now the FIRST thing I do when clamping a new knife, even before I set the angle is make sure the paddles wont slide down to far! Great tip!!!
02/28/2015 at 3:23 am #23948Thanks Cliff. I can’t tell you how crushed I was when this happened… I was so despondent and clueless for two days, that I was telling people who just plain couldn’t give a rip about knives what had happened. This was not one of my sharper moments. Then I sat down and studied it when I finished fixing the blade on the buffing wheels and was ready to sharpen it, and it all sank in.
These were bushings I had laying around, so one of these days when I get a minute I’m going to make a set of different lengths so that I make the stopping point no higher than necessary for any particular knife to keep as much travel available as possible.
02/28/2015 at 4:25 am #23953Here’s another one! Do you need extended arms to use the WEPS LAA with the upgraded arms and riser? I was thinking with the extra height from the riser and the LAA….you will need em
I’ve done everything on the LAA with Gen.2 arms. so I’m not sure beyond that. But one of these days I’ll make extended arms for better travel. Since you’re trying to get a feel for the LAA, let me drift a bit please…
The one thing I learned (through fire) about the LAA is that you expose knives to scratching of the primary bevel if you bring the top of the stone too low (below the plane of the secondary edge) and by accident brush it against the primary or thinned part of the blade… this can’t happen with the normal vice, only the LAA vice. It happened once and I threw a full-on brush fit when I finished the job and noticed the scratches and realized what had happened… had to start all over by first polishing out all the scratches and than redoing the edge. Luckily this particular custom knife was screaming for a nice 100% polished blade.
What I do now when using the LAA is slide one plastic bushing down each arm, sometimes two bushings depending on the knife, then slide on the stones. The bushings act as stoppers so that stones can’t go too low on the arms. They’re my failsafe.
With the bushings in place it is impossible to lower the handles too far and scratch the blades in the primary area.
I suppose maybe this has already been thought up and is buried in a previous post somewhere – not sure.
Hear’s a pic of two bushings slid down as stoppers for a taller knife
.[/quote]
man that’s a great idea! what bushings are those?
02/28/2015 at 4:41 am #23954Thanks. I’m one of those guys that just keeps stuff… so no idea where they came from – just scoured the shop for a temp fix and tripped across these in a drawer and they were perfect. I haven’t got around to finding some more material so that I can make different lengths. This was all I had. I know for a fact that similar metal bushings in different lengths are down at the hardware store, but haven’t looked around for nylon/plastic etc. yet.
These can also be called ‘spacers’ depending on application.
btw, I re-posted this along with some extra photos over on the ‘show me you mods’ thread, since it is probably a better home for this.
02/28/2015 at 5:55 am #23955Hey sorry if I offended, you’re not getting any guff from me victorf !- input from others here is what we’re all after. The written word can be a fickle beast me thinks :blink:
I love both my Tormek and WE and they have their place, but if I can get a small knife to work on the small knife jig clamped into the WE – that’s where the game ends.
I even scabbed together a temporary WE setup so that I could do Ulus on it, and another temporary setup to successfully but a WE edge on a Fiskar hatchet (crazy crazy sharp) – when I get time that one will be redone as a permanent jig. If I can figure out a way to strap it into the WE- that’s where it goes.
No offense taken and thank you for chiming in with the comparison.
On the bushings you used. May I suggest , instead of multiple length, you could take a short length of what you already got, drill/tap that particular bushing for use with a soft tipped set screw and now you ended up with a “stopper”. Stopper can slide on any part of the arm, lightly tighten for positioning. Stopper is commonly used for positive stop on drills and what not in machining practices.
02/28/2015 at 5:59 am #23956On the bushings you used. May I suggest , instead of multiple length, you could take a short length of what you already got, drill/tap that particular bushing for use with a soft tipped set screw and now you ended up with a “stopper”.
Brilliant idea :woohoo: and a “must have” item for longer rods and the low angle setup!!!
02/28/2015 at 6:03 am #2395702/28/2015 at 6:15 am #23958yep, more than one way to skin a cat. Thanks.
03/01/2015 at 2:45 am #23969On the bushings you used. May I suggest , instead of multiple length, you could take a short length of what you already got, drill/tap that particular bushing for use with a soft tipped set screw and now you ended up with a “stopper”.
Brilliant idea :woohoo: and a “must have” item for longer rods and the low angle setup!!![/quote]
Really not my idea Cliff, so I can’t take credit for that Yeah?
Weather report last night said you guys gonna get soaked today!?
Here, on Oahu, mean overcast!
Aloha!
03/01/2015 at 11:21 am #23975Yeah we got hammered this morning. Funny because I got your message as I was in the middle of this:
Lucky didnt last long as it blew out…
03/21/2015 at 5:56 pm #24557FYI
-
AuthorPosts
- You must be logged in to reply to this topic.