Using the Variable Thickness Stone Adapters
Recent › Forums › Main Forum › Techniques and Sharpening Strategies › Advanced Techniques and Sharpening Strategies › Using the Variable Thickness Stone Adapters
- This topic has 44 replies, 14 voices, and was last updated 12/29/2016 at 6:08 am by
phillyjudge.
-
AuthorPosts
-
07/23/2014 at 12:07 pm #19512
Since the Variable Stone Thickness Adapter (VSTA) first became available, I’ve seen two or three requests for explanations or demonstration of how it works. I haven’t seen a serious response so far, and since I’ve settled in on using it now with every stone (grit) change, I figured I might as well offer my method as an example.
First, in full disclosure, I have to state that I’ve converted all of my Wicked Edge stones to Bronze Bushings. I’ve counterbored the ends to 3/8” diameter, about ½” deep and reamed out the factory bores to 5/16”. The bushings, which I’ve epoxied in place are from McMaster-Carr, part number 6338K412 , as seen on their web page http://www.mcmaster.com/#catalog/120/1142/=syghhp.
As installed, my converted stone assemblies have almost zero detectable angular backlash, as compared to the stock bores, which I’ve measured to have angular backlashes anywhere from 0.1 to 0.3 degrees . It’s possible that the tighter tolerance in my stones have pushed me to full-time use of the VSTA’s, as the variability in the thickness of my stones is more easily seen in the form of angular errors in my scratch patterns.
STEP 1:
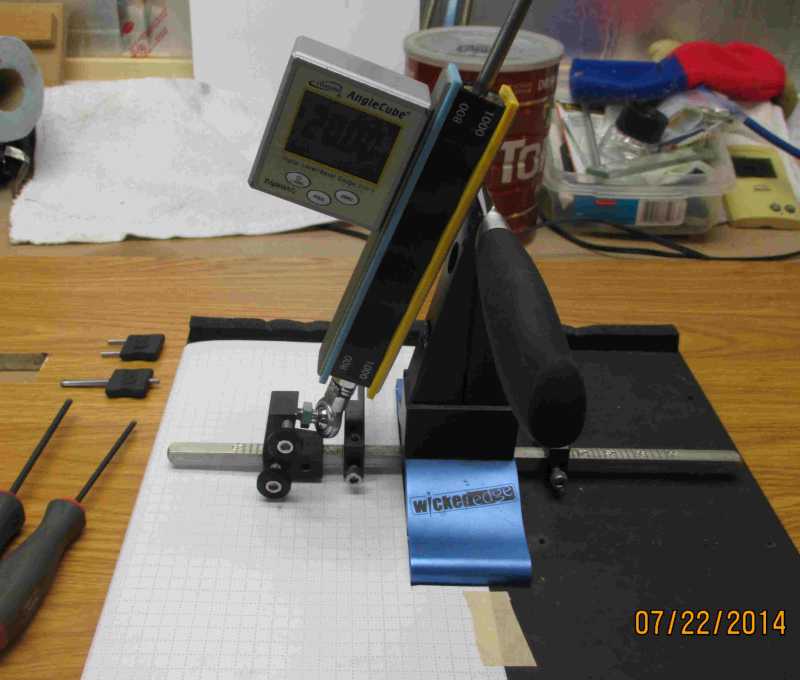
When using the Variable Stone Thickness Adapters, you start with a beginning or reference stone, set to a beginning or target angle. You then set the VSTA’s to match your reference stones as closely as possible. For instance, I will set the beginning angle(s) as desired or by using the Sharpie method to find the sweet spot, using my 1000-grit diamond stones. This is the highest grit which has a ferrite substrate, which will hold my magnetic-base AngleCube. The high grit is to reduce the severity of any scratches resulting from carelessness in the setup process. To provide adequate adjustment range for the micro-adjust screws, you’ll want to have them showing about three turns of thread between the hex-nut on the ball joint and the face of the mounting block after the initial angle adjustment. See the photo below:STEP 2:
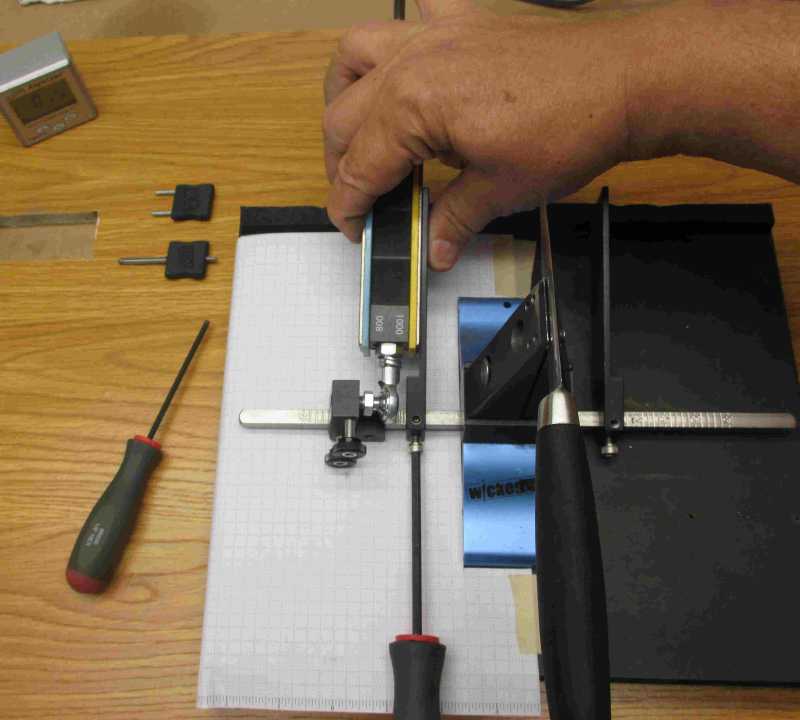
The next step is to move the VSTA into position against the face of the reference stone. I slide the VSTA into position against the face of the stone and then pinch the center of the stone against the inside face of the VSTA. See the photo below. When I feel the VSTA is in a comfortable position, I tighten the set screw, locking the VSTA onto the degree-bar. Now, the VSTA is the fixed reference, and all subsequent micro-adjustments are made to it. You don’t tamper with the VSTA’s position until the knife is done or you’ve decided to change the angle, as when adding additional bevels.STEP 3:
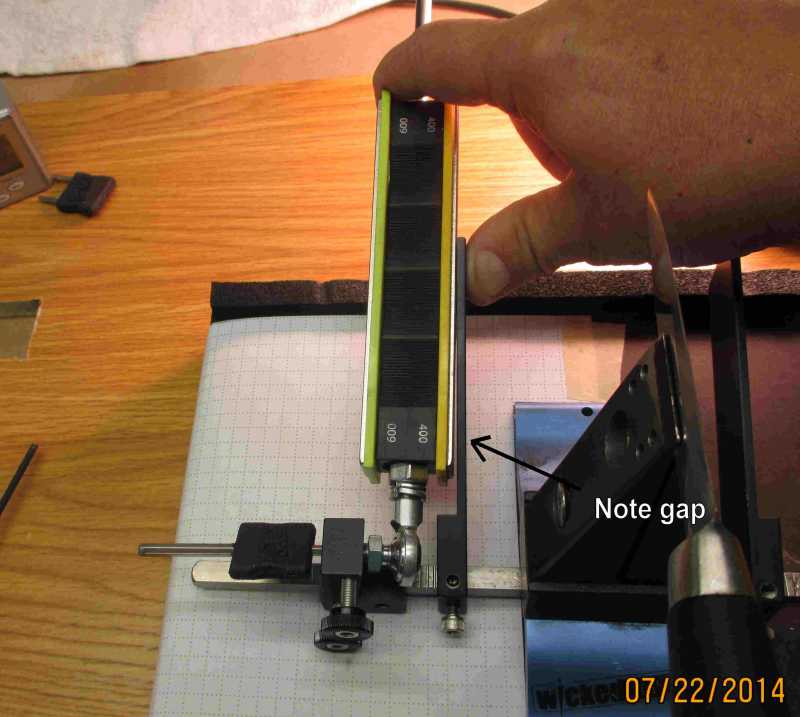
Now that the VSTA is fixed in position, you switch to your starting grit stones and make the appropriate micro-adjustments to match the stone to the VSTA. I reach around the vise with my opposite hand and pinch the top end of the stone against the face of the VSTA. Hold the rod just above the stone against the VSTA with your thumb and index finger. See the photo below. While holding the stone fairly tightly against the VSTA, turn the micro-adjust OUT (ccw) until you see daylight between the base of the stone and the near face of the VSTA.STEP 4:
Next, without releasing the holding force at the top of the stone, slowly turn the micro-adjust screw IN (cw) until you feel resistance. This will happen when the bottom end of the stone makes contact with the near face of the VSTA. This means that if the bore is parallel to the face of the stone, the rod is now parallel to the face of the VSTA and you are ready to begin stoning.Of course, you do STEP 1 and 2 for both left and right sides and you execute STEPs 3 and 4 for each change in stone faces – yes, even when turning a block from the coarse face to the fine face. For most stones, there will be a very small change in the final micro-adjust screw, but there are examples of substantial change.
ADDITIONAL NOTES:
If this seems confusing, I’m sorry I didn’t explain more clearly. This exercise is really quite simple, takes only a few seconds per side and easily becomes routine. Once I got the process down to a level of consistency, it was readily apparent that it improved my sharpening process. I had several stones which had never seemed to work quite right. This explained why and fixed the problem for good.
It helps to have a micro-adjust hex-wrench for each side. I have the screwdriver type, but a short wrench which stays put in the micro-adjust socket would be even better.
Making frequent changes in the micro-adjust screws would bugger up the threads if you had the set screws sitting metal-on-metal. I cut a short (maybe 3/16”) length of wire insulation and compressed it against the threads of the micro-adjust with the set screw. I roughly polished the end of the set screws flat, so they wouldn’t twist the plastic out of position. Once the plastic is compressed to a solid, it will assume the shape of the threads and act as a friction brake – think Nylok. It doesn’t have to be a substantial amount of braking force, as you’ll be adjusting the screw again in a few minutes anyway. It probably ain’t gonna move much anyway and you don’t want to bugger the threads.
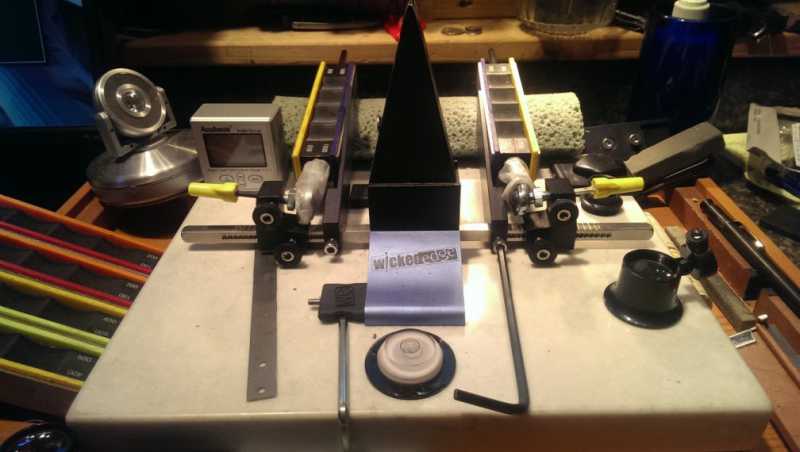
If you’re wondering what the deal is, the photos were taken with much of the unnecessary hardware removed for clarity.
Further info on how I converted my WE stone blocks available on request.
OK guys… the board is open for disclosure of your methods. What do you do different?
Attachments:07/23/2014 at 7:05 pm #19515You are sooooooo OCD….. I love it! :cheer:
Since the Variable Thickness Stone Adapter (VTSA) first became available, I’ve seen two or three requests for explanations or demonstration of how it works. I haven’t seen a serious response so far, and since I’ve settled in on using it now with every stone (grit) change, I figured I might as well offer my method as an example.
Thank you for the photos and the write-up. I’m still well into the learning curve.
Now, the VTSA is the fixed reference, and all subsequent micro-adjustments are made to it. You don’t tamper with the VTSA’s position until the knife is done or you’ve decided to change the angle, as when adding additional bevels.
I reach around the vise with my opposite hand and pinch the top end of the stone against the face of the VTSA…..
This point is so important… “subsequent micro-adjustments are made to it”
And, I’m reaching around, too, and carefully. I wondered the other day about turning the VTSA’s around to the front.
If this seems confusing, I’m sorry I didn’t explain more clearly. This exercise is really quite simple, takes only a few seconds per side and easily becomes routine. Once I got the process down to a level of consistency, it was readily apparent that it improved my sharpening process. I had several stones which had never seemed to work quite right. This explained why and fixed the problem for good.
The more time I take with each stone change, the “cleaner” my edges are becoming. If I rush, I can see it in the inconsistent scratch patterns. By “taking my time” I mean a total of just a few seconds during the whole process. It’s an insignificant amount of time in relationship to the improved edge. (In my opinion. And my wife noticed (without prompting) that her favorite kitchen knife is sharper.)
I’ve just figured some things out about my little digital microscope and now get a clearer image of what havoc I have been wreaking on my blades! Wow.
It’s amazing what a small fraction of a degree can do to (or not do to) the scratch pattern.
I love this! I’m no hand-sharpening expert but I can now put a pretty good edge on by hand. I wonder what percentage of degrees I am “off” in my hand sharpening.
But, this is about being able to approach perfection as close as humanly possible!! 😉 :woohoo:
To paraphrase some wise person, “It’s never close enough. It either IS or it ISN’T.”
It helps to have a micro-adjust hex-wrench for each side. I have the screwdriver type, but a short wrench which stays put in the micro-adjust socket would be even better.
I got a 4.5 inch L-shaped hex wrench for my VTSA. Lays nicely over the front edge of my stone in front of the vise. For my micro-adjusts, I cut off two hex-wrench segments to about an inch and super-glued a twist-on wire connector.
On an excursion to Goodwill to look for knives to sharpen I found a serving tray. Said to myself, “Self, that looks about right.” Got it home and it was nearly perfect. My whole setup sits in it. I can pick it up and in no time flat move my whole kit into the kitchen or out back onto the lawn.
(No, I don’t yet have a steady enough flow of outside knives so I hunt for new ones to sharpen. I look for different shaped blades and oddities and, especially, quality knives discarded unnecessarily.)
OK guys… the board is open for disclosure of your methods. What do you do different?
Thanks, again. Excellent….
Attachments:~~~~
For Now,Gib
Φ
"Everyday edge for the bevel headed"
"Things work out best for those who make the best out of the way things work out."
07/23/2014 at 8:10 pm #19518I guess I’m not understanding why, if you’ve flipped the angle bar around so it’s not using the divots (as shown in tcmeyer’s photo), you’re not just loosening the main screw to move the stone flush with the adapter?
07/23/2014 at 9:17 pm #19519If I’m understanding your question correctly, Curtis, you simply can’t make tenth of a degree adjustments by using the main clamping screw. It would drive you nuts. And to follow my set-up method, you’d need three, maybe four hands.
I removed the quick-locking screw assemblies for the photos, so it isn’t shown, but I usually use the detent screw on the backside to pick a detent position, and then use the front locking lever to hold it in place. I’ve had the thumbwheel set screws work loose from the detents too many times.
Neither of you guys picked up on the fact that I transposed Stone and Thickness? It should read VSTA, not VTSA. Two o’clock in the morning. Mumble, mumble. I’ll go back and edit it if I can.
07/23/2014 at 11:19 pm #19520Thanks TC! That is a very clear explanation of the use of the VTSA!
I moved it to the advanced strategies forum and made it sticky.
Molecule Polishing: my blog about sharpening with the Wicked Edge
07/24/2014 at 11:13 am #19536I’m still waiting to hear if you other OCD-types are using the VSTA’s in the same way.
I was thinking that maybe I’m seeing results which are related to my modified stones, and that maybe it doesn’t pay to do this with standard, unmodified stones.
???? Or do you see any holes in my methodology?
07/24/2014 at 1:12 pm #19537I use them in about the same way. I don’t use the VTSAs with the stock stones (diamonds, ceramics) but do use them with my Choseras and Shaptons. And, like Curtis, I also use the main screw to move the stones. But this may also be due to the considerable thickness difference between the waters tones and the stock stones.
Molecule Polishing: my blog about sharpening with the Wicked Edge
07/24/2014 at 5:00 pm #19538If I’m understanding your question correctly, Curtis, you simply can’t make tenth of a degree adjustments by using the main clamping screw. It would drive you nuts. And to follow my set-up method, you’d need three, maybe four hands.
I removed the quick-locking screw assemblies for the photos, so it isn’t shown, but I usually use the detent screw on the backside to pick a detent position, and then use the front locking lever to hold it in place. I’ve had the thumbwheel set screws work loose from the detents too many times.
The way I described, I’m not making tenth of a degree adjustments. When switching between stones, for example on the right side, I would:
- loosen the main angle set screw
- slide the new stone on
- hold the stone against the adapter with my right hand
- tighten the main set screw with my left hand.
(It would be the same for the left side, just switch hands).
I’m not saying your method is wrong, in fact it probably is more accurate. And you’re right, your modified stones may actually require a higher level of accuracy. I just look at the adapters as a way to quickly make adjustments between stones, with as few steps as possible.
Neither of you guys picked up on the fact that I transposed Stone and Thickness? It should read VSTA, not VTSA.
It’ll always be the SWAT jig to me, so they’re both “wrong”. 🙂 🙂 🙂
07/24/2014 at 8:37 pm #19541I’m still waiting to hear if you other OCD-types are using the VSTA’s in the same way.
I was thinking that maybe I’m seeing results which are related to my modified stones, and that maybe it doesn’t pay to do this with standard, unmodified stones.
???? Or do you see any holes in my methodology?
I’ve talked to a few people who are reporting very similar methods with similar results – surprisingly much better edges.
-Clay
07/24/2014 at 10:51 pm #19548I’ve just figured some things out about my little digital microscope and now get a clearer image of what havoc I have been wreaking on my blades! Wow.
hey Gib you should examine your tips under your new scope 😉 i found that mine looked horrendous!
back to the main topic… I have found that I don’t really use the VSTA, even when going to my choseras… this is because I only go to my choseras when I am 1. mirror finishing an edge or 2. sharpening a straight razor. In both of these cases I use my USB scope to examine each level and I alternate the scratch pattern.
I have figured out exactly what adjustments I need to make when going from my stock stones to my choseras… and it is exactly 2 dps away from the vise that i need to adjust them. then when going from my 5k’s to my 10k’s i move it out one more to ensure I am hitting the very edge.
the biggest advantage I can see to them would be (for me) when mirroring an edge… if I don’t want to do a microbevel at the end but want one super polished bevel!!
07/24/2014 at 10:52 pm #19549Further info on how I converted my WE stone blocks available on request.
I am waiting on the tutorial similar to this thread! 😉
So tom, what if you just drilled down just enough to seat the bushing but didn’t drill the WE paddle all the way through? then you wouldn’t have to worry about it slipping off the end of the rod on the shorter arms, right?
07/25/2014 at 7:48 pm #19562I’ve just figured some things out about my little digital microscope and now get a clearer image of what havoc I have been wreaking on my blades! Wow.
hey Gib you should examine your tips under your new scope 😉 i found that mine looked horrendous!
……..[/quote] :pinch: :blush: 😳 :unsure: :dry: :huh:
Ouch….. Oh, God. Do I have to? Sheessshhh, now the little pointy part has to be perfect! :S
~~~~
For Now,Gib
Φ
"Everyday edge for the bevel headed"
"Things work out best for those who make the best out of the way things work out."
07/26/2014 at 2:47 am #19570Quote from Razoredge:
“So tom, what if you just drilled down just enough to seat the bushing but didn’t drill the WE paddle all the way through? then you wouldn’t have to worry about it slipping off the end of the rod on the shorter arms, right?”I suppose you could do it if you had a very long drill bit or reamer. The problem is that the hole has to line up almost perfectly with the centers of the bushings. From my experience, the chances of the counter-bores being concentric with the thru-bores is nil. The factory bores are too sloppy to let you find exact center. And if you’re off by a 32nd of an inch, you lose the advantage of not over-running the end of the rod. I considered drilling the bore out after mounting the bushings (your drill would be held concentric to the bushing bore), but if part of the bore was out of line, the rod would catch it and it’d just be annoying. So I just tossed that idea out and went with 2″ longer rods. I had to buy a 1/4-28 die for about $10, but money isn’t an issue for me. No debts, no other filthy habits.
If Clay is OK with me posting an explanation of my process, I’ll be glad to do so. Having been in a business with a lot of intellectual property and having a loyal nature, I’m sensitive to posting alternative solutions on the guy’s own web site. My method is the equivalent of teaching the reader how to make his own handles – which I did before WE offered glass blocks. Otherwise, I’ll be glad to put something together and e-mail it to you. Gimme a couple of days.
Tom
07/26/2014 at 7:11 am #19572Does the VTSA set screw go into a divot? I assume no or else fine adjustment would not be possible. By fine adjustment I mean being able to set it the first time perfectly flush with the first stone. I know you don’t move it after initial setup. I ask only because from the photos I see it looks like it does.
Tom, great write up. Well written and good photos. This should go in the Wiki. B)
07/26/2014 at 7:23 am #19573I’m still waiting to hear if you other OCD-types are using the VSTA’s in the same way.
I was thinking that maybe I’m seeing results which are related to my modified stones, and that maybe it doesn’t pay to do this with standard, unmodified stones.
???? Or do you see any holes in my methodology?
I’ve talked to a few people who are reporting very similar methods with similar results – surprisingly much better edges.[/quote]
Not only does the VTSA allow for consistent stone setting, it throws out the inaccuracy of the angle cube. Every time the angle is used there is more potential inaccuracy introduced. Both from the cube itself, and possibly front the user. I remember previous discussions about the cube only being accurate to +/- 0.1 to 0.3 degrees. I am both surprised and delighted to hear that the VSTA gets better results. This tells me that that little bit of slop eliminated does make a difference. If you see it in cutting performance that is a real gain.
Also there are lazy people like myself. I use the cube for each stone type, but not every grit. So I use it once for diamonds, water stones, then strops, but not every grit. With the VSTA you can easily check every stone used.
-
AuthorPosts
- You must be logged in to reply to this topic.