Tip Repair Done Right! Er…Wrong! No…Right! Um?
Recent › Forums › Main Forum › Techniques and Sharpening Strategies › Basic Techniques and Sharpening Strategies › Tip Repair Done Right! Er…Wrong! No…Right! Um?
- This topic has 5 replies, 3 voices, and was last updated 03/14/2013 at 2:39 pm by
Eating Pie.
-
AuthorPosts
-
03/12/2013 at 6:43 pm #10186
I cut lots of cardboard with my Spyderco Delica 4. I often like to cut with the tip, but I have a nasty habit of overzealously dragging the point of the tip across the cement. This inevitably leads to needing a repair!
Technique #1
The first time I repaired the tip, I did it similar to a basic reprofile. Using the 100/200 stones, I layed them flat against the bevel, with about 1/4 of the stone extending past the tip, and “scrubbed.” By paying attention to holding the stone flush against the bevel, I could ground down the metal without rounding off the point. I also made sure to run the stones across the whole length of the blade every so often just to maintain its original shape.
I quickly learned that the 100/200 stones were overkill — is in overkilling the point by tearing it to shredsl! Now I typically start at 400 or 600 grit, depending on the circumstances. I need something coarse enough to remove metal, but fine enough to create/maintain a point.
I have done this about 6 or 7 times. I always improve the point a lot, but when viewed with a 60x loupe, I can see deformation like chipping or rounding. I simply could not achieve a satisfyingly apexed point. So I decided to try something new.
Technique #2
Call this the Brute Force method… aka “Are You Kidding Me?” To me, it’s just doing the obvious — wrecking the edge completely! (Well, not completely, just near the tip.)
I removed the 600 grit stone from the control arm, and laid it flat against the apex of the knife’s edge (the knife is mounted normally in the WE, and the stone is parallel to the table). I “biased” my pressure toward the tip because I didn’t want to flatten more edge than I had to. And so I basically ground a new point with a few (very careful) brushes forward. I used the loupe to verify I had created a new — very finely apexed — point. Now I put the 600 stone back on the control arm, and I return to sharpening as usual. Okay, yeah, I killed my edge, so “as usual” isn’t quite right, but there it is.
A few caveats. I removed too much metal when creating the point so I probably would try 800 grit next time. I also believe I will eventually deform the shape of the blade. (Good thing I like Tantos! :D) Obviously this is a major drawback, and I will need to find an answer if I want to continue with this method.
I’m pretty much a sharpening newbie (in case purposefully wrecking my edge didn’t make that clear!). So I be love to hear some comments on what I’ve tried here, and especially if there are other suggestions!
-Pie
03/12/2013 at 11:10 pm #10189Probably the best “tip” (pun intended) I ever learned was, never work the tip to repair the tip. Work behind the tip up to the tip. Doesn’t make sense in writing, but if you think about this while sharpening, it will begin to. You want to work enough behind the tip to maintain the profile and geometry of the blade.
So, for example, in Technique 1, by scrubbing right at the tip, with the stone overhanging, no matter how careful you are, you’re probably continually “eroding” the tip, which makes it harder to repair.
And in both techniques, especially Technique 2, by just trying to work the very tip, you’re essentially blunting the knife. You’ll eventually end up with such a steep angle leading to the tip, it will no longer be “pointy”, even though the edge and spine meets at a point. (Think of this, you won’t create a “tanto”, you’ll create closer to a 90 deg. square). You’ll also reach a point where the tip will be above the handle when you close the knife (how long this takes depends on the style), because you’re basically moving the tip up the spine.
In your case, it doesn’t sound like it’s a big repair. I would just give the knife a good sharpening, paying a litle more attention to the area near the tip (maybe 1/5 or 1/6 of the blade), to restore the tip. If it’s a larger repair, like the knife I did in this thread, and you want to do it on the Wicked Edge, try setting the angle as high as you can, (30 or 35 deg. depending on the model you have), and “sharpen” around 1/3 of the blade or so, to establish a new tip. Stop when you’re close, and return to your sharpening angle, when you’re done, the tip will be there.
You can also repair it from the spine side (some repairs can be made entirely from the spine), and again, at some point you’ll need to, or the tip will be above the handle when closed. In the case of this knife, laying the whole spine flat on a fine stone should do the trick, or you might work 1/3 or so into a curve toward the tip. But again, don’t just do it right at the tip, or you’ll blunt the knife. On the knife I referenced above, I dd some work on the spine side, if you look at this photo of it on top of another Blur, you can see it easier…
To learn this, get a cheap “junky” knife, and practice by grinding off the tip and fixing it. It also helps, if it’s a larger repair, to mark the blade with a Sharpie of how you want it to look when you’re done.
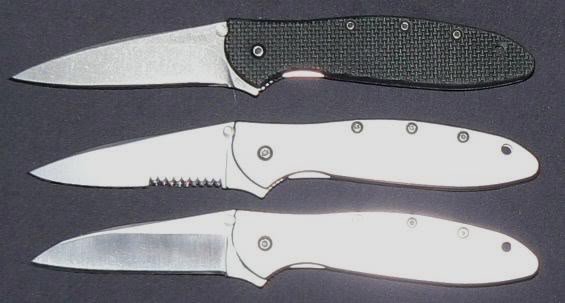
I used to buy Kershaw Leeks with broken tips off Ebay and fix them various ways, for example, in this photo I had two Leeks with broken tips (the top knife is undamaged). I fixed the middle one from the edge side, and the bottom one from the spine side, to show different examples..
Hope this helps!!! 🙂
Attachments:03/14/2013 at 4:34 am #10234Awesome post!!
Okay, I tried the “Dort work the tip” tip and it worked! 🙂
I am going to kill a kitchen knife and practice your suggestion of increasing sharpening angles… Seems almost like the middle ground between technique #1 and #2. I can report that my technique #2 created a very pointy tip, but noticeably deformed the blade’s shape, and this with a TINY bit of grinding. Brute force method indeed!
Do you have any advice on “re-squaring” a Tanto’s transition point? It strikes me as similar to tip maintenance.
Much thanks!
-Pie
03/14/2013 at 6:34 am #10237Great post, Curtis! I had a small paring knife I sharpened for a friend of the family which had a broken tip. I handled it much the same as you describe, from the edge side in this case. I guess I sort of intuitively considered working from behind the tip as “blending” in a manner of speaking, and it worked out great.
I think re-pointing a broken tip can be a daunting task at first because it’s hard to visualize exactly how you want it to come out before you start working. Very cool photo, the different styles make a great comparison!
03/14/2013 at 9:01 am #10241Do you have any advice on “re-squaring” a Tanto’s transition point? It strikes me as similar to tip maintenance.
On tantos, I try and sharpen as perpendicular to the edge as I can (in other words, straight up and down strokes). And while it seems obvious, don’t let the stone rotate around the point at all. I found this is sometimes easier said then done… the tendency to “sharpen around a belly” wants to kick in. Even the slightest rotation can kill the point.
Clay also has a video sharpening a tanto…
Thanks!!!!
03/14/2013 at 2:39 pm #10248Good link. I had watched that a week or so ago and have been using Clay’s two-step technique. Good news for me is that based on your post, I’m doing the Tanto right! I will add the vertical movement next time, so more good advice.
Thanks
-Pie
-
AuthorPosts
- You must be logged in to reply to this topic.