Tip for clamping
Recent › Forums › Main Forum › Techniques and Sharpening Strategies › Advanced Techniques and Sharpening Strategies › Tip for clamping
- This topic has 6 replies, 4 voices, and was last updated 09/12/2019 at 11:50 am by
 tcmeyer.
-
AuthorPosts
-
09/12/2019 at 7:14 am #51993
Ok. I have a cane knife that I am going to sharpening. Doesn’t seem like it’s going to be all that hard to get the edge on. The problem is I have no flat place to clamp it. As you can see in the picture it is two sided,and long I am going to have to do this in stages. How would you guys recommend clamping this to get it to stay in place? I was thinking using painters tape to square off the bottom side and then putting sand paper on the side of the vice to grab the tape better to hold in place. What are your thoughts? Thanks
Attachments:
You must be logged in to access attached files.
09/12/2019 at 7:15 am #5199509/12/2019 at 7:42 am #51997Did you sharpen this knife? I have only sharpened one long knife, had to clamp in multiple locations. Take time in making sure you clamp in the proper locations to keep bevels even and blend the overlap slowly and carefully. The knife I did was not near that long. I have sharpened a dagger and I had to use blue tape to build up the clamping area.
09/12/2019 at 8:48 am #51998I can’t really get an idea of the daggers dimensions from the photos, other then it’s long. The other aspect I’d consider is this a valuable collectors item that may go down in value if it’s alter by sharpening. Some things have their value in an untouched, unused, unpolished and unaltered original state. With the original patina.
The other consideration is this is a long weapon used with blunt stabbing force, to be being driven or thrusted into the assailant. I don’t believe that it may be intended to be very sharp.
That being said It will take multi clamping in several positions as Travis wrote above. The hard part is re-positioning the dagger to create consistent uniform cohesive bevels.
It really requires a highly customized W.E. set-up like “the Big Rigs” Ed K and I have:
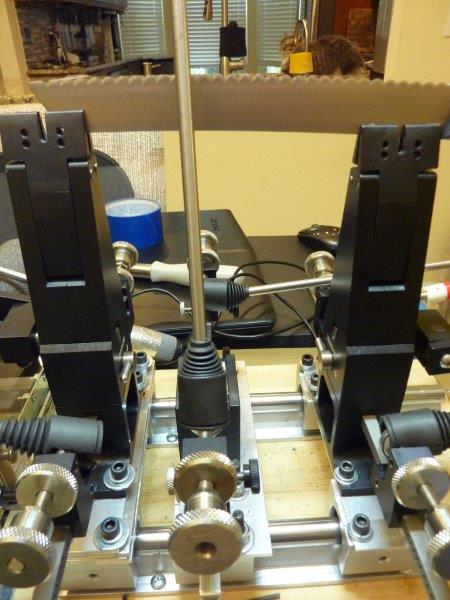
My “Big Rig” has two movable end vises and a third vise-less carriage that can roll along under the knife to sharpen the bevel length between the two outside vises. Even with this setup I would probably still need to re-position the dagger to accomplish the entire length.

Our “Big Rigs” have multi guide rod sets to allow for overlapping sharpening to better sharpen the long cutting edge.Marc
(MarcH's Rack-Its)Attachments:
You must be logged in to access attached files.
09/12/2019 at 10:11 am #52003No I have not sharpened it yet. Going to start it tonight. Was getting it set up to see how it was going to go last night going to have to build up the edge so I can get it to clamp properly. As mentioned above I am going to have to move this a few times to blend and make sure I get the bevel consistent down the blade on both sides. Now MarcH if I had that nice little setup would make it a lot easier for sure. Im going to start on it tonight. Might take a few nights since right now we just started 12hr. shift for probly the next week. I’ll keep you update on the progress. Thanks
09/12/2019 at 10:16 am #52004Be careful. The steel may not be like a knife. It may be plated not solid. There’s no telling what it’s made of. Possibly it’s ornamental and not the real thing.
Marc
(MarcH's Rack-Its)09/12/2019 at 11:50 am #52012Good thoughts, guys…
A comment about blending when you have to sharpen in stages:
I complete the entire length of the edge with each grit before proceeding to the next grit . I keep the stages fairly short to ensure a good overlap.
I’ve found that the key is to vary the starting and ending points of your strokes randomly. I will try to make some very long strokes (with a low angle of approach) along with some very short strokes (very steep angles of approach) at each stage. Fixed length starting and ending points defeat the blending process.
Much like polishing to a mirror edge, achieving a good blending requires that you erase the vast majority of scratches from the previous grit before proceeding to the next grit. This practice helps to ensure that you’ve removed an equal amount of material at each stage, but after 600 grit probably doesn’t matter as much.
I’ve done this on a couple of 12″ slicers just to see if it works and it seemed to do quite well. It also seems to help when blending in the heel on blades with a high ricasso.
-
AuthorPosts
- You must be logged in to reply to this topic.