Thumb screws keep loosening
Recent › Forums › Main Forum › Techniques and Sharpening Strategies › Thumb screws keep loosening
- This topic has 28 replies, 1 voice, and was last updated 08/07/2020 at 3:55 am by
Al.
-
AuthorPosts
-
09/27/2019 at 8:42 am #52187
Happens to my gen3pro all the time. I check the angles with each grit change and usually must adjust the angle; so, they get tightened. Invariably, they are loose each time. It was suggested to me that I use a bit of locktite. That was a real drag on my fingers when trying to loosen the thumbscrews; so, I just check’em regularly.
09/27/2019 at 5:58 pm #52195Get a micro adjustment kit from NotSharpEnuff and you want have that problem. I upgraded my Gen 3 Pro with his kit and it works great.
-
This reply was modified 4 years, 6 months ago by
 Tommie.
3 users thanked author for this post.
09/27/2019 at 6:24 pm #52196Ed’s micro-angle adjusters are a great way to go. They work very well and eliminate the problem.
For the WE120s or WE130s, if you want to try an inexpensive fix that may do the trick, you might try buying a fishing reel drag washer at a Fishing Bait and Tackle Shop that repairs fishing reels. Try to place a drag washer on the angle adjuster screws between the locking thumb wheel and the guide rod “L” brackets. You should be able to find an appropriate sized one that will simply ride on the adjustment screw and slide along it as the thumb wheel rolls. Maybe a drag washer from a spinning reel spool or a fresh water bait caster would be a small enough diameter? As you tighten down the thumb wheel the drag washer should supply that little bit of friction, compression and added surface area needed between the thumb wheels and flat surface of the “L” brackets to keep them from slipping loose while you’re sharpening.
You also may find it you swap the locking knurled wheels position around it may work better. By that I mean if you have it now on the inside between the “L” bracket and the guide rod ball ends when they comes loose, maybe if you switch the knurled thumb wheels so they’re on the outside of the “L” brackets and between the angle adjuster screw ends and the “L” brackets. That’s easy enough to try. Possibly it will work better on one side then the other for you.
Marc
(MarcH's Rack-Its)4 users thanked author for this post.
09/29/2019 at 11:07 am #52204I had forgotten the design of the locking mechanism for micro-angle adjuster screws on the newest version Gen 3 Pro model. That it is comprised of a two screw set-up that locks the angle adjustment position by the physical contact within the threaded holes in the black end bracket between the screw’s flat end of the inside ball end adjuster screw and the screw’s flat end of the outside locking knurled knob thumb screw:
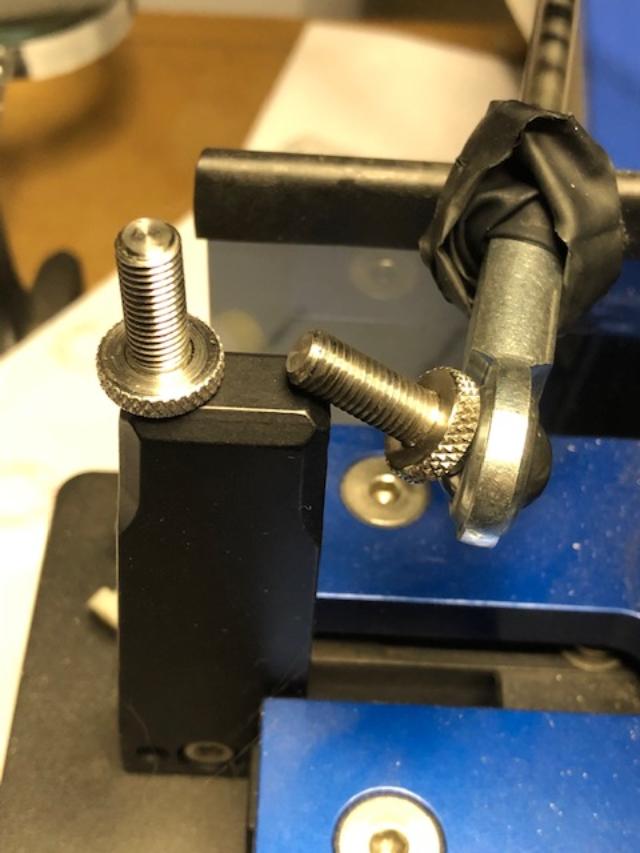
As the two flat screw ends are tighten against one another the physical contact provides the locking of the rotating motion of the ball end adjustment screws.
To improve the compression and locking hold between the two flat ended screws some material that is compressible and will contribute to the friction can be inserted into the threaded holes through the black end brackets. Maybe a small piece of a fishing reel drag washer material, a small piece of leather or possibly a small piece of plastic wire insulation, (stripped off with the wire removed). I would use only one of these materials at a time, and not a mixture. As the materials are compressed between the two flat screw ends by screwing the outer screw tight against the inner micro-angle adjustment screw, the compression and the friction should aid in the locking power to help eliminate any slipping you may have previously experienced.
I’d experiment with different materials keeping them sized smaller then the threaded hole diameter to allow for the materials expansion as it’s compressed between the two screw flat ends. If the materials expand too much like flattening a pancake it may expand and jam too tightly into the threaded holes preventing the screws from being able to move the compressed friction material as the micro-angles are changed and adjusted.
Marc
(MarcH's Rack-Its)Attachments:
You must be logged in to access attached files.
3 users thanked author for this post.
09/29/2019 at 9:29 pm #52208I had forgotten the design of the locking mechanism for micro-angle adjuster screws on the newest version Gen 3 Pro model. That it is comprised of a two screw set-up that locks the angle adjustment position by the physical contact within the threaded holes in the black end bracket between the screw’s flat end of the inside ball end adjuster screw and the screw’s flat end of the outside locking knurled knob thumb screw:
As the two flat screw ends are tighten against one another the physical contact provides the locking of the rotating motion of the ball end adjustment screws. To improve the compression and locking hold between the two flat ended screws some material that is compressible and will contribute to the friction can be inserted into the threaded holes through the black end brackets. Maybe a small piece of a fishing reel drag washer material, a small piece of leather or possibly a small piece of plastic wire insulation, (stripped off with the wire removed). I would use only one of these materials at a time, and not a mixture. As the materials are compressed between the two flat screw ends by screwing the outer screw tight against the inner micro-angle adjustment screw, the compression and the friction should aid in the locking power to help eliminate any slipping you may have previously experienced. I’d experiment with different materials keeping them sized smaller then the threaded hole diameter to allow for the materials expansion as it’s compressed between the two screw flat ends. If the materials expand too much like flattening a pancake it may expand and jam too tightly into the threaded holes preventing the screws from being able to move the compressed friction material as the micro-angles are changed and adjusted.Great advice, as always but you lost me at “two screw set-up that locks the angle adjustment position by the physical contact within the threaded holes in the black end bracket between the screw’s flat end of the inside ball end adjuster screw and the screw’s flat end of the outside locking knurled knob thumb screw”…..It doesn’t apply to me since I have a WE130 but who knows, I may upgrade, and I have Ed’s micro adjusters. I’m not very mechanically inclined so for me at least, simple is good. All this to echo the other forum members in recommending Ed’s micro adjusters.
2 users thanked author for this post.
09/30/2019 at 2:24 am #52209Has anyone brought this issue to Clays attention yet?
I havent noticed this happening with mine yet but I am cosidering upgrading to the new L-brackets with the all steel thumb screws but I am concerned I might begin to have this problem if the newer style L-brackets are the cause?
I have the older Wicked Edge Field and Sport Professional Sharpener from Jan. of 2017 probably just before all the upgrades came out. However I have upgraded everything including the new vice and everything else except the newer L-brackets.
-
This reply was modified 4 years, 6 months ago by
SDMF74.
Attachments:
You must be logged in to access attached files.
09/30/2019 at 3:23 am #52212The co-axial arrangement of the locking screw shown in the photo depends on the friction between the threads to hold position. Tightening the two screws against each other forces their threads apart, hopefully locking the surfaces of the screws’ external threads against the internal threads of the tapped holes. Unfortunately, how well they “lock up” is dependent on the coefficient of friction between the metal surfaces. If the hole was drilled slightly oversize, or if the metal surfaces of the threads are rather smooth or lubricated, they are less likely to “lock up” successfully. As the end faces of the two screws contact each other, rotation of one against the other will tend to rotate the other as well. Where one rotates away from the other, the contact is likely to be lost, allowing both to turn freely.
To demonstrate this problem, try turning the locking screw in without holding the micro-adjust screw stationary. The screws become one single screw and tend to rotate freely. The amount of force you can apply between the two screws is limited by the diameter of the knurled heads. If you have very strong fingers, you are more likely o get a solid lock-up.
I checked the current 3D images listed for the WE120 and WE130, as well as the Pro Pack II and III (but not the Gen 3 Pro) appear to have the jam nut arrangement. The images seem to show socket micro-adjust screws with an external jam nut, but the screws appear to be shorter than I’d prefer. In any case, I think the jam screw vs jam nut issue is a design flaw by WE – something really unusual, but something needing to be fixed. No mention of warranty fixes offered yet.
I’m sure that WE has the ball-joint couplings made special with the socketed screws and that replacing all of them represents a significant cost to them. I would hope that a complaint to them would be responded to with some form of a fix.
1 user thanked author for this post.
09/30/2019 at 8:31 am #52214SDMF74, I have used the older larger “L” brackets that you have with the locking screw against the adjuster screw threads. I have also used the newest mini “L” brackets with the knurled thumb wheel locking system. Both these locking systems have their good and bad points. Nonetheless the WEPS models are the the heart of this fine precision knife sharpening system. With out them we’d have nothing. We have simply adapted and modified our set-ups to help us to use them better.
I prefer to use and continue to use the old style larger “L” brackets. I had been using them with paired hex thumb screws on both sides to locks the “L” brackets position on the square bar and paired nylon locking screws, again one on either side to lock the angle adjuster screw. The nylon locking screws hold well and never damaged the adjuster screw threads. See the picture below:
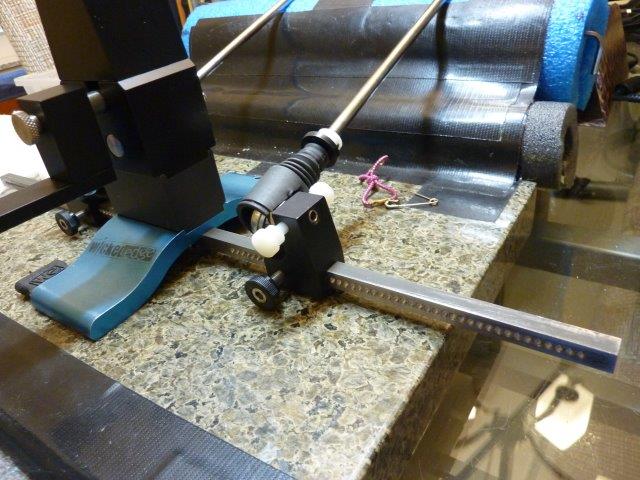
I continue to use this older modified WE130 model. I have recently began using the micro angle adjuster adapters I purchased from forum member Ed, “NotSharpEnuff”. These adapters with the old style “L” brackets are the best angle adjustment and locking system combination I have ever used. I have installed these adapters on all four of my WE Models WE120, WE130, Gen 3 Pro and a custom two Vise Setup with twin WE130 vises.
Here is the angle adjuster mod on my customized WE130:
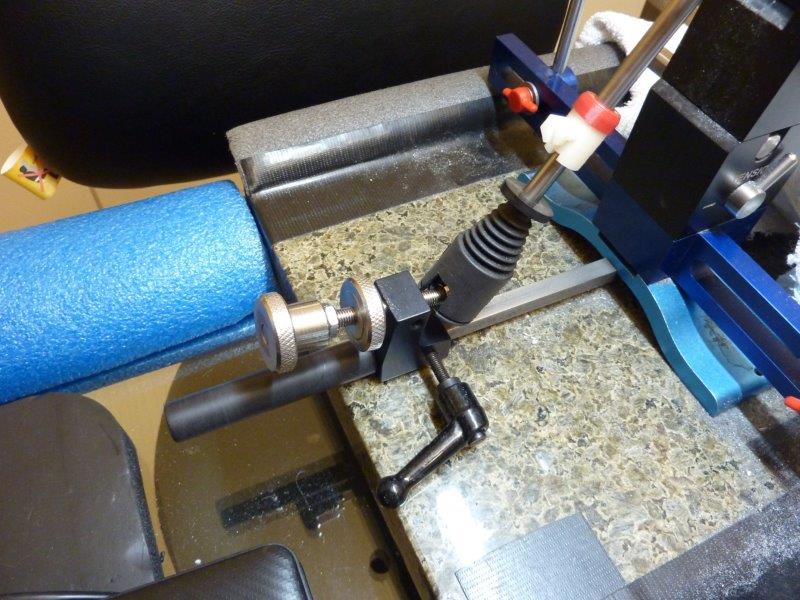
In this photo, above, I am using the older, first version, steel adjusters Ed was making. They were quite expensive because they were hard for him to fabricate. Now Ed is making a plastic knob adjuster set-up that works just as well, exactly the same, and they are much less expensive.
I have also used both the twin or paired locking screw setup, (top photo) and the micro Angle Adjuster Mods, (bottom photo), with the newest mini “L” brackets W.E. now provides with the latest versions WE120s and WE130s . Both these adjuster and locking methods worked just as well with these smaller more compact “L” brackets and hold very securely and allows for easy angle adjustments with secure “L” bracket positioning and angle locking.
SDMF74: If you are having good results with your current old style larger “L” brackets then I’d suggest you continue to use them. There is no advantage to update to the newer smaller mini “L” brackets. If you’d like extra square bar locking screws and nylon angle locking screws I’ll be glad to send these to you. Private message to me your email address so we can continue this conversation.
Marc
(MarcH's Rack-Its)Attachments:
You must be logged in to access attached files.
1 user thanked author for this post.
09/30/2019 at 8:51 am #52218I do not have a problem with the micro adjustment coming loose on my gen-3.
I put some large diameter weed eater line in the L-Bracket where the jam bolt hits the threaded part of the universal joint.
This weed eater cord was purchased about 10 years ago and came in the form of a 3 pound spool. It is .155″ thick I cut the cord to between 1/8″ & 1/4″ lengths.
i just wanted something like nylon that would not catch on the threads in side the L-Bracket.
1 user thanked author for this post.
09/30/2019 at 9:28 am #52219@MarcH pm sent.
Thanks for the info guys. I will probably hold off on the newer L-brackets for now & see how mine hold up, Ive already spent so much on this system on upgrades its ridiculous. I personally believe we should be allowed discounts on these expensive upgrades from W/E especially since at least for me some of them came almost right after I purchased my W/E.
@tcmeyer thanks for the detailed info although I had a somewhat dificult time with what you were describing. It appears that some people are having issues with the screws on the main adjustment bar coming loose & others are having issues with the screws on the micro adjustment. So far I havent really made large adjustments on the micro adjustments during sharpening but I will keep an eye on it & possibly test it out as I am due for a touch up on my ZT0393 and my Mora bushcraft as well as some others Im sure.
-
This reply was modified 4 years, 6 months ago by
11/08/2019 at 8:25 am #52516I’m having the same issue with my Gen 3 P I just got. I’m just trying to be fastidious checking the tightness/adjustment between grits. I don’t want to use pliers and stuffing something between the bolts doesn’t seem right.
1 user thanked author for this post.
11/08/2019 at 3:11 pm #52517Welcome to the Wicked Edge Forum “SquatchSharp”. The Gen 3 Pro micro-angle adjustment screws working loose is an issue some Wicked Edge users have experienced. “Stuffing something between the bolts” may not seem right. It can be a quick, inexpensive, and simple fix, nonetheless. It’s worth trying however wonky it seems, if your looking for a simple and free work-around to the loosening adjuster screws issue.
Marc
(MarcH's Rack-Its)4 users thanked author for this post.
11/08/2019 at 4:39 pm #52518Welcome to the forum @SquatchSharp, hope you’ll like your Gen 3. I have the same issue on my WE 130 micro adjusters, though I’m using my “tricked out” ones. My solution was a set of belleville spring lock washers (https://www.mcmaster.com/91235a112) between the bracket and the screw. I’m hoping that will work but I just got the washers and haven’t had the time to play with the WE yet.
5 users thanked author for this post.
08/07/2020 at 3:55 am #54764Use a jam nut between the thumbscrew and the arm hole. I wind the thumbscrew to firm tightness. Then turn the jam nut until it hits the arm hole. Use a thin profile spanner to give it a small cinch up. Done right, it doesn’t mark, and the holding power is high enough you won’t be able to turn the thumbscrew by hand let alone it vibrate loose.
3 users thanked author for this post.
-
This reply was modified 4 years, 6 months ago by
-
AuthorPosts
- You must be logged in to reply to this topic.