Sharpening issues
Recent › Forums › Main Forum › Techniques and Sharpening Strategies › Basic Techniques and Sharpening Strategies › Sharpening issues
- This topic has 16 replies, 9 voices, and was last updated 12/30/2012 at 3:24 pm by
Phil Pasteur.
-
AuthorPosts
-
10/01/2012 at 7:25 am #5782
So I’ve had my wicked edge almost a week, and I’m just not getting the results I thought I was going to. Prior to my wicked edge I was using Spyderco’s Sharpmaker and getting really good results. It’s probably my technique.
I’ve tried a few different things holding the paddles at the top, holding them at the top and holding the bottom out a little bit. But, I’m still having issues.
What sort of information do I need to provide to you all so you can help me troubleshoot? Most recently, I took my Kershaw Cryo and formed a burr each step of the way, 100 all the way up to 1000 and I had trouble cutting paper.
Previously with my Cryo I was lifting the paddles out at the bottom and i had no issues cutting paper but couldn’t shave hair. So I’m not quite sure what my issue is. Any help is greatly appreciated!
Thanks!
10/01/2012 at 7:58 am #5783Kyle Welcome!
I have only had my WE for a couple weeks so I am confident that more experienced sharpeners my be able to add to or correct my help.
What sort of information do I need to provide to you all so you can help me troubleshoot? Most recently, I took my Kershaw Cryo and formed a burr each step of the way, 100 all the way up to 1000 and I had trouble cutting paper.
In my limited understanding the burr created with the 100 grit stone indicates that you have the bevel centered on the blade. Once this has been accomplished it is not necessary to create a burr with each stone.
When I am sharpening my knives I only create a burr with the 100 grit stone and only if I have to re-profile the blade (which I have done with every knife first pass through the WE). Then I use alternating strokes to sharpen the knife. Initially I counted strokes per side and was doing between 25 and 50. I had some questions about stroke count and the members here helped me understand that you could do it by sound and feel, still learning this part. I have good success with either method but the second method has help me to produce some very sharp edges.
Check out the Demos section of the WE website. Clay as several very good videos that should be able to help also.
Good luck but most of all have fun! :woohoo: I am off to find another knife to sharpen.
10/01/2012 at 9:04 am #5784Hey Kyle, welcome! I think the main thing is probably time and that your stones haven’t broken in yet. There are a lot of extra diamonds that need to come off with the first bunch of knives you sharpen. The more you use your stones, the better they’ll get. For now, I’d focus on doing a lot more passes with the 600-1000 grit stones so that you’re simultaneously breaking in your stones and refining your edge. Now would be a really good time to lighten up on your pressure while you’re refining your technique. Specific hand position doesn’t matter too much as long as it’s consistent – you should hold the paddles the same way and apply pressure in the same way all the time. I tend to hold my paddles in the middle and let the heels of my hands light rest on them so the pressure is on the bottom of the paddles. I hope that’s helpful and would love to hear how your progress goes.
So I’ve had my wicked edge almost a week, and I’m just not getting the results I thought I was going to. Prior to my wicked edge I was using Spyderco’s Sharpmaker and getting really good results. It’s probably my technique.
I’ve tried a few different things holding the paddles at the top, holding them at the top and holding the bottom out a little bit. But, I’m still having issues.
What sort of information do I need to provide to you all so you can help me troubleshoot? Most recently, I took my Kershaw Cryo and formed a burr each step of the way, 100 all the way up to 1000 and I had trouble cutting paper.
Previously with my Cryo I was lifting the paddles out at the bottom and i had no issues cutting paper but couldn’t shave hair. So I’m not quite sure what my issue is. Any help is greatly appreciated!
Thanks!
-Clay
10/01/2012 at 10:57 am #5786If the above doesn’t work, consider getting a loupe or handheld magnifier of some sort. For me, seeing what’s going on often tells me what the problem is.
10/01/2012 at 11:24 am #5787thank you both very much! i do have a loupe i need to use it more though. i’ll keep you posted! off to practice!
10/01/2012 at 11:41 am #5788If you have the ability to make a short video of your sharpening and set-up technique I am sure the forum will help out. A picture is worth a thousand words (at times).
10/02/2012 at 7:44 am #5811I think things have gotten better. but if i continue to have issues I def will send pics and videos. thanks all!
10/02/2012 at 8:33 am #5821I think things have gotten better. but if i continue to have issues I def will send pics and videos. thanks all!
Hey Kyle,
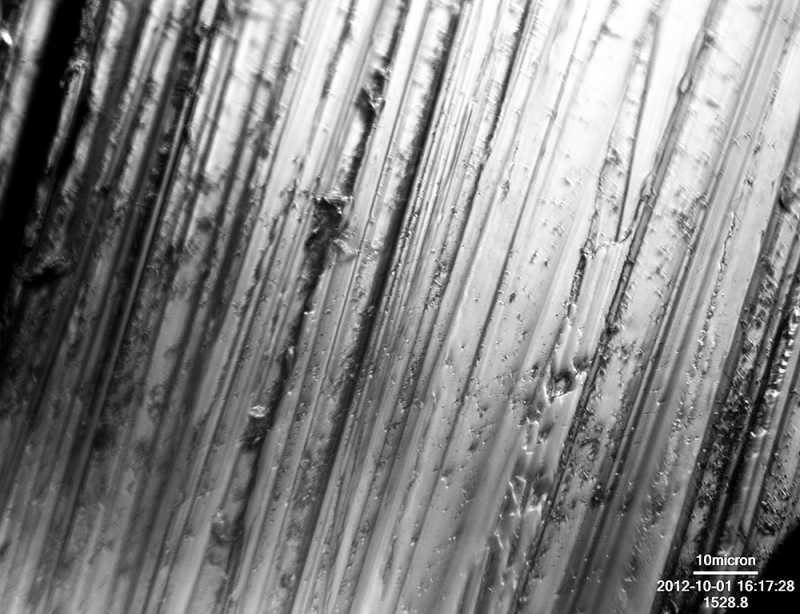
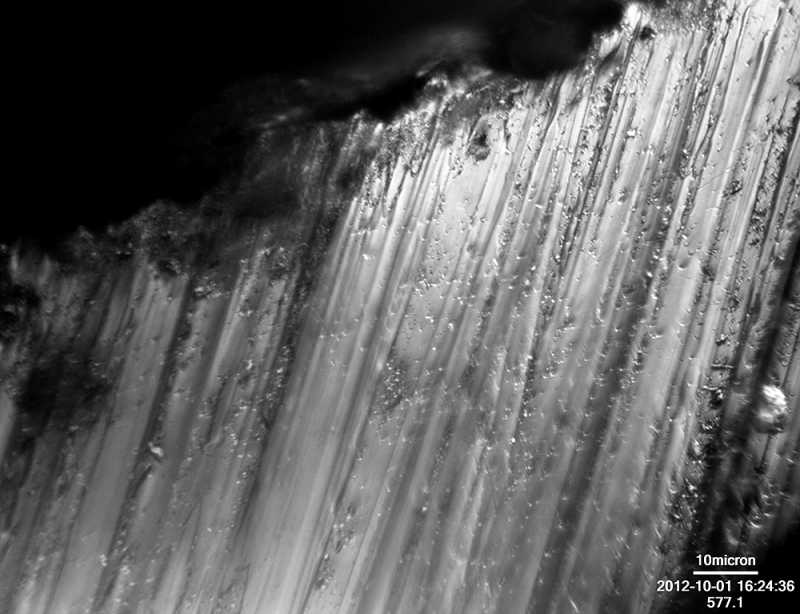
I just completed some interesting images after sharpening using my very well worn 600# diamond plates and some nearly new 600# diamond plates. These images were take at 2000x magnification under the microscope and may shed some more light on what’s going on in your sharpening:
The images above are of the blade after the newer 600# diamond plates (50 strokes)
The above image is of the blade after the well worn 600# diamond plates (50 strokes)
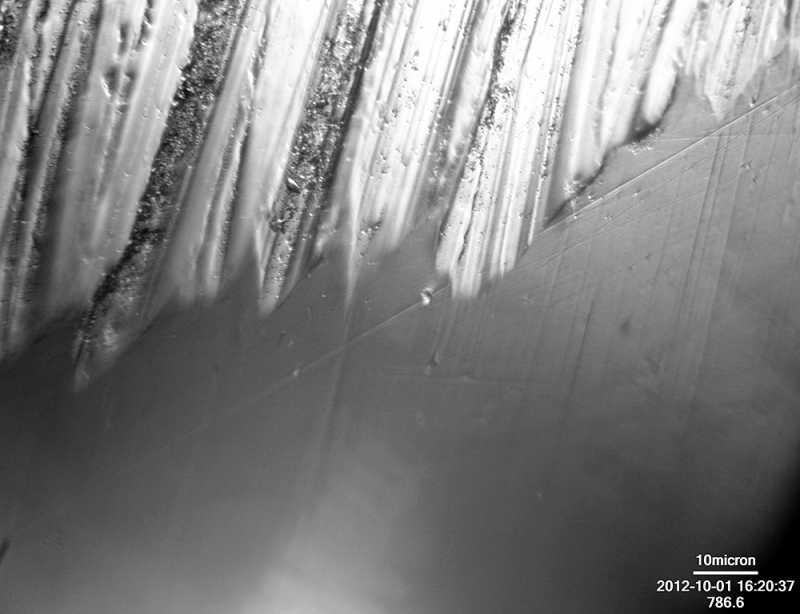
For fun, here is an image of the border between a super polished shoulder and the bevel where the newish 600# stones were used:
The main concept here is that the scratches on the bevel (hopefully) extend all the way to the edge. If not, you have more work to do in getting the bevels fully established. Once the scratches reach the edge, they become micro-teeth and so, the bigger the scratches, the bigger the teeth at the edge. Teeth can have a lot of advantages but if you’re measuring hair or paper cutting ability, then the teeth won’t be very impressive. If you’re after tomatoes though, you’ll love ’em.
-Clay
10/02/2012 at 10:23 am #5828wow thanks so much!
10/02/2012 at 9:10 pm #5840I just wanted to thank everyone for their input. my results are getting so much better. now my next goal is to get that mirror polish. it looks like i need to get some accessories! any suggestions would be appreciated
10/03/2012 at 6:17 am #5852Since I’m on a budget, but still wanted to bridge the gap between the 1000 grit diamond stones and the strops from the Pro Pack, I hunted down some very fine grit auto body sandpaper. A few folks here have mentioned using it and getting good results, so I’m experimenting with what I have (just 600 wet/dry) and treating the sandpaper as a strop more or less. Surprisingly good results, hoping to get in the other grits (1000, 1200, 1500, 2000, 2500, 3000 in aluminum oxide paper) by the end of the week to try those out too.
From what I’ve read and my couple of experiments with the 600 paper, the main difference is sandpaper is more fragile and breaks down quickly, while usually giving a finer finish even in the same grit as diamond stones.
I can definitely recommend some more strops, probably down to 0.5 micron paste. That’s where I’m heading with my first round of upgrades, particularly if the sandpaper experiments work out well. I think having a good progression of strops, including maybe a final finish set in kangaroo leather, would go a long way toward that mirror finish! Just remember that sometimes the most polished edge isn’t the right one for the job 🙂
10/03/2012 at 8:00 am #5861Once you switch over to real waterstones you will not go back (IMHO).
10/03/2012 at 8:52 am #5866Absolutely! But until I can get a couple sets of waterstones for about ten bucks at Autozone, my budget has me making do with what I can 🙂
I’m definitely looking forward to adding more stones and some ceramics to the mix, but it’ll be quite a while before that happens. If nothing else, getting the extra fine grit paper gives some extra experience with different finishes at low cost, as well as being usable for plenty of other things around the shop!
10/03/2012 at 10:42 am #5876Stones are the ONLY way to have real consistency. The problem with the WE strops is that they are mounted on a very uneven plastic platen. Bob Nash has some leather, roo and nano cloth mounted on aluminum and glass platens. That said if you use stones in the various grits you end up with a very consistent finish and have better control on what you want for micro teeth. Yes you have to have a little tooth or the knife rolls off what your cutting. Now if what you want is the mirror finish and have bragging rights go for the strops. What Stropping I now do is on 3×8 blanks of balsa using diamond paste and sprays only to finish on roo or nano cloth with the same demensions. Instead of small strokes I use large sweeping strokes on those materials. The results are amazing.
10/08/2012 at 4:21 am #5996I just wanted to say thank you again to you all that responded. I am getting some truly amazing results. Thank you all so much!
kmm
-
AuthorPosts
- You must be logged in to reply to this topic.