My WE experience
Recent › Forums › Main Forum › My WE experience
- This topic has 25 replies, 6 voices, and was last updated 07/08/2020 at 4:12 am by
 tcmeyer.
-
AuthorPosts
-
06/25/2020 at 10:48 pm #54421
ME: When I wrapped them in tape, they grew 0.05″ in diameter.
TOM: One quibble….the tape thickness probably is .005″ and not 50 thou.
Thanks, Tom. You are correct. I missed a decimal point.
06/26/2020 at 3:57 am #54422It’s an interesting point to note, that with each increase in grit, the distance between the rod center and the face of the stone is slightly reduced. At least after being fully broken in. With each step, the average diameter of the diamond particles is smaller, hence the distance is less. The result is that the angle is reduced accordingly, assuming that you don’t change the micro-adjust settings. The total change is quite small, but it means that with each progression step, the stone will tend to cut closer to the apex. Clay called it a “happy accident,” and it really does work to our advantage.
Check your stones with a micrometer or a good digital caliper and you’ll see the differences. If memory serves me, (as I age, it’s less reliable) each 0.010″ works out to be about 0.1 degrees over the 6″ from the knife edge to the ball joint. While you’re at it, check the difference from one end of the stone to the other. Occasionally, we see cases where a stone is not fully seated into its pocket. This causes angle variation on the side with the mal-positioned stone.
The platen thickness and tape thickness are pretty fixed, so the differences in the face-to-face dimensions would be attributed to the height of the diamond substrates.
4 users thanked author for this post.
06/26/2020 at 10:22 am #54426It’s an interesting point to note, that with each increase in grit, the distance between the rod center and the face of the stone is slightly reduced. At least after being fully broken in. With each step, the average diameter of the diamond particles is smaller, hence the distance is less. The result is that the angle is reduced accordingly, assuming that you don’t change the micro-adjust settings. The total change is quite small, but it means that with each progression step, the stone will tend to cut closer to the apex. Clay called it a “happy accident,” and it really does work to our advantage. Check your stones with a micrometer or a good digital caliper and you’ll see the differences. If memory serves me, (as I age, it’s less reliable) each 0.010″ works out to be about 0.1 degrees over the 6″ from the knife edge to the ball joint. While you’re at it, check the difference from one end of the stone to the other. Occasionally, we see cases where a stone is not fully seated into its pocket. This causes angle variation on the side with the mal-positioned stone. The platen thickness and tape thickness are pretty fixed, so the differences in the face-to-face dimensions would be attributed to the height of the diamond substrates.
I noticed that as well but didn’t think much of it since I check and adjust the angle everytime I change stones. I also like my Klein Tools 935DAG angle finder better than the one WE sent with my PPIII. I will just set the angle of the first stones that I start with on the next knife that I sharpen and not change the settings through the rest of the stones, and see how it turns out.
-
This reply was modified 3 years, 9 months ago by
 000Robert.
06/26/2020 at 12:23 pm #54429I choose to check between grits with my USB microscope. If there’s an angle difference, I’ll see it in the scratch pattern.
At one point, I realized that one of my 1000-grit stones was consistently about 0.016 degrees different from the others, so when I’d get to that stone, I could check with the angle cube, or even just make the appropriate adjustments accordingly (almost exactly one-half turn on the micro-adjust screw).
2 users thanked author for this post.
06/26/2020 at 12:33 pm #54430I need to get a USB microscope. My big AmScope is on my electronics bench and I don’t like to put my WE on it. My HH microscope doesn’t work well with checking edges. The blade edges keep sticking into the plastic lens spacer/protector. I usually just use my lighted magnivisor while the blade is clamped.
06/26/2020 at 2:34 pm #54431It’s an interesting point to note, that with each increase in grit, the distance between the rod center and the face of the stone is slightly reduced. At least after being fully broken in. With each step, the average diameter of the diamond particles is smaller, hence the distance is less. The result is that the angle is reduced accordingly, assuming that you don’t change the micro-adjust settings. The total change is quite small, but it means that with each progression step, the stone will tend to cut closer to the apex. Clay called it a “happy accident,” and it really does work to our advantage. Check your stones with a micrometer or a good digital caliper and you’ll see the differences. If memory serves me, (as I age, it’s less reliable) each 0.010″ works out to be about 0.1 degrees over the 6″ from the knife edge to the ball joint. While you’re at it, check the difference from one end of the stone to the other. Occasionally, we see cases where a stone is not fully seated into its pocket. This causes angle variation on the side with the mal-positioned stone. The platen thickness and tape thickness are pretty fixed, so the differences in the face-to-face dimensions would be attributed to the height of the diamond substrates.
I checked all my stones for parallel, which was very good. However, there is variability in the distance from stone face to stone face among the stones. So, when I switch grits, I must check/reset the angle before cutting. This factors out the gradual o.10 degree angle change provided by grit progression. I could adjust my reset angle that 0.10 degree so I can enjoy that happy accident, assuming my angle finder is accurate enough. I didn’t realize that natural angle change happened. That’s really cool. Thanks for that tip.
1 user thanked author for this post.
06/27/2020 at 3:58 am #54434I checked all my stones for parallel, which was very good. However, there is variability in the distance from stone face to stone face among the stones. So, when I switch grits, I must check/reset the angle before cutting. This factors out the gradual o.10 degree angle change provided by grit progression. I could adjust my reset angle that 0.10 degree so I can enjoy that happy accident, assuming my angle finder is accurate enough. I didn’t realize that natural angle change happened. That’s really cool. Thanks for that tip.
To be clear, there is no 0.1 degree that necessarily happens in the progression. I simply use it as an example of how much an error in thickness can affect the angle. The differences between stones are quite small, but they can accumulate. A series of tests I ran some years ago showed that a change of 0.15 degrees could be seen in the scratch patterns – especially at the higher grits. An increase in angle would show up as scratches that wouldn’t quite reach down to the shoulder, while a decrease would result in scratches that wouldn’t quite reach up to the apex. If you had a 1000-grit stone that was mounted on thinner-than-normal tape (like mine), it could cause the apex to be lowered to the extent that subsequent stones wouldn’t reach the apex at all.
1 user thanked author for this post.
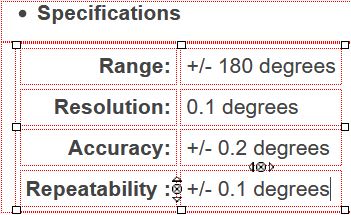
06/27/2020 at 6:43 am #54435Also it is a good idea to look at the specs of your measuring cube.. For instance the popular WR300 Type 2 had the following specs
You will notice repeatability is +-.1 so you can expect to have a difference of .1 to either side of your first measurement when you set the angle even with the same stone. That said, the play between rod and stone, thickness of the adhesive tape they use to hold the stone plate to the handle, the thickness variance from handle to handle, the thickness variance between stone plate to stone plate, if the stone is held by a stop so it is centered on the bevel with every measurement (Contact point at top of stone will exaggerate the play between rod and handle) as well as rock and roll of table surface can all change the angle between stones. The last one just screws up your measurement.. 🙂
So check each change until you know your stones.. you will notice every time you check a certain stone or set that changes need to happen and other they do not..
Attachments:
You must be logged in to access attached files.
07/07/2020 at 8:27 pm #54503I’d be interested in a real life example. I don’t have the precision measuring equipment and I think I may need a better angle cube. My angle cube has a margin of error of +/-0.2, which is a country mile on this level of measurement. To you fellas who have this process dialed in, would you mind recording your settings next time you clamp up a knife? What angles did you find with each stone and how much was it necessary to correct? Most importantly, do you find that chasing the angle measurably increases sharpness?
07/07/2020 at 9:16 pm #54504There’s a couple schools of thought, here. Some users set the angle with their cube only with the first stone pair. Then they just swap stones and follow their sharpening progression till done, without any corrections. For the utility sharpeners this is efficient and works quite well. When the goal is to apply a mirror reflective bevel, I believe more precision helps accomplish this edge.
I prefer to set my guide rod angles with each stone pair change. I double check my angle settings, with my angle cube, making micro-fine angle adjustments with each and every stone in my progressions, as necessary.
Many of us also use a USB microscope. That allows us to visually inspect our sharpening progress throughout the entire process. With the scope we can visually verify our scratch patterns are being laid down superimposed over the previous grit’s scratches. If the angle is off for any reason it should be easily noticed. Some experienced W.E. sharpener user are able to make micro-fine angle adjust simply by the scratch placements they see.
There are also some very experienced W.E. users that know their sharpening stone’s characteristics so well that they know the required corresponding adjustments they need to make as they choose each stone in their progression. Numbering or labeling each stone helps to recognize each individual stone of the same grit pairs.
Our sharpening results, both the physical sharpness and the aesthetics or appearance, require consistency and “attention to details”. I choose to take advantage of the precision the Wicked Edge designs allow so I use all the tools I have at my disposal to help me accomplish this.
Realize though, visual inspection with a USB scope and verifying/correcting micro-angle settings are time consuming and tedious. My results are worth that extra effort, to me. If I were sharpening for a fee I’d have to reconsider or streamline the process.
Besides the angle settings, your finger positions while holding the stones and applied pressure also contribute to the scratch pattern’s appearance and placement. Consistency is needed here too.
Last thing I’ll say is the absolute accuracy of each stone’s sharpening angle settings are less important then these sharpening angle setting being consistent from one stone pair to the next.
Marc
(MarcH's Rack-Its)4 users thanked author for this post.
07/08/2020 at 4:12 am #54506As with my comments above, I find the microscope more useful. If I see a change in the scratch pattern, I may check with my anglecube to make a correction, but if the scratch pattern is uniform and reaches from apex to shoulder, there’s no reason to use the anglecube.
1 user thanked author for this post.
-
This reply was modified 3 years, 9 months ago by
-
AuthorPosts
- You must be logged in to reply to this topic.