MODS!!! Lets see em!!
Recent › Forums › Main Forum › Sharpener and Accessory Maintenance › MODS › MODS!!! Lets see em!!
- This topic has 290 replies, 53 voices, and was last updated 11/28/2023 at 9:26 am by
Micheal Fuller.
-
AuthorPosts
-
02/25/2015 at 4:17 am #23841
My arm rest setup is just a personal preference. For me the rest is simply a matter of ergonomics. It feels better, feels more efficient and everything is right where I want it. I guess I felt like I was sort of ‘chasing’ the arms without the rest. up and down and up and down…
A piece of cardboard taped to the back of the platform was my initial test to see if the rest was necessary or value added… it was (for me).
So now I’ve swapped the cardboard out for something more visually appropriate – and sanitary.
02/25/2015 at 9:36 am #23854I use the foam tape. The original reason is/was to reduce the impact and noise resulting from dropping the handles/arm if you set them down a little carelessly. For me, that was just about every time I changed handles. And boy, does it make a pleasant improvement in the sharpening process.
02/25/2015 at 10:06 am #23857I copied Josh’s vacuum base setup and used Romex wire twisted around to hold up the arms. Works nice.
02/25/2015 at 10:36 am #23859I copied Josh’s vacuum base setup and used Romex wire twisted around to hold up the arms. Works nice.
The vacuum base mod is SERIOUSLY underrated. I’m still finding ways in which sharpening on the WEPS is made that much more convenient.
02/25/2015 at 11:10 am #23862I use the foam tape. The original reason is/was to reduce the impact and noise resulting from dropping the handles/arm if you set them down a little carelessly. For me, that was just about every time I changed handles. And boy, does it make a pleasant improvement in the sharpening process.
I forgot about that… you’re spot on that the arm rests quiet things down when sliding the stones off – and loading the next set is a touch easier too.
02/26/2015 at 2:12 am #23883Extra foam from an old Pelican case.

~Steven
02/28/2015 at 3:54 am #23952So CliffCurry and I were talking about this on another thread and I thought this might be an appropriate “mod” to also post here. This may have been mentioned or brought up in the past on this site, but I’m not sure, and so here you go.
The one thing I learned (through fire) about the Low Angle Adapter (LAA) is that you can expose knives to scratching of the primary bevel if you bring the top of the stone too low (below the plane of the secondary edge) and by accident brush it against the primary or thinned part of the blade… this can’t happen with the normal vice, only the LAA vice. It happened once and I threw a full-on brush fit when I finished the job and noticed the scratches and realized what had happened… had to start all over by first polishing out all the scratches and then re-sharpening the edge. Luckily this particular custom knife was screaming for a nice 100% polished blade.
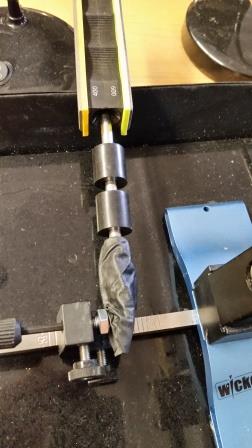
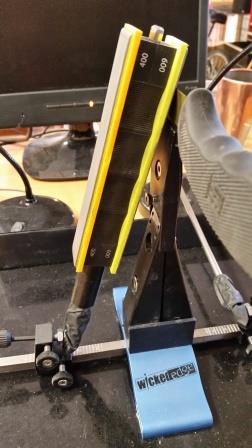
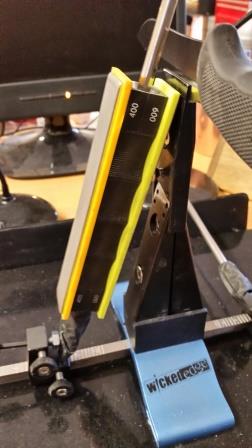
What I do now when using the LAA is slide one plastic bushing down each arm, sometimes two bushings, depending on the knife, then slide on the stones. The bushings act as stoppers so that stones can’t go too low on the arms. They’re a failsafe.
With the bushings in place it is impossible to lower the handles too far and scratch the blades in the primary or thinned area of the blade.
Here’s a pic of two bushings slid down as stoppers for a taller knife.
And another below showing a SOG chucked up in the LAA without the bushings. If you make a mistake and brush that handle against the knife while in the lowest position, whether on the up or down stroke, you’ll wish you hadn’t !
And below is the same setup, but now the bushing stopper is in place – the handle can’t come down too low. I’ll make some different length plastic bushings later so that the handle isn’t held any higher than necessary.
Attachments:02/28/2015 at 11:46 pm #23963Here’s my updated setup with lights and new knobs and handles.
Sent from my iPad using Tapatalk
What do I need to look for if I want to mod my arms like you guys? The micro adjustment seems pretty easy since the components are readily available. But I have no idea what to look for and/or where to get the components for anchoring into the detents on the crossbar…
Can you or TC point me in the right direction? Maybe I can find the parts at Grainger or Fastenall? Anyway, the earlier the better since I’m trying to make this a quick Saturday project. :woohoo:
03/01/2015 at 1:10 am #23967The locking handles are from McMaster.com are their number 6522K28. I don’t know what lwaller1980 used, but my knurled thumb knobs are McMaster # 60205K51. I epoxied the knob onto the screw threads of the locking handle. The knobs are nly used to spin the loosened screws. The handle is then needed only for locking.
Like several others here, I turned my degree bar around, so the locking handle doesn’t lock inthe detents. This gives you infinite adjustability. You can retain the screw on the detent side for those situations where you p[refer it.
Sorry I can’t help you with a quick delivery, but you could copy the specs from the McMaster pages and show it to your dealer. I live 150 miles from McMaster, so if I place an order over the weekend, they ship Monday morning and I usually have it in the afternoon.
03/04/2015 at 7:39 pm #24083Here’s my micro-knobs mod :silly:

~Steven
03/04/2015 at 11:12 pm #24088Here’s my micro-knobs mod :silly:
Like the metallic looks, mind sharing the materials or process? Also if you feel like it why don’t we start doing these in their own topic post so they can be sorted by mod? Just a thought B)
03/05/2015 at 12:15 am #24091Here’s my micro-knobs mod :silly:
~Steven
I also got some nylon tipped set screws to go in where hand screw is for the micro adjustment so you dont have to loosen and tighten them every time you want to change your setting. The nylon screw gives just enough pressure where they wont move but the threads slide through the nylon tips when you want to adjust them without damaging the threads! 😉
03/05/2015 at 12:18 am #24092Here’s my micro-knobs mod :silly:
~Steven
I also got some nylon tipped set screws to go in where hand screw is for the micro adjustment so you dont have to loosen and tighten them every time you want to change your setting. The nylon screw gives just enough pressure where they wont move but the threads slide through the nylon tips when you want to adjust them without damaging the threads! ;)[/quote]
Man… That’s such an awesome idea. So simple. I think I’ll make a trip to the hardware store later this evening.
Thanks for sharing!
03/05/2015 at 1:17 am #24093Ive been using a piece of foam pipe insulation. I was thinking a larger “pool noodle” would work great too. 😆
Cliff
I’ve also got 2 risers that the guy had when i bought my kit 2nd hand. DO you leave both of them on all the time? Im assuming you do it to get a lower angle?03/05/2015 at 1:50 am #24094I’ll start a new thread topic here under MODS when I get home. Now that it has its own forum heading it would be really great if we could get these mods separated out of one thread… Maybe? 😛
-
AuthorPosts
- You must be logged in to reply to this topic.