MODS!!! Lets see em!!
Recent › Forums › Main Forum › Sharpener and Accessory Maintenance › MODS › MODS!!! Lets see em!!
- This topic has 290 replies, 53 voices, and was last updated 11/28/2023 at 9:26 am by
Micheal Fuller.
-
AuthorPosts
-
09/17/2019 at 2:12 pm #52098
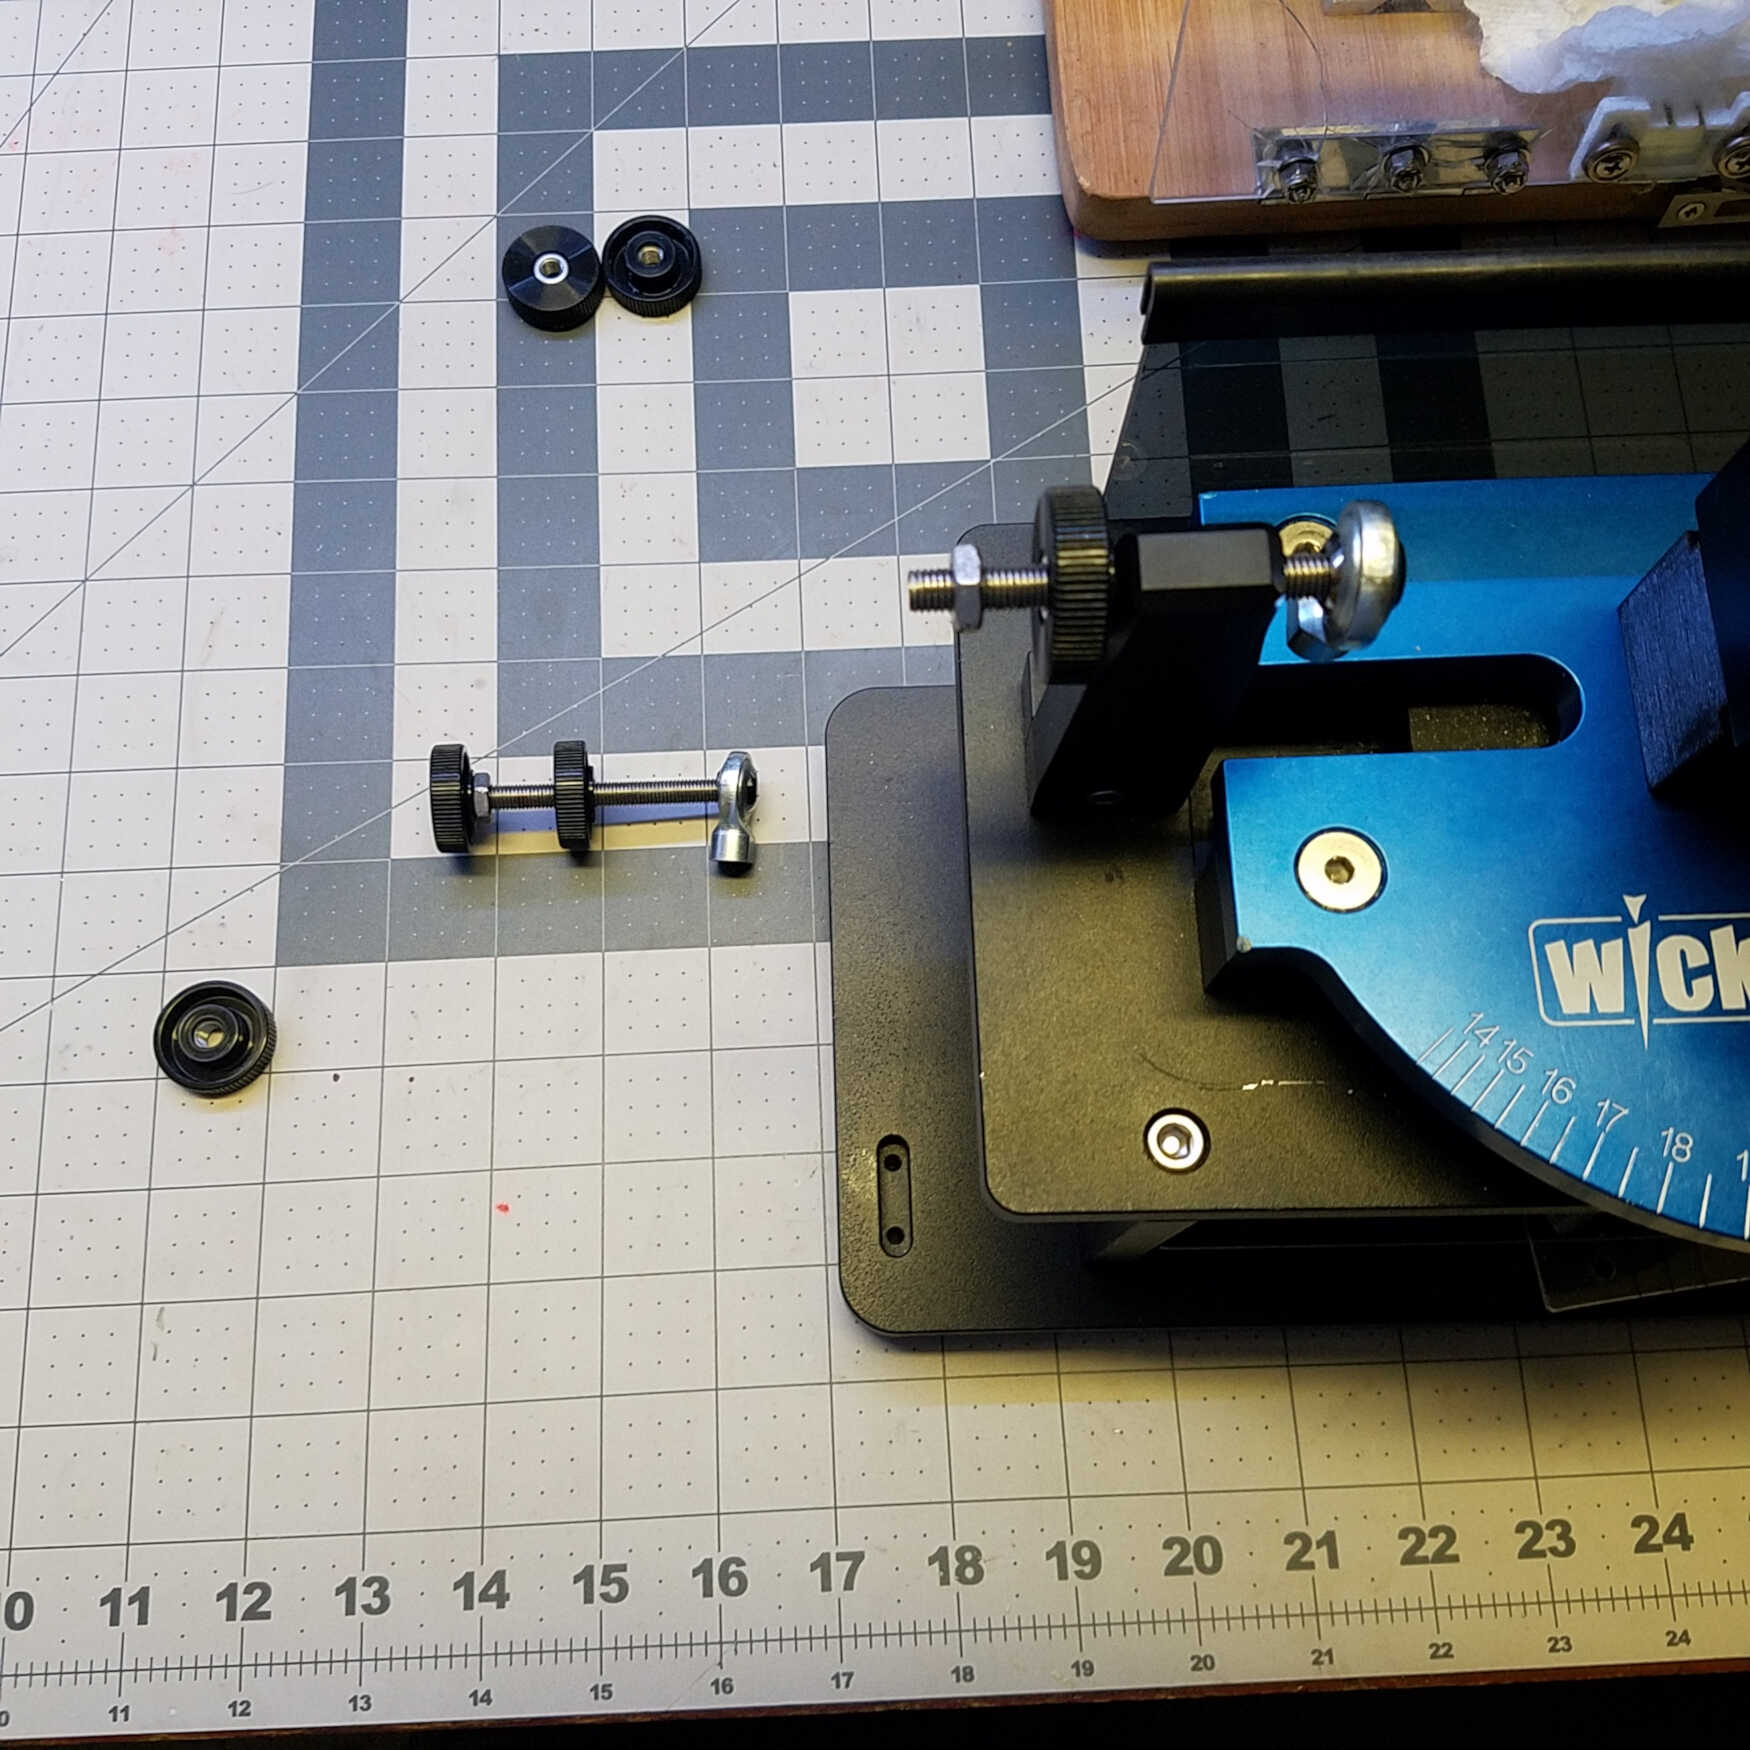
I’ve had some questions concerning what is included in the micro angle adjustment kit. I also wanted to post a detailed picture of how the kit is assembled. The mini L brackets in the top of this first picture are not included! They are there just to add size perspective. Those who have the Gen 3 Pro model will not need the spring loaded L lockdown screws. Rubber axle boots are available by request.
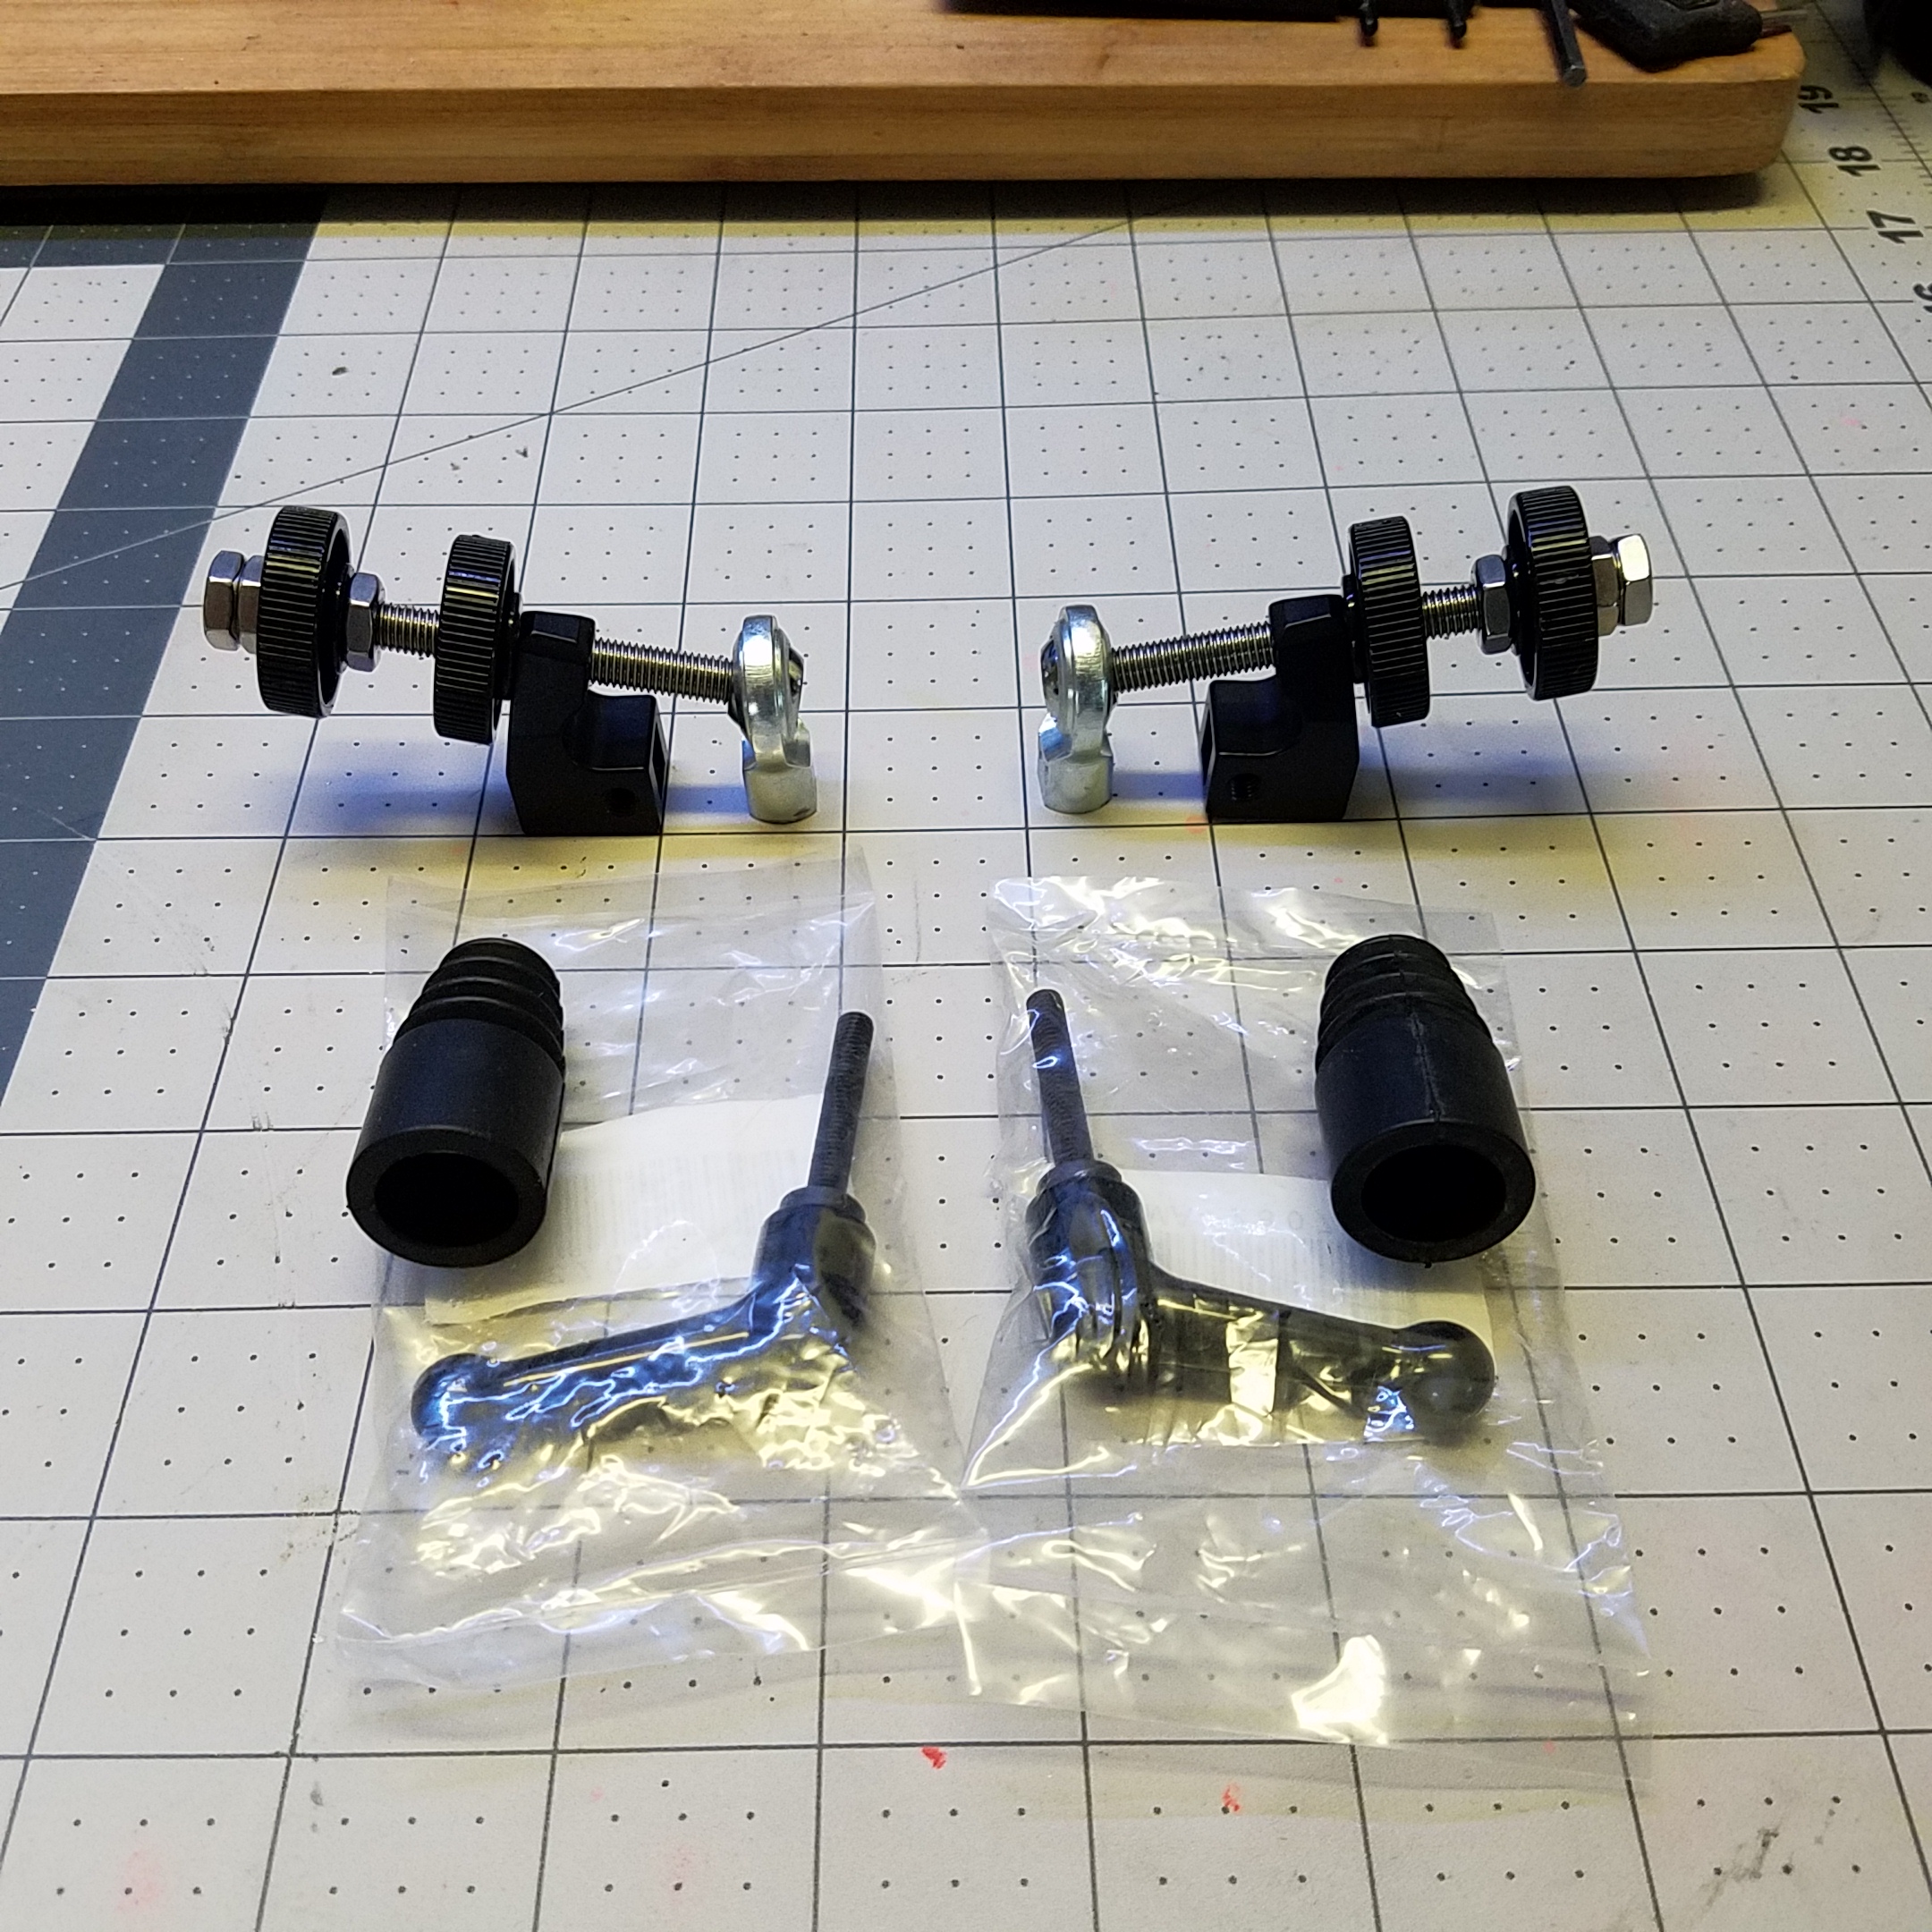 The first small picture, (below) shows my assembled adjuster with boots. Because I cut about 1/2″ off of the ball joint end I added a jam nut to the mod for those users who feel it’s needed to keep the guide rod locked tight into the shorter cut ball end. You may opt to not use it as the rod does tighten without one. Reducing the ball joint end allows the paddle to be lower relative to the blade edge. This helps a lot on the Gen 3 model when sharpening smaller (edge to spine) pocket knives. I use two jam nuts on the outer knob, which is probably overkill as well. It will work well with only the single inside jam nut. When using the spring loaded L screw, I’ve found that flipping the angle bar 180 degrees is how I like it best. This puts the now, not needed, angle positioning detents, on the back side and the smooth face to the front. This gives unlimited course angle adjustments with positive lock-down, by turning the handle from a 9:00 position to a 3:00 position, (after the handle’s positioning has been adjusted with the spring lock). I’ve never had my angle bracket loosen up or move with this setup. Others prefer to use the spring loaded L screw inserted into the screw on the backside of the L bracket avoiding the need to even rotate the square bar. Not easy to see in the photos, but the plastic knobs have plastic covering the pressed in nut on one side. On the other side the steel nut is visible. I put the plastic covered side facing inward to make contact with the L bracket. Again, I’ve never had my micro adjustment loosen up during sharpening. And, it doesn’t take much force to get positive lock-down. Ed K.
Just wanted to give a big shout out to Ed in coming up with the design and fabrication of the micro adjusters for my Gen 3 Pro. I am now able to through a complete set of stones with confidence that the screw won’t back out and screw up the knife I’ve been working on over the last two hours which has happened many times in the past. So worth the money I paid him!
3 users thanked author for this post.
09/17/2019 at 4:28 pm #52099There is no doubt they are an excellent addition and @tcmeyer deserves our thanks for the idea as well as Ed for making them available to all of us. My only hitch is that the brackets in the WE 130 are fairly short and I can’t get more out of the extenders. Even so, they are great. Many thanks tcmeyer and Ed K
2 users thanked author for this post.
09/17/2019 at 5:50 pm #52100I used my micro angle adjustments that I got from Ed today and they work great on my Gen 3 Pro. I found making small adjustment in the angles of the stones much easier and they never moved after tightening the knobs. Thanks to everyone that continue to come up with ideas to improve an already great sharpening system.
3 users thanked author for this post.
09/30/2019 at 7:10 am #52213About three weeks ago I told that I had been drooling those stainless steel Micro-Angle adjuster locking Mods for the Gen 3 Pro. I even tried to buy the parts from McMaster, but I did not get a shipping price to Finland. MarcH suggested that I should contact Ed and he would take care of me. I had no idea how well he would take care of me…
I asked Ed about the stainless steel micro angle adjustment kit that he does not really want to make any longer. It is a lot of work to make them and the parts are a bit expensive. After couple of pm’s he kindly offered to sell HIS OWN KIT for me and ship it to Finland! Can you believe it!? This man is super nice and helpful.
The kit looks gorgeous and the function is now superb. It is so much nicer to sharpen the knives when you don’t have to check the knob tightness all the time. Making the adjustments is also way easier.
Thank you Ed.

-
This reply was modified 4 years, 6 months ago by
 Lay. Reason: Corrected some typos
5 users thanked author for this post.
09/30/2019 at 7:51 pm #52224Thank you Lay for the kind endorsement.
I can always make another set of stainless for my rig, but the plastic knobs work as well. If I make the plastic set for others, I need to test and use them as well.
This post is to answer some questions I’ve had once forum members get their “kit” – I like that term. I work with many folks from far off lands and they use “kit” like we in the U.S. use “stuff.”
So, in the pictures that follow, I hope to show how the adjusters are installed. I personally have a “post” 2017 Gen 3 Pro. For those who have an earlier model, the lock down knob is on the other side of the stanchion. More on that later..
The picture below shows the parts and the stanchion with the original adjuster removed.
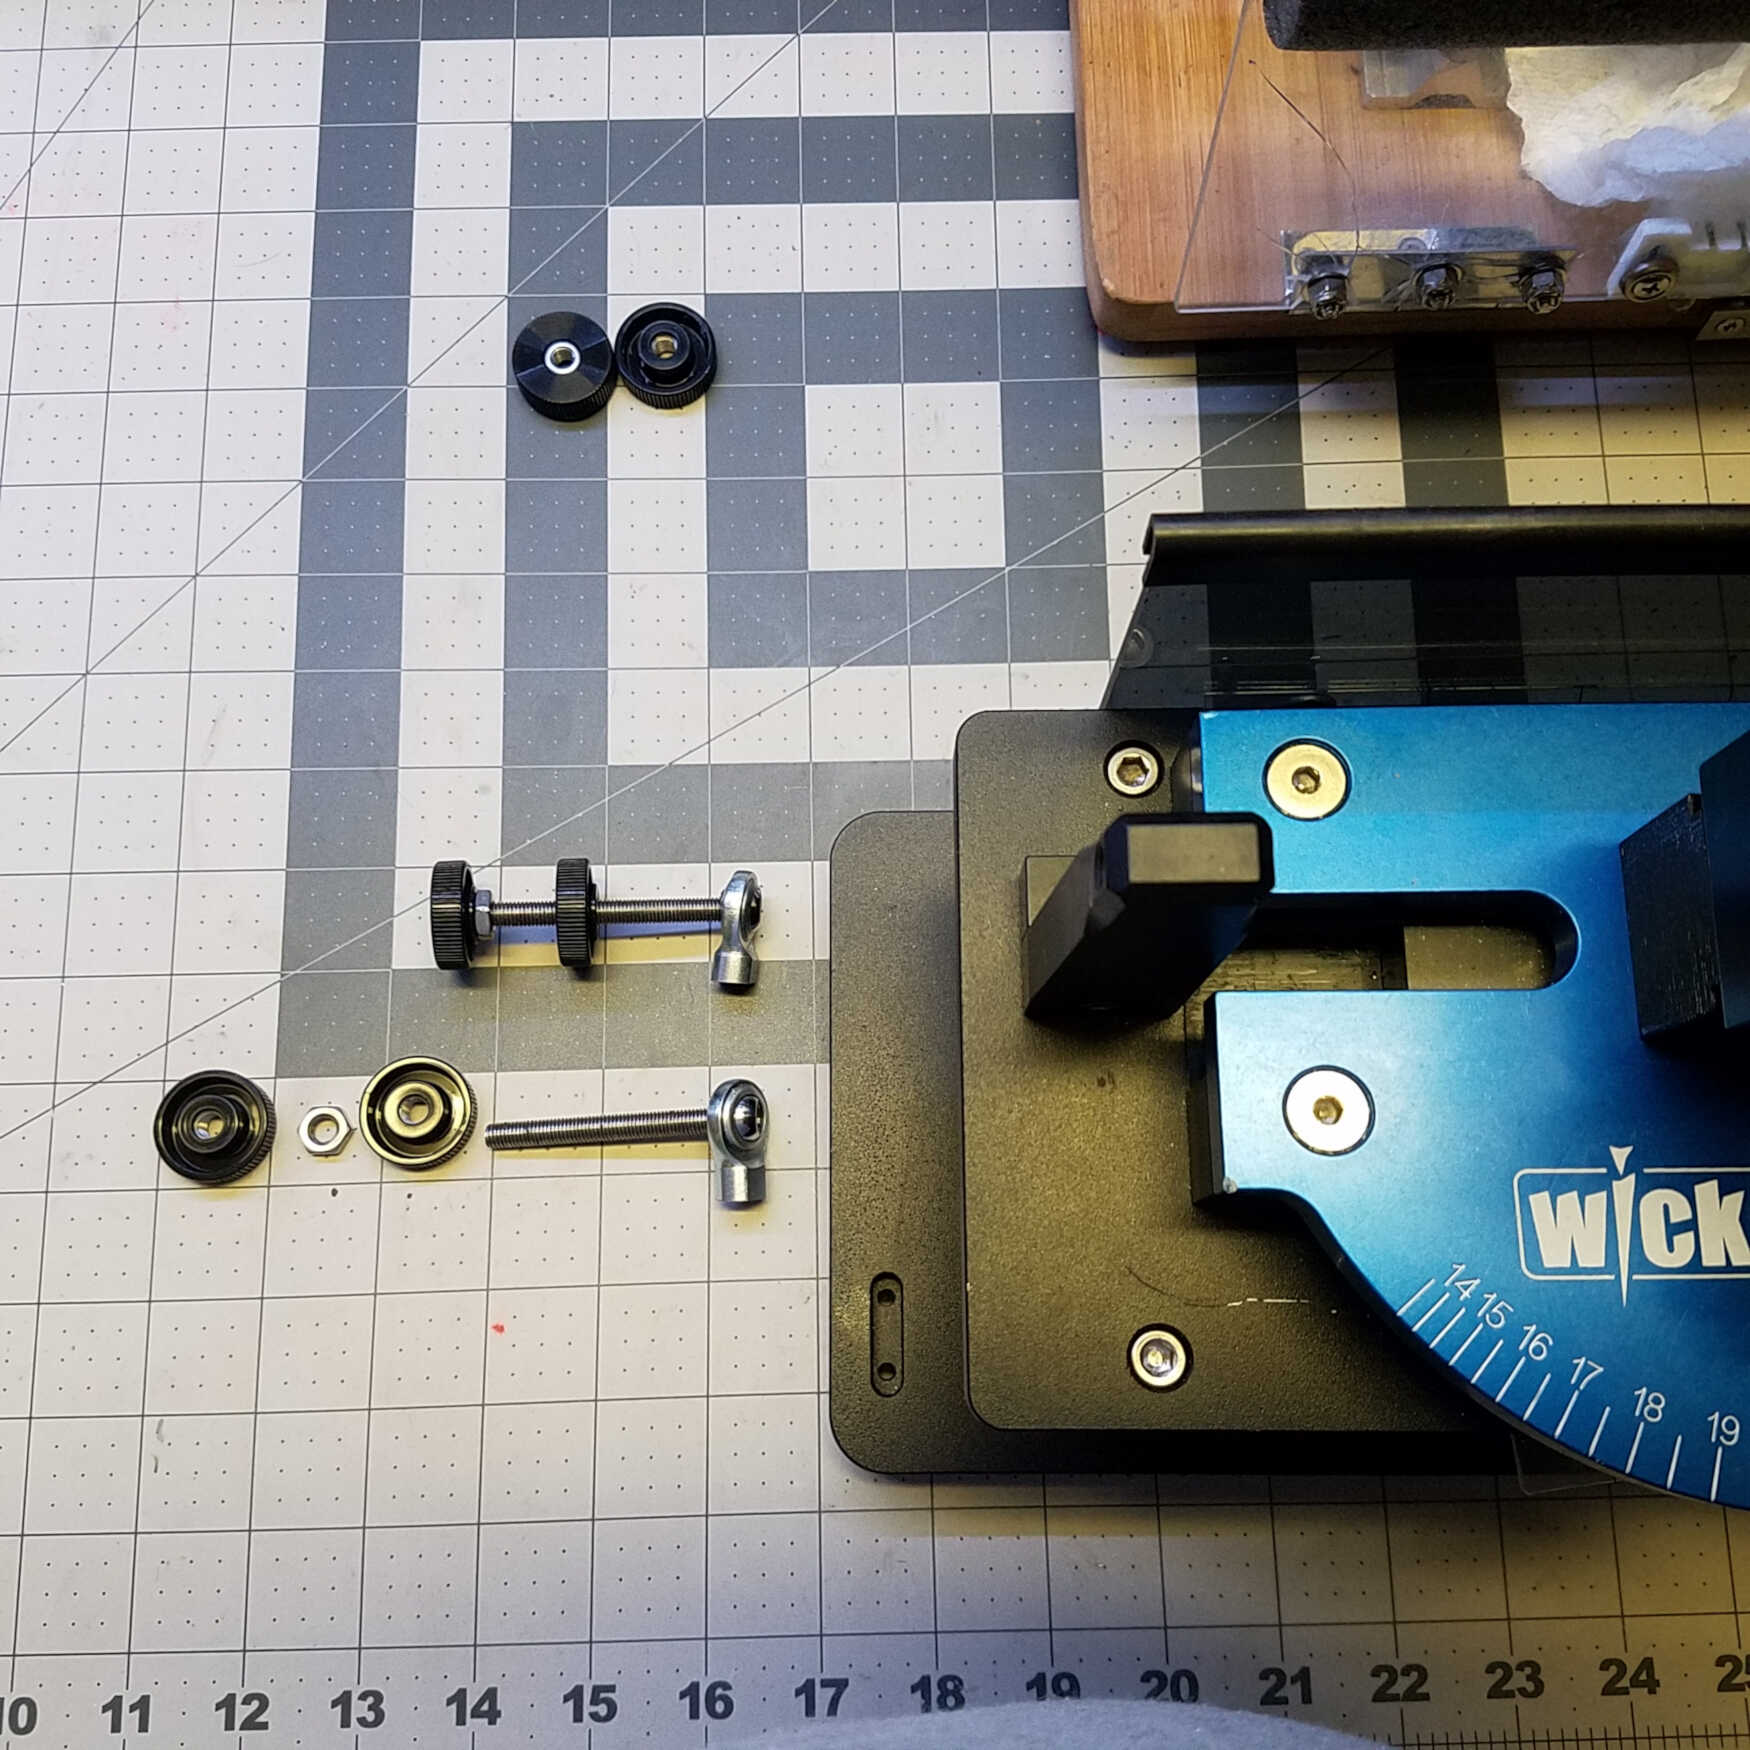
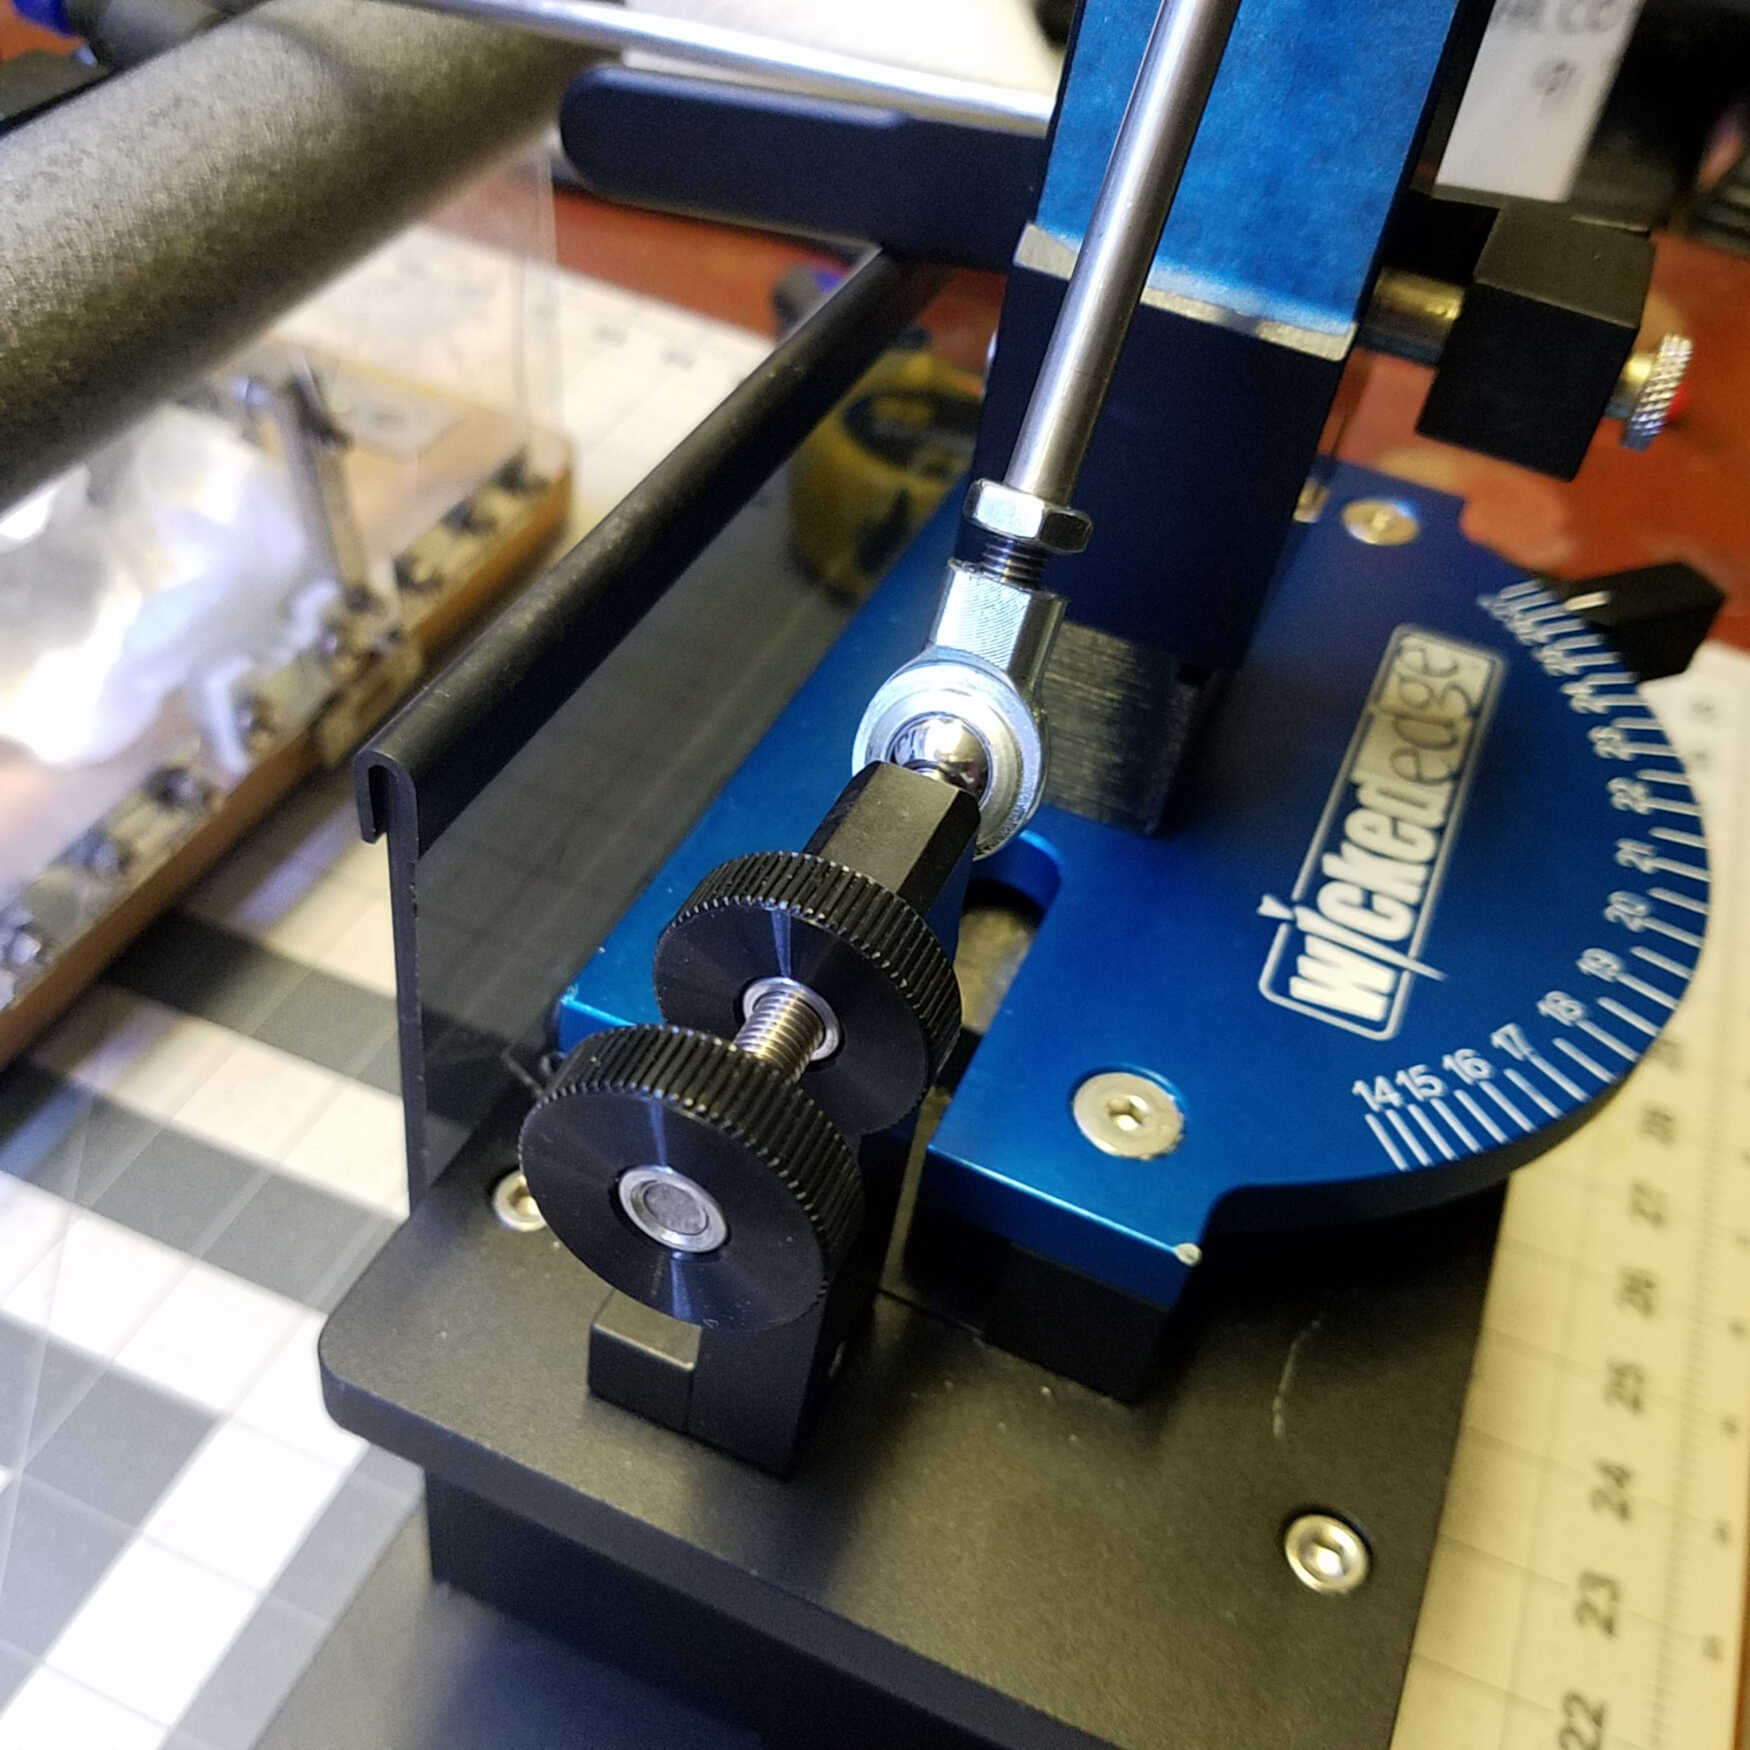
First, insert the threaded rod into the stanchion from the inside out.
Next, thread the plastic knob onto the exposed rod. Notice the two knobs in the photo at the top. One side has the nut covered and the other side it is bare. Thread the knob with the covered side toward the stanchion.
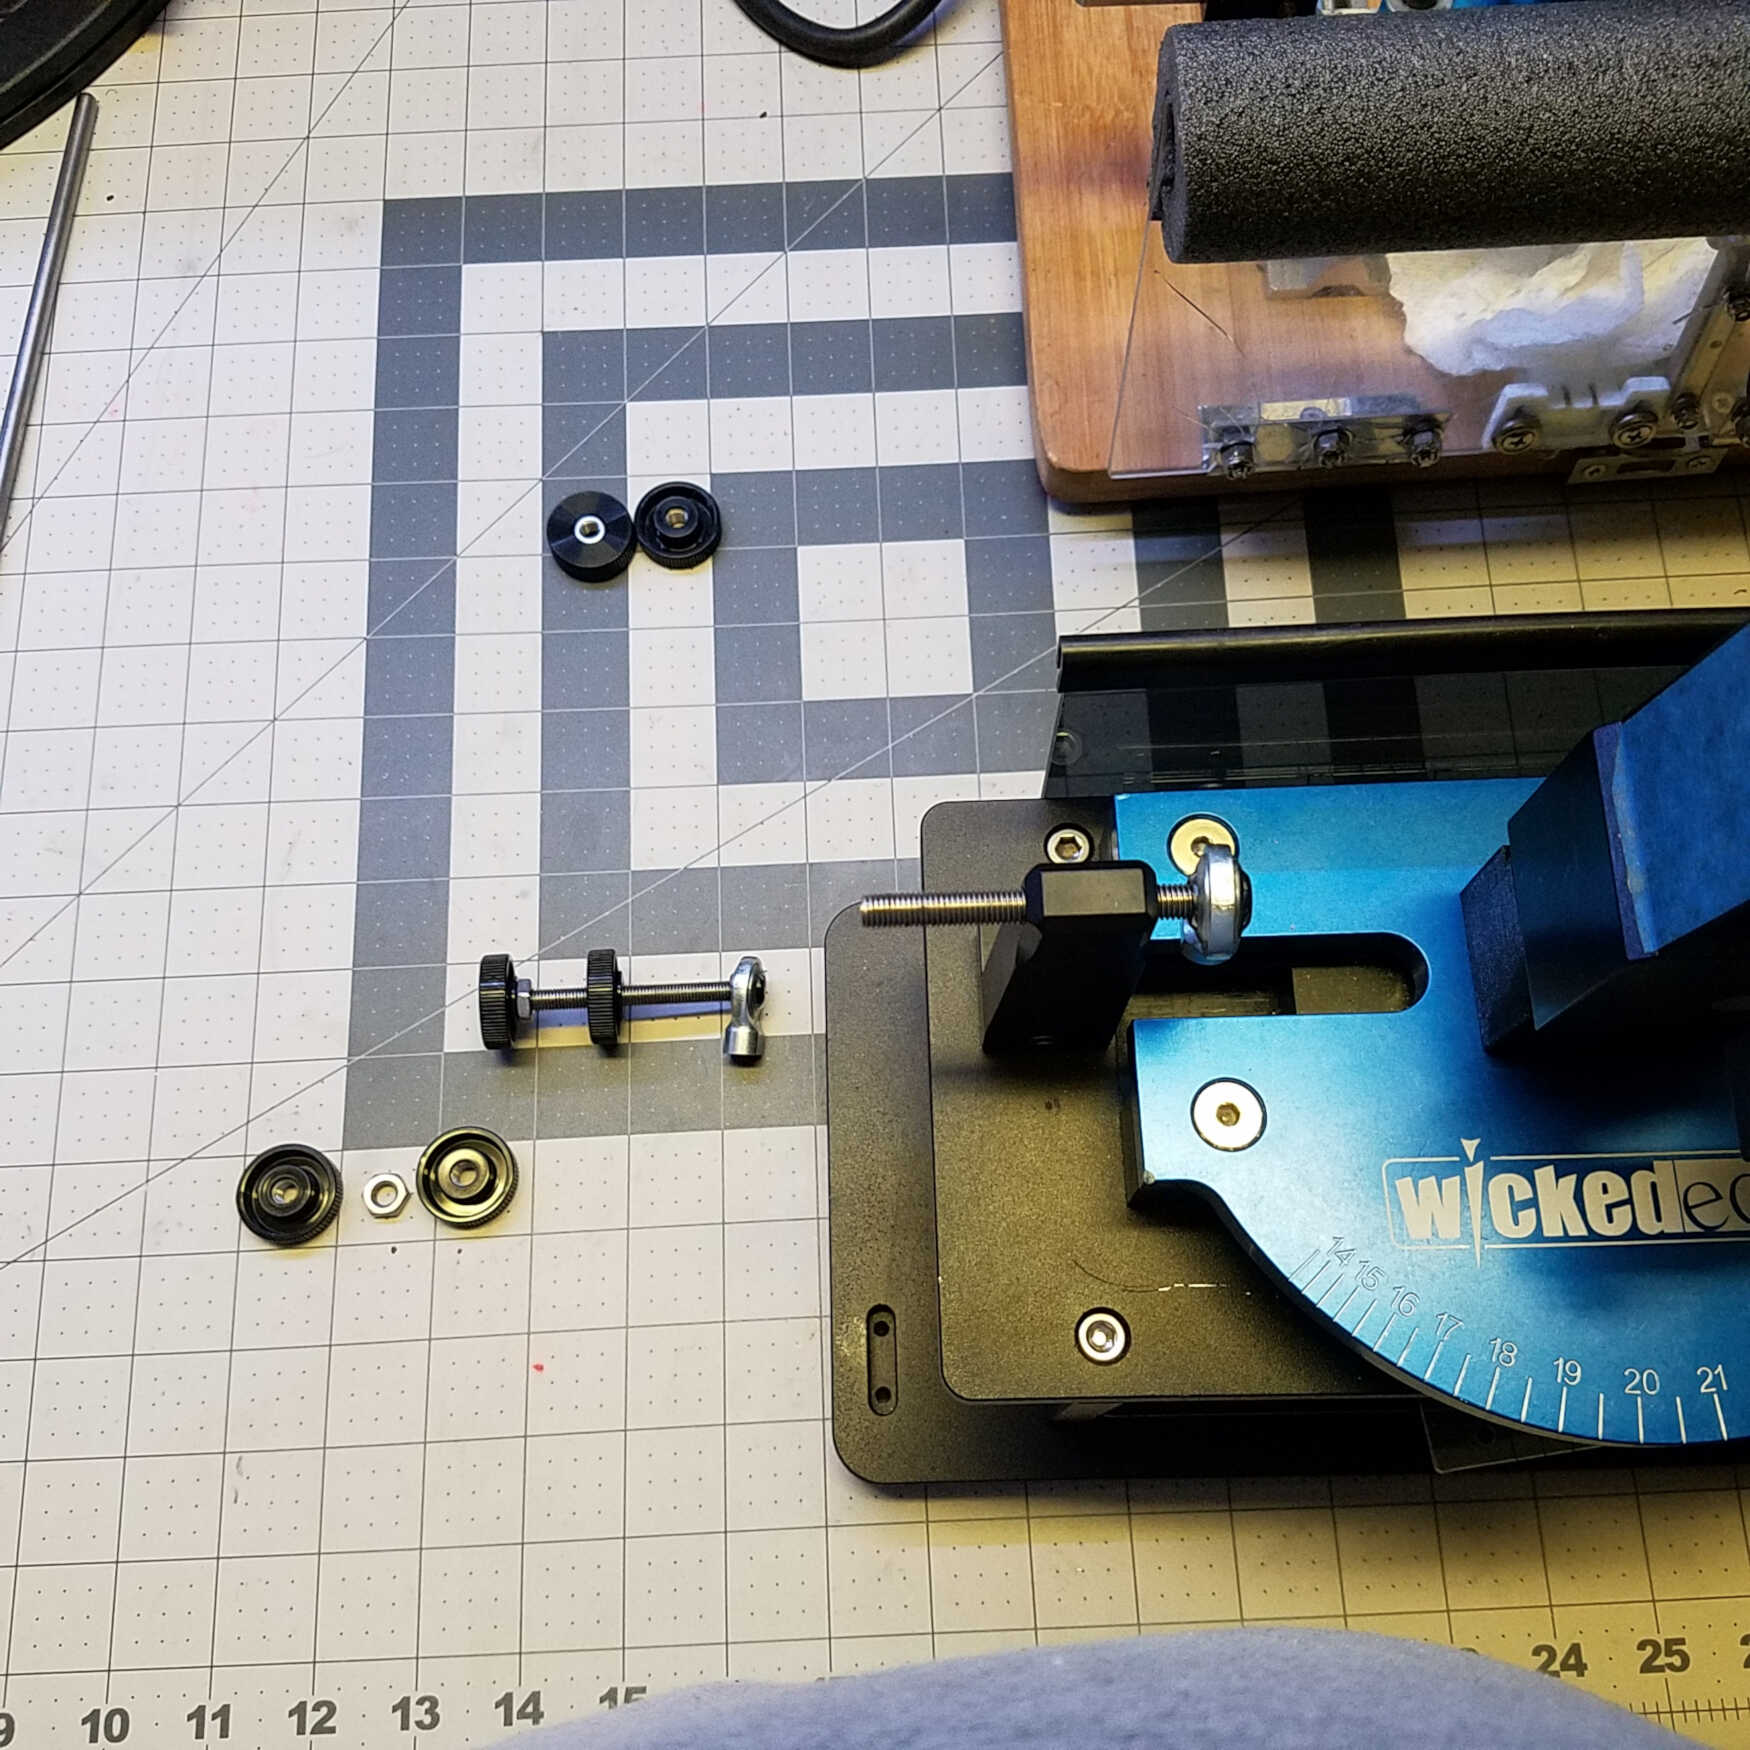
Thread the jam nut onto the rod with enough room for the second knob to be added flush with the end of the rod.
Then thread the outside knob onto the rod until it is flush. The rod should not protrude outside the knob edge.
Reached my limit on adding files – see next post.
Attachments:
You must be logged in to access attached files.
1 user thanked author for this post.
09/30/2019 at 8:11 pm #52230Continued….
Then thread the outside knob onto the rod until it is flush. The rod should not protrude outside the knob edge.


Almost done, snug the knob and the jam nut together. Hold the knob and turn the nut into the knob with a wrench. It doesn’t take much force for the jam nut to lock the knob in place.
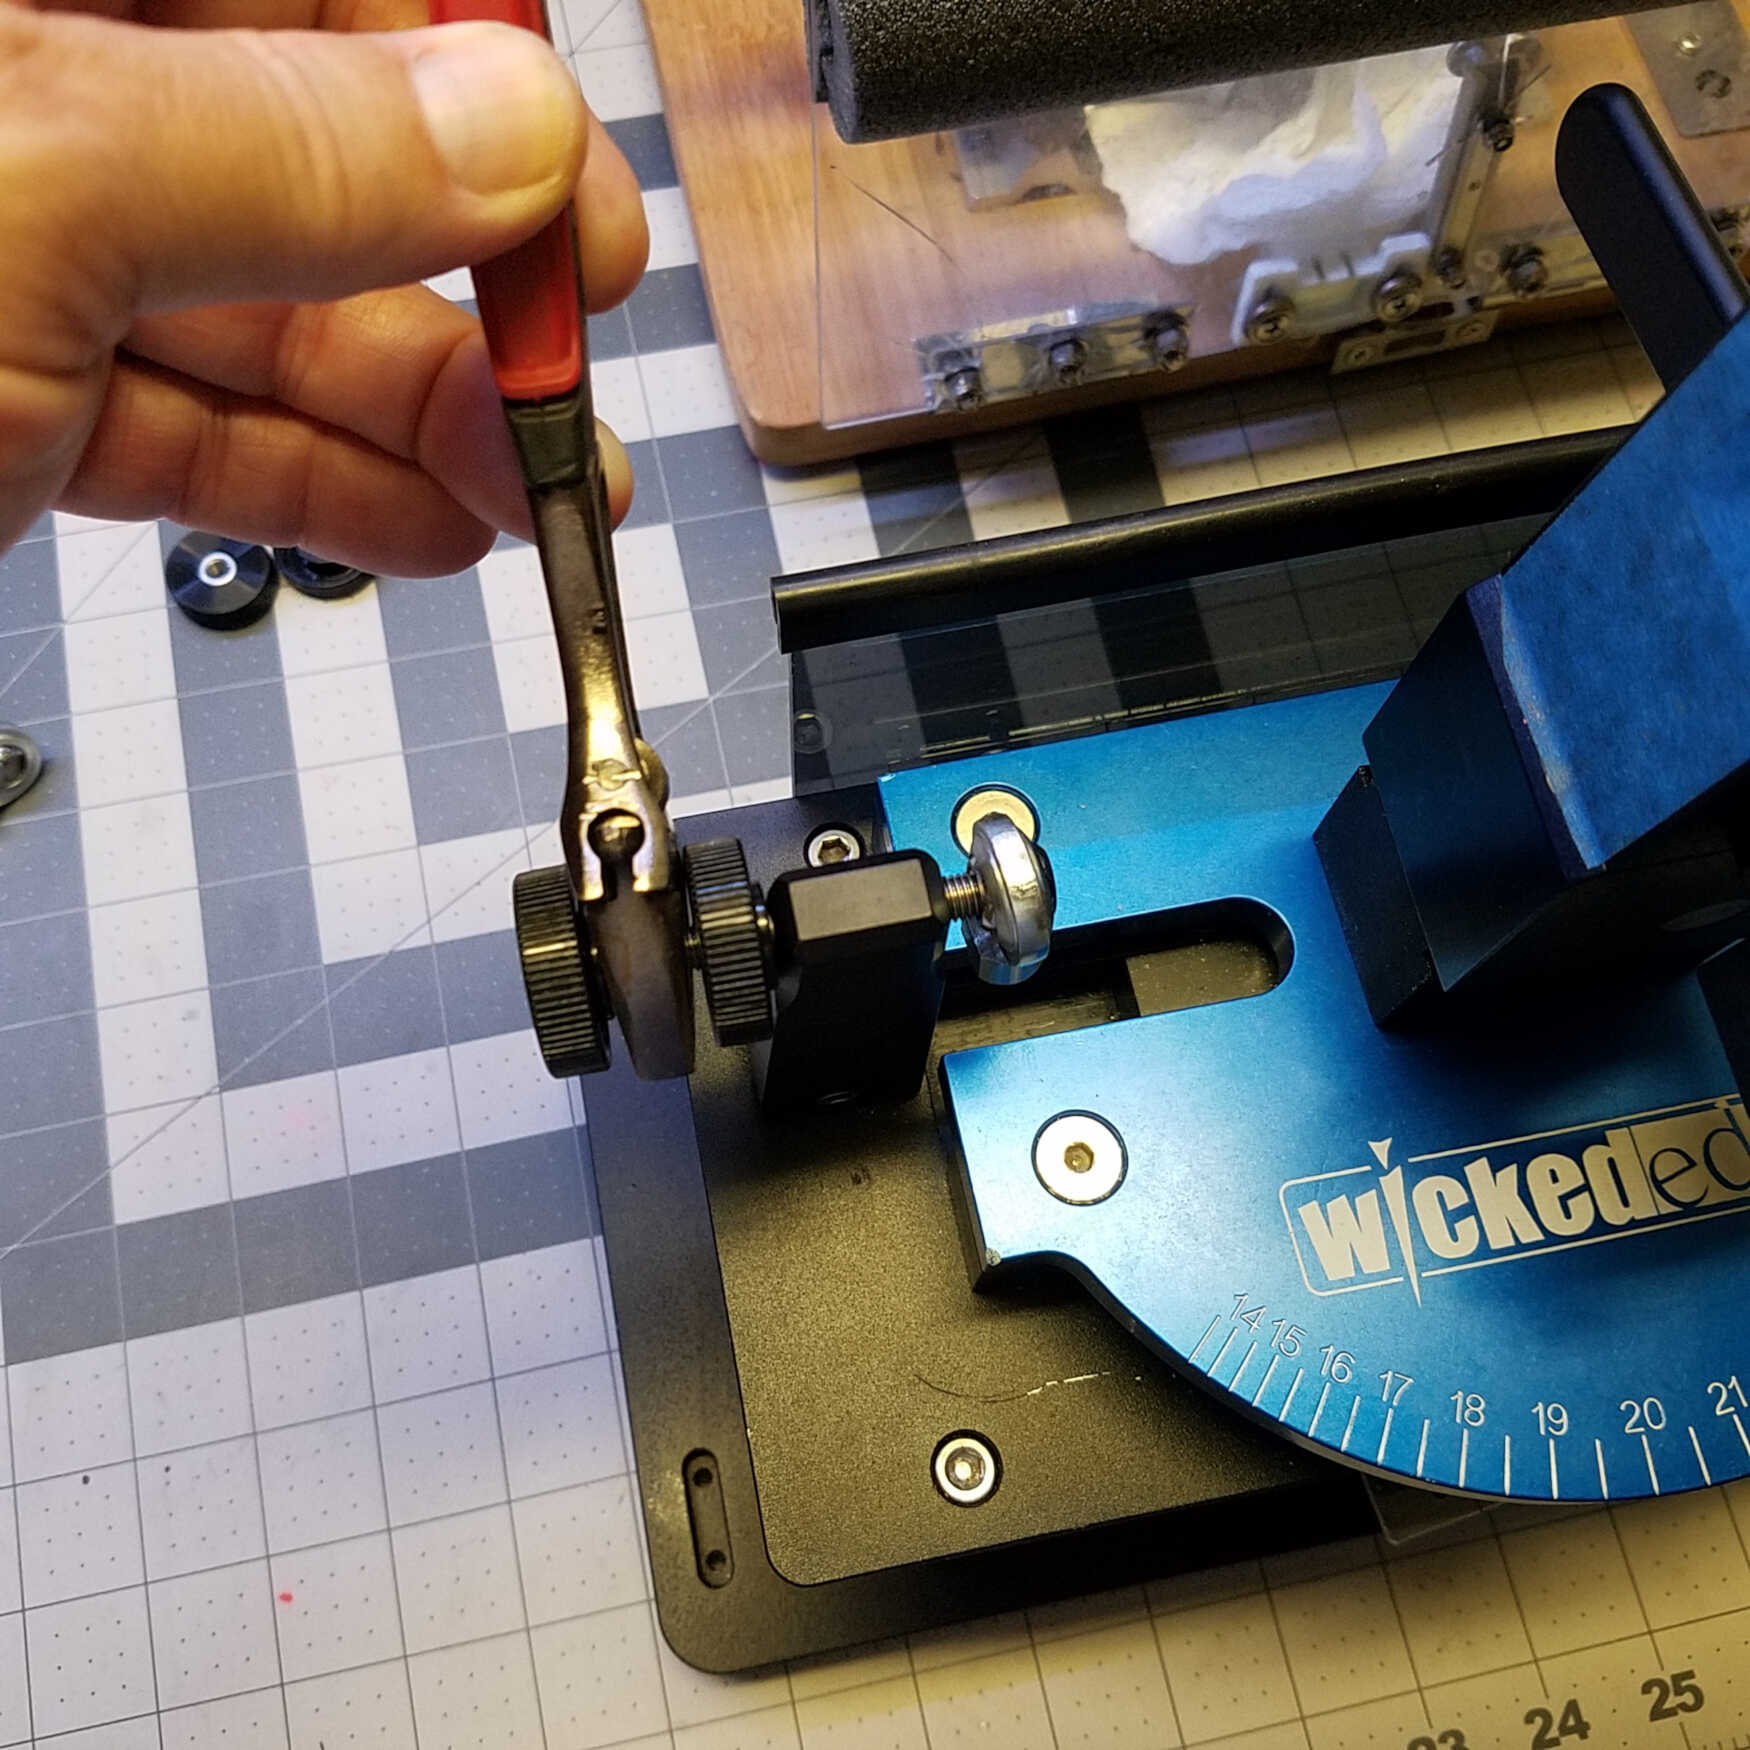
Now thread your guide rod into the ball joint sleeve. I cut the ball joint sleeve down 1/2″ from what is the stock ball joint. This allows the paddle to sit lower in relation to the vise jaws. In the picture, I provide a jam nut to lock the guide rod into the ball joint because there are less threads to keep it tight. I do believe the jam nut is not needed, but it’s for those who wear a belt and suspenders just to be safe!
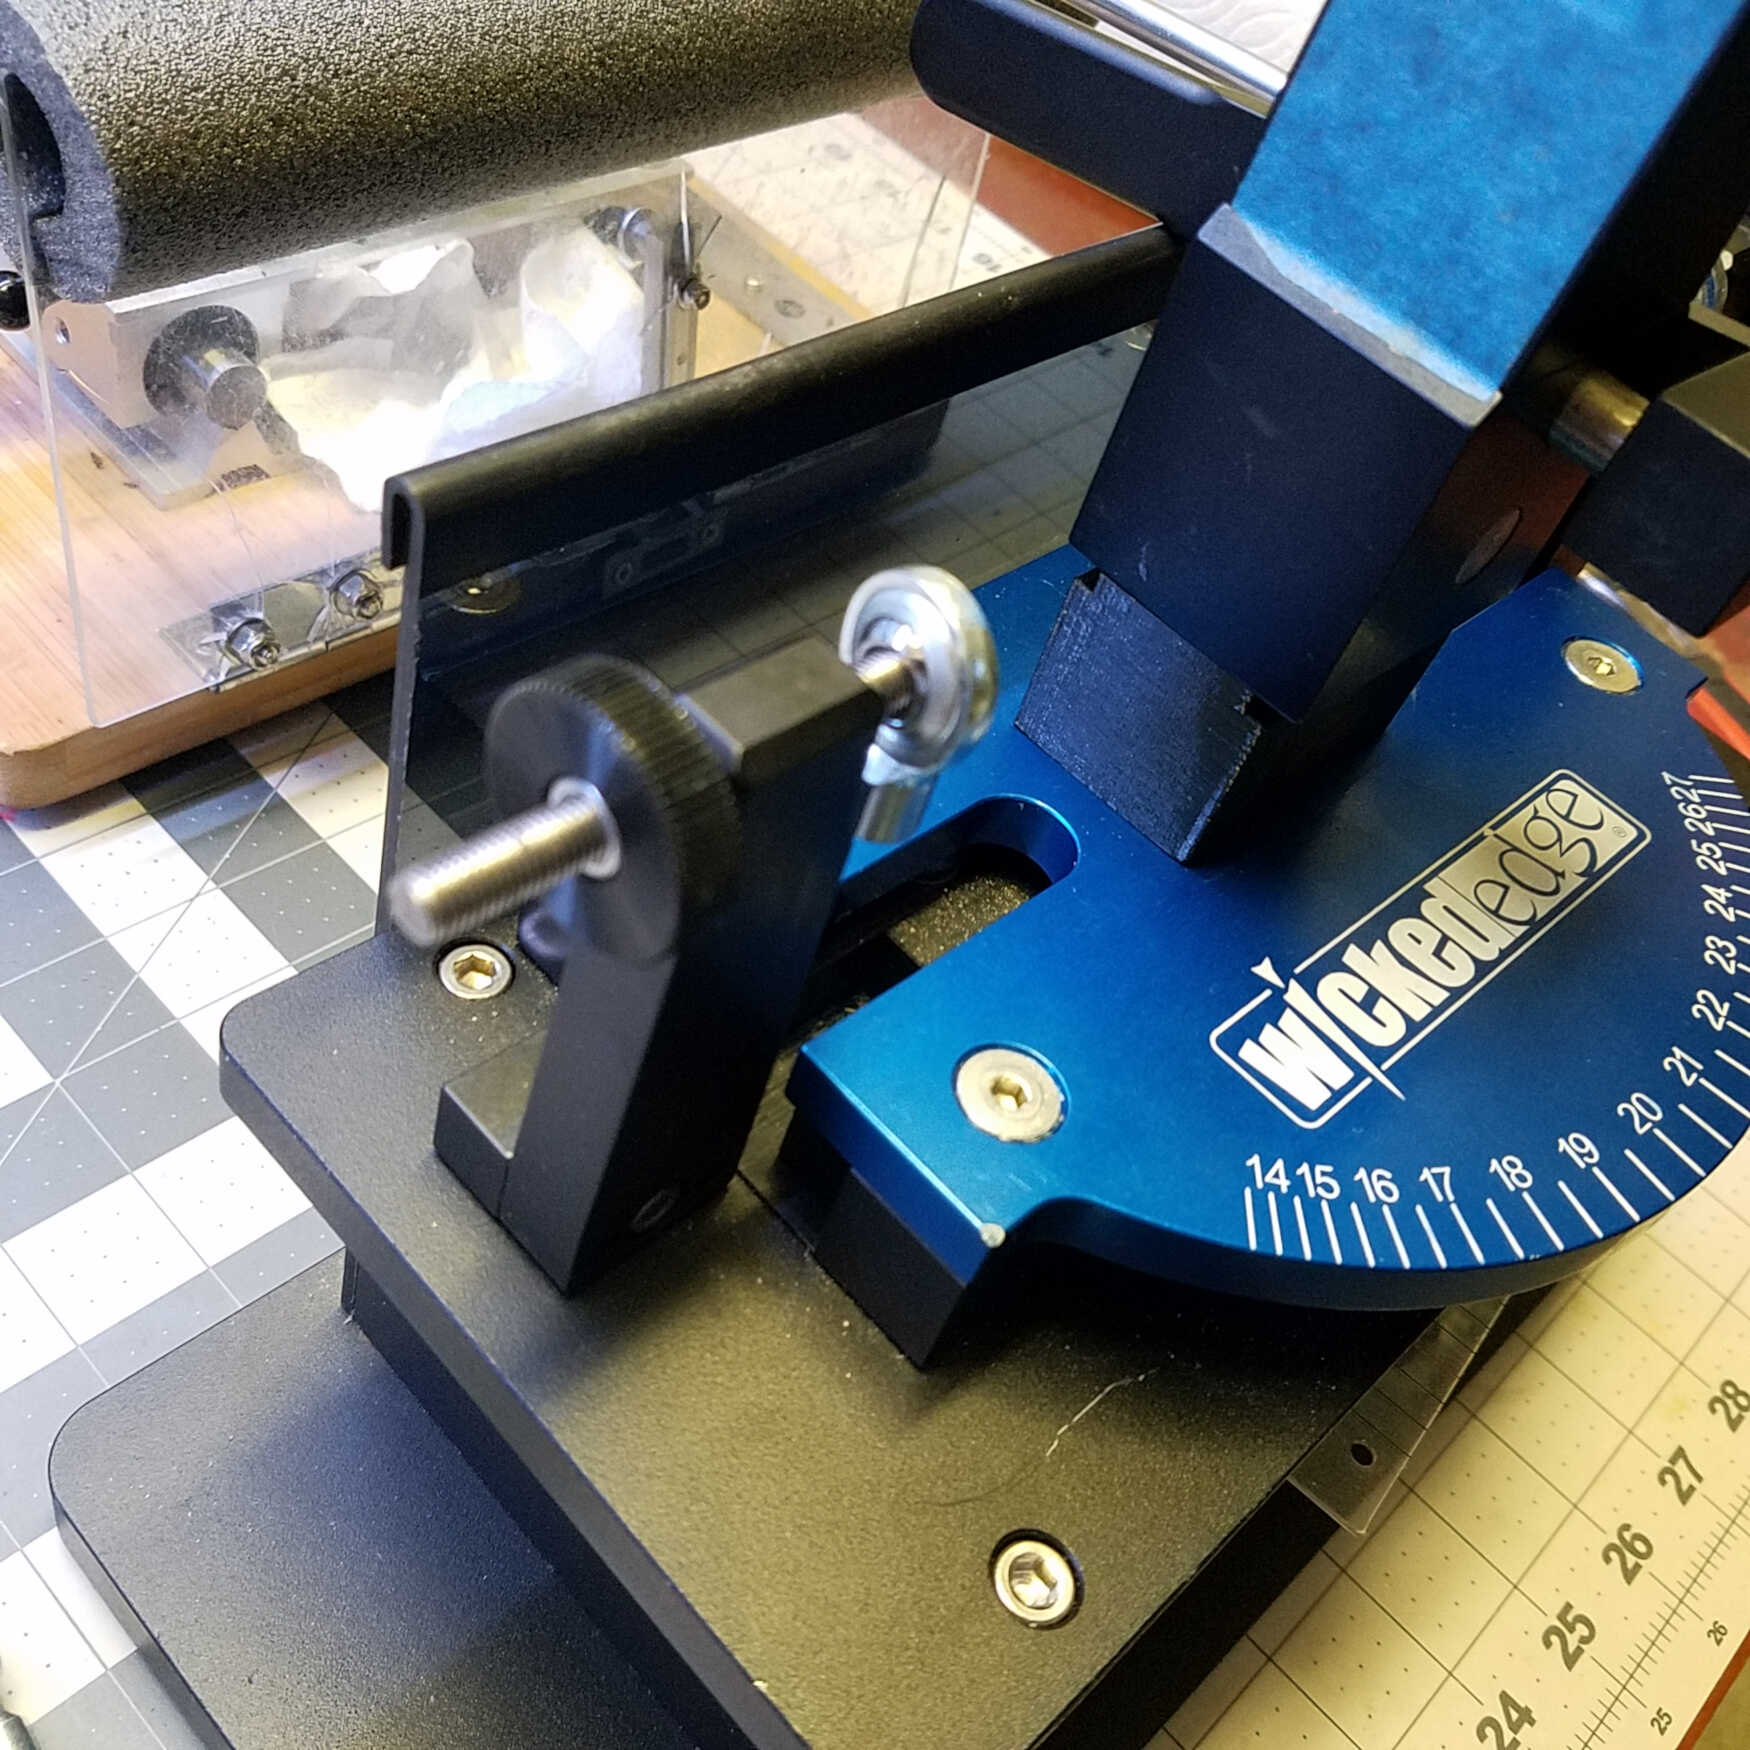
If you sharpen pocket knives on the Gen 3 Pro, you will be able to use more of the diamond stone. In fact, I installed a riser block to raise the vise up about 1.5″ on my Gen 3 Pro.
If your Gen 3 model has black screws on the blue faceplate (pre 2017 model), the outside edge of the stanchion is slanted toward the vise and the inside edge is vertical. On those models, put the plastic knob on the rod next to the ball joint before threading the rod into the stanchion.
Once again reached my file limit….
Ed K.
Attachments:
You must be logged in to access attached files.
09/30/2019 at 8:19 pm #52236Continued #2.
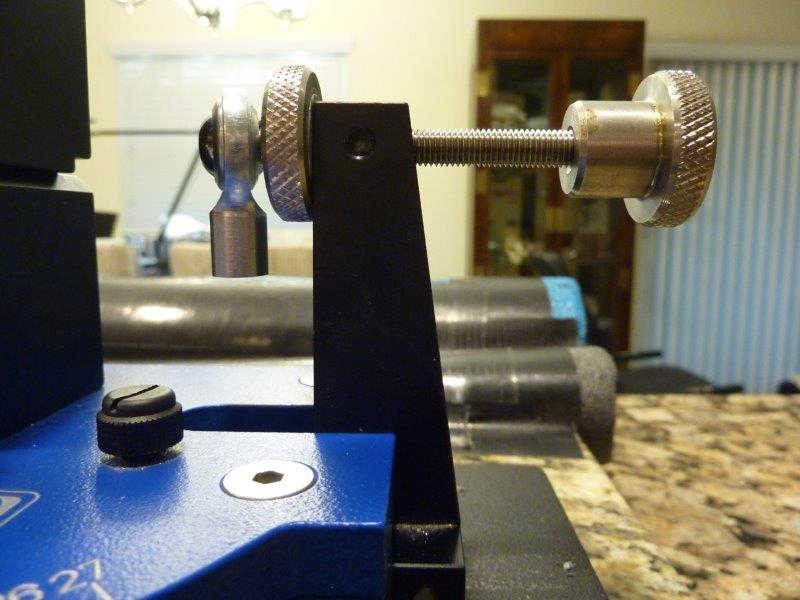
The last picture is of MarcH’s pre 2017 Gen 3 Pro. You can plainly see the black screws on the faceplate which my model does not include.
He has installed a set of stainless knobs, but notice that the lock down knob is on the inside where the stanchion is vertical not slanted. That provides the knob more area to tighten against. When installing the plastic knobs on the inside of the stanchion, make sure the plastic covered side is toward the stanchion.
Ed K.
-
This reply was modified 4 years, 6 months ago by
 NotSharpEnuff.
-
This reply was modified 4 years, 6 months ago by NotSharpEnuff.
Attachments:
You must be logged in to access attached files.
1 user thanked author for this post.
10/01/2019 at 2:45 am #52240Lay: Now that you have the ultimate in micro-adjustments, you need to add the final piece. I have rotation scales on my rigs, so I know how much I am moving the adjustments. See the photo here:

This is pretty easy to make, either by hand or with a computer. The scale is cut from from a piece of printer paper, 50.8 mm long by about 9 mm wide. Divide it into ten divisions, labeled 0 through 9.
For most knives, one complete rotation changes the angle by about 0.3 degrees, so each division is about 0.03 degrees. This is particularly handy if you want to adjust the angle by -0.8 degrees. 0.80 divided by 0.03 is about 26.7, so you’d turn the knob in about 2.7 turns. Unless the knife has a very broad blade (like a wide chef’s knife), you’ll be pretty close to the right angle settings. Most adjustments are much smaller, so I will usually make the appropriate adjustment, then proceed without confirming the angle. I’ll be confident that I’ll be within one or two tenths of a degree. Two tenths of a degree is the equivalent of about 12 inches at 100 yards, or about 60 mm at 100 Meters. Not enough to buy a cup of coffee.
You can attach the scale to the hub (smaller diameter portion of the knob) with almost any adhesive. Library paste is a good choice. I positioned the “0” directly over the set screw, so I’d remember where it is and not have to replace the scale every time I needed to remove the micro-adjust.
The angular accuracy you experience is dependent a good deal on your measuring discipline. The digital angle cubes (all of them) are very sensitive, so any vibration will cause them to bounce, even someone walking by your workstation. I’ve found that you can eliminate 90% of that erratic behavior by applying some steady pressure with your hand/fingers, holding the gauge against the stone while it is on the knife over the centerline of the vise. To further eliminate errors, I always place the stone on the knife edge so that the stone has about 20 mm extended above the knife edge. If you make a small adjustment and want to get an updated reading, momentarily lift the gauge/stone from the knife, then replace it and reapply pressure. This will make the gauge “forget” its previous reading and settle in for a new one.
6 users thanked author for this post.
10/01/2019 at 4:33 am #52241Thank you tcmeyer for the great tips.
About the knob numbers. That looks really practical but I’m just the type of guy who want’s to keep everything as “clean and minimalistic” as possible. It might not be as functional but that is just me. I even have a custom Playstation 4 controller with all the button markings off 😀 Luckily it is quite easy to learn how much turning is needed to get the desired change and then make the final adjustment with the angle cube.
After doing re-calibration for my DXL360S the accuracy is great for all the sides. Within 0.02 degrees. Before the re-calibration there was a 0.08 degrees variation between some sides of the angle cube. So far I have just lowered the stones gently against the blade to get the reading (centerline of the vise). If I make minor adjustments I have just lifted the stone and gently lower it back against the blade to get an accurate reading without touching the gauge or stone. I have not tried to apply any pressure to the gauge & stone. I will try how it works for me.
-
This reply was modified 4 years, 6 months ago by Lay.
-
This reply was modified 4 years, 6 months ago by Lay. Reason: Removed off topic part to another thread
2 users thanked author for this post.
10/01/2019 at 12:58 pm #52248This is what I did with the extra nuts that Ed sent out with my shipment, I stuck them on the end of the outer knob. Then I snugged them both down using a couple of wrenches. I know I’m compromising stone angle by the nut width but I feel like it locks the entire assembly down tight. Three weeks now and zero incidents of loose hardware.
Attachments:
You must be logged in to access attached files.
2 users thanked author for this post.
10/09/2019 at 3:40 pm #52334Just a couple more pictures of my “portable” sharpening station with the latest additions .
Attachments:
You must be logged in to access attached files.
5 users thanked author for this post.
10/09/2019 at 4:15 pm #52338I must add to my above post that the stones stand draws heavily on MarcH’s idea, mine is more “compressed” to fit the width of the top used. My thanks and gratitude to MarcH for his help and guidance, many thanks to tcmeyer and NotSharpEnuff for sharing the great ideas and talent.
2 users thanked author for this post.
10/13/2019 at 10:27 pm #52363Just a couple more pictures of my “portable” sharpening station with the latest additions .
Wow this is pretty cool… I’m getting the Gen 3 Pro but it sits so high, I have been looking for a height adjusting table
1 user thanked author for this post.
10/14/2019 at 3:18 pm #52370Rumor has it that WE is coming out with an adapter kit to lower the Gen 3 Pro, but it hasn’t been seen yet. You could do like others here, myself included and go to your local hardware store and pick up the necessary hardware and lower it yourself. Easy job.
2 users thanked author for this post.
10/16/2019 at 12:56 pm #52381Rumor has it that WE is coming out with an adapter kit to lower the Gen 3 Pro, but it hasn’t been seen yet. You could do like others here, myself included and go to your local hardware store and pick up the necessary hardware and lower it yourself. Easy job.
Couldn’t we just get a higher chair, or a chair that has vertical adj? Reason is that such is easier to adjust vs. making a potentially permanent adjustment to the WE unit which changes depending on knife width, etc…
-
This reply was modified 4 years, 6 months ago by
-
AuthorPosts
- You must be logged in to reply to this topic.