Mirror Edge PM2
Recent › Forums › Main Forum › Knife Photos › Mirror Edge PM2
- This topic has 12 replies, 6 voices, and was last updated 05/12/2012 at 9:16 am by
Robert Borowski.
-
AuthorPosts
-
04/19/2012 at 11:18 am #2840
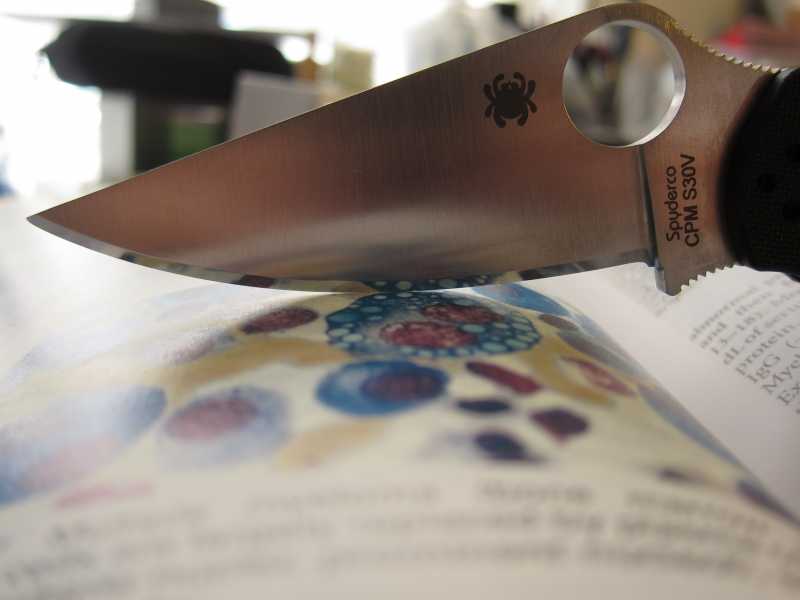
Here is one of the first blades I put through a whole progression on my wicked..been very busy lately and didn’t want to rush it! Came out pretty good. It’s screaming sharp (passes the hanging hair test no problem) and it reflects real nice (see below).
Here are some pictures with a piece of Navajo horsehair pottery and some reflected pictures of my pathology textbook.. I such a nerd..but it was sitting on my desk at the time.. They are malignant melanoma cells if anyone is wondering. ha
Enjoy!
Attachments:04/19/2012 at 11:54 am #2841Very nice pottery! Beautiful knife! Superb edge!And the photography ain’t too shabby either! LOL!
Well done sir!Cheers
Leo04/19/2012 at 12:34 pm #2842Sweet! Beautiful edge, beautiful photos! Very nicely done.
-Clay
04/20/2012 at 1:01 am #2852Thanks, I think some of the photos could be improved but not bad for my first attempt.
Everything went well I just have a few small critiques/problems. I had a few mm of unsharpened blade by the heel. This was because of the extra plastic boarder on the blocks of the stones. I think the problem may have been the placement of the blade in the grip. It was placed pretty far forward. The heel was about the in center of the grip. This was mainly because it felt more comfortable for me (the strokes were mostly forward). It was placed so the stones started at 90 degrees and went forward. Would moving it back a little may catch more of the stone because it will be at an angle.
Also I had a small problem with the point on this blade which is very pointy. The edge was as sharpe as the rest of the blade but the actual piercing point needs a little work. Any suggestions? Is it technique? I think taking off a little of the spine would restore the point but I don’t want to do that unless I decide to sharpen the first 1cm of the spine. (my SOG bowie 2.0 is like that and it pretty cool)
thanks for any suggestions!
04/20/2012 at 3:20 am #2853Good questions. The stones aren’t hitting all the way to the heel of the blade because of the choil; this is really common with Spyderco knives. At the moment, the only solutions are to either trim the plastic from one side of your stone handles or use the thicker waterstones. Another possible option is to remove the stones from their handles, add a spacer piece and then mount the stones to the spacer for extra height.
For the tip, I’d recommend mounting the knife more centered in the clamp with the tip closer to the vise. You can use this guide: Finding the Sweet Spot to help find the right position. It also helps not to over-rotate the stones on the rod as you approach the tip. If you imagine keeping the stone in the same plane throughout the stroke and adding just a tiny bit of pressure with your thumbs, you’ll be able to get the tip needle sharp.
-Clay
04/20/2012 at 6:55 am #2854Good questions. The stones aren’t hitting all the way to the heel of the blade because of the choil; this is really common with Spyderco knives. At the moment, the only solutions are to either trim the plastic from one side of your stone handles or use the thicker waterstones. Another possible option is to remove the stones from their handles, add a spacer piece and then mount the stones to the spacer for extra height.
For the tip, I’d recommend mounting the knife more centered in the clamp with the tip closer to the vise. You can use this guide: Finding the Sweet Spot to help find the right position. It also helps not to over-rotate the stones on the rod as you approach the tip. If you imagine keeping the stone in the same plane throughout the stroke and adding just a tiny bit of pressure with your thumbs, you’ll be able to get the tip needle sharp.
Good call Clay. I had to do this on some of my stones… I took them to my belt sander and removed the plastic shoulders… helped immensely! What I do on my Para 2 is this….
- I don’t use any double sided tape or anything to help clamp it in
- I actually clamp it in all the way at the base of the blade (on the flat part near the heel… Where you can see the “s30v” and where it was made, etc.
- I then tilt the tip downward towards the base and do this while I have my stone on the rod propped up against the edge. I do this so that way I can see exactly the point at which the tip is perpendicular to the stone itself. In theory this will maintain a consistent angle all the way through the edge because the stone will always be perpendicular to the edge (since the joint at the base of the rod arm is fixed).
I’ll try to take some photos soon of this… what progression and how many passes did you do roughly on each?
04/20/2012 at 1:15 pm #2861My goal is to get a mirror edge but want to be sure of my skills first. What angle did you put on that blade? I put a 17 degree angle on one of my knives, but it chipped the first time I used it. I assume it because it was too thin, but maybe it was the quality/hardness of the steel. Any ideas?
04/20/2012 at 2:07 pm #2862My goal is to get a mirror edge but want to be sure of my skills first. What angle did you put on that blade? I put a 17 degree angle on one of my knives, but it chipped the first time I used it. I assume it because it was too thin, but maybe it was the quality/hardness of the steel. Any ideas?
I am relatively new to the wicked edge system but I am not so new to knives so I am speaking more on that experience.
The angle that I used was 15 degrees and I used the following progression (I am not sure if I already posted this).
100–>200–>400–>600–>800–>1000 with diamond stones then I swiched to balsa strops with the follwing diamond pastes 14–>10–>5–>3.5–>1.0–>0.5 micrometersI spend most of the time stropping and it did take some effort but that’s expected and is half the fun!
I did this simply because this was the angle the factory edge was set at and it gives a nice wide bevel for extra mirroring surface area. As far as chipping, premium steel does generally not really chip at that angle unless you are putting them under rigorous use or stretching the practical limits of that knife. An angle this acute may slightly limit the realistic expectations of that the knife can do before it may chip.
I have a variety of steels in my collection and I have never had a very bad chip. The knifes I use for heavy duty work are made of softer steels at more of an obtuse (wider) angle so they more likely to roll then chip. I put even more acute angles on my kitchen knives and I have never had one of those chip either. All that being said, I think it is possible to chip any steel at any angle given the right get of circumstances. I think bigger determining factors for chipping include how you are using it, how thick the edge/spine is, and the material you are cutting. It still possible that that angle maybe to acute for that steel. What kind of steel is the blade made of? How did the chip occur?
Also a convex edge is a great way to go to get a more acute angle that is still a solid “working edge” clay has a real nice series of photos and explanation of how to put a convex edge on a knife using the WES. I am sure someone can speak more about convex edges but to start here’s a link:
Also I would suggest this video of Clay doing a convex edge on a sebenza: (thanks Clay!)
Convex Edge On A Sebenza By Clay
Hopefully that helped, Good Luck!
04/20/2012 at 10:13 pm #2865Thanks for responding; the information you suppplied is very helpful.
My knife is a Marvin Poole (440C steel with a 55-57 hardness). It is a wonderful little knife (7″ overall, 3″ blade): though I was disappointed with the edge (that might have been my faught trying to sharpening it will another system) until I got my WEPS. I usually use it for cleaning deer and cutting hotdogs. I chipped it trying to fillet a flounder using the tip with the knife verticle to the fish along the backbone.
Just yesterday, I resharpened the knife with a bevel (19 and 22). It is “wicked” sharp and probably very strong. It cuts a hotdog easily, but I’ll have to wait until next fall to clean a deer.
Thanks, also, for the references. I have seen them, but will view again when I make the concerted effort to fulfill my goal of a mirror edge.
04/26/2012 at 7:54 am #2912Good questions. The stones aren’t hitting all the way to the heel of the blade because of the choil; this is really common with Spyderco knives. At the moment, the only solutions are to either trim the plastic from one side of your stone handles or use the thicker waterstones. Another possible option is to remove the stones from their handles, add a spacer piece and then mount the stones to the spacer for extra height.
For the tip, I’d recommend mounting the knife more centered in the clamp with the tip closer to the vise. You can use this guide: Finding the Sweet Spot to help find the right position. It also helps not to over-rotate the stones on the rod as you approach the tip. If you imagine keeping the stone in the same plane throughout the stroke and adding just a tiny bit of pressure with your thumbs, you’ll be able to get the tip needle sharp.
Good call Clay. I had to do this on some of my stones… I took them to my belt sander and removed the plastic shoulders… helped immensely! What I do on my Para 2 is this….
- I don’t use any double sided tape or anything to help clamp it in
- I actually clamp it in all the way at the base of the blade (on the flat part near the heel… Where you can see the “s30v” and where it was made, etc.
- I then tilt the tip downward towards the base and do this while I have my stone on the rod propped up against the edge. I do this so that way I can see exactly the point at which the tip is perpendicular to the stone itself. In theory this will maintain a consistent angle all the way through the edge because the stone will always be perpendicular to the edge (since the joint at the base of the rod arm is fixed).
I’ll try to take some photos soon of this… what progression and how many passes did you do roughly on each?[/quote]
Could you please illustrate this technique with photgraphs? It would help me tremendously!
04/27/2012 at 3:01 am #2919Could you please illustrate this technique with photgraphs? It would help me tremendously!
Sure will! Try to get them up tonight…
05/10/2012 at 2:48 pm #3126Here you go Crimson… sry it took me so long!!!

 05/12/2012 at 9:16 am #3159
Nice pictures. I tired something similar on my milie when i had a similar problem and got good results. great reference! Thanks!
-
AuthorPosts
- You must be logged in to reply to this topic.