Linkage play–your technique for consistency?
Recent › Forums › Main Forum › Techniques and Sharpening Strategies › Linkage play–your technique for consistency?
- This topic has 104 replies, 24 voices, and was last updated 01/01/2013 at 1:17 pm by
Chris.
-
AuthorPosts
-
03/13/2012 at 8:01 am #1897
I found some nylon bushings I’m going to try. ID is 0.240 so that leaves about 0.005 clearance for the rods. OD is 0.312 so I’ll have to ream about 0.042 wider so they fit tight. I’ll keep you posted on the progress. Clay have you found one method for counter boring the paddles better than another. I have 5/16 fostner bit that should work well and leave a square surface for the bushings to adhere to.
Can’t wait to hear your results. I picked up some cast bronze bushing from McMaster-Carr, part# 6381K412 – Alloy 932 Bronze Sleeve Bearing, for 1/4″ shaft, 3/8″ OD, 1/4″ Length. I put one in each end of the handle, reaming it out with a 5/16″ bit. I wasn’t overly careful to make a perfectly vertical hole, and I’m wondering if the bushings are in at a slight slant, causing the rod to hit the edge (inside the handle) of the bushing before finding its way into the hole.
-Clay
03/17/2012 at 7:44 am #2081Howdy,
I still haven’t received my nylon bushings but I may have found the perfect alternative. And it doesn’t cost a dime.
A drinking staw..:P
I cut two to the length of the paddles. Split it the entire length. Place one small drop of super glue opposite the slit and slide it into the paddle. Then immediately run the swing arm through it and spin the paddle around the arm pressing firmly.
Voila – instant sleeve bushing. The ID measurse about 0.242 which is only 0.002 larger than the bushings I was ordering and you don’t have to worry about the end of the arm slipping inside and off the bushing on the up stroke. One drop of oil if needed and works like a charm.
I thought of this when I visualized how thin the wall of the bushings I wanted to order were; just like a straw. And being an Old Army Grunt you know what came next; field expediency.
03/17/2012 at 7:50 am #2082Howdy,
I still haven’t received my nylon bushings but I may have found the perfect alternative. And it doesn’t cost a dime.
A drinking staw..:P
I cut two to the length of the paddles. Split it the entire length. Place one small drop of super glue opposite the slit and slide it into the paddle. Then immediately run the swing arm through it and spin the paddle around the arm pressing firmly.
Voila – instant sleeve bushing. The ID measurse about 0.242 which is only 0.002 larger than the bushings I am was ordering and you don’t have to worry about the end of the arm slipping inside and off the bushing on the up stroke. One drop of oil if needed and works like a charm.
I thought of this when I visualized how thin the wall of the bushings I wanted to order were; just like a straw. And being an Old Army Grunt you know what came next; field expediency.
Great tip, I’m definitely trying it!
-Clay
03/18/2012 at 11:32 am #2091I’ve now upgraded all my paddles with the “straw sleeve bushings” and there is no measurable play in them. Between that and the upgraded swing arms there is no play unless you intentionally put torque on the swing arms. So far I’ve only re-sharpened one knife and I did not see any of the “micro-bevels” as before. And by that I mean being able to visually see two different planes that the stone cut. It never affected the edge but I guess I’m just a little OCD about it.
As you can see in this image there are still micro scratches but the entire bevel is uniform now. Before I could see multiple facets.
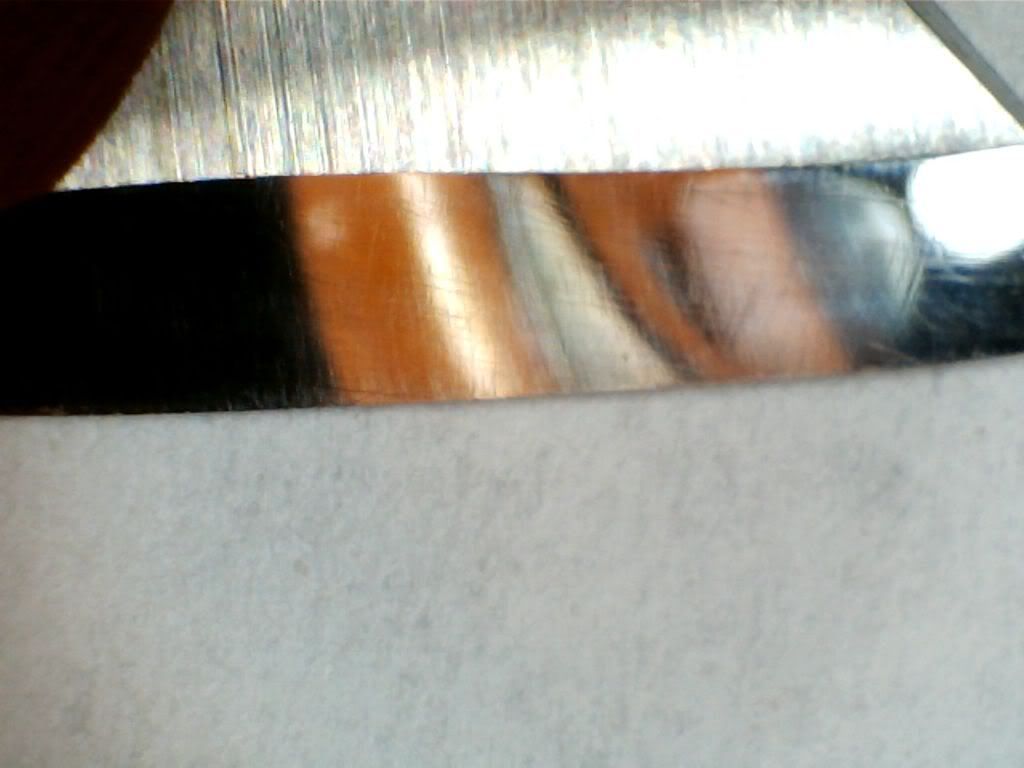
The reflection is of the bottom of the Veho microscope.
Oh and for those interested the image is from the tip of one of my Tanto blades.
03/18/2012 at 11:39 am #2092That looks really good. I saved some straws today 🙂 can’t wait to try it.
-Clay
03/21/2012 at 3:51 am #2139One update; I am now cutting a narrow strip off the straw after splitting them so that there is no overlap after they are inserted into the paddles. In two cases it seems that the overlap causes them to be a bit too tight and they drag a bit when used. A drop of oil takes care of it but I’ll most likely redo those two.
03/22/2012 at 3:34 am #2149I am Curious, is there a specific kind of drinking straw that you have found to work well? Since I read this I have been looking at drinking straws, particularly at different restaurants that provide them. There is a large variation in the ID and wall thickness of the different ones that I have seen. I suppose that I could just start trying them, as it is not that difficult to do. I just thought it would be easier if I could duplicate what you have done and know to work properly.
Phil
03/22/2012 at 4:59 am #2151I am Curious, is there a specific kind of drinking straw that you have found to work well? Since I read this I have been looking at drinking straws, particularly at different restaurants that provide them. There is a large variation in the ID and wall thickness of the different ones that I have seen. I suppose that I could just start trying them, as it is not that difficult to do. I just thought it would be easier if I could duplicate what you have done and know to work properly.
Phil
+ 1
the straws I tried were too small on the ID
03/22/2012 at 5:06 am #2152The first one I tested was from Sonic; but I found the corner store down the street from me had the same one. They are the larger/longer ones for larger drinks About 10 inches long and red.
As I split them lengthwise I am not concerned about the ID and these are larger than the opening for the paddles so they actually “spring open” when inserted into the paddles.
On average the ID of the paddles is 0.270 inches while the swing arms are 0.235 leaving 0.035 “play. The walls of these straws are 0.007 inches thick; so inserting the staw “closes up” the paddles to about 0.255; reducing the “play” by about half. Leaving 0.020 inches free space which seems to work perfect. As stated in my previous post I am now trimming the straws about 1/8 inch so that there is no overlap. On two paddles I believe this is causing a “slight” bind that I can feel but goes away with a drop of oil.
Hope this helps.
03/22/2012 at 11:34 pm #2155I picked up some straws last night and tried the straw bushing idea. The ones that I used were not the same as what you describe. They are about 10 inches long. Long enough that one straw will work for two handles with about half an inch left over. But they are clear or sort of translucent. They will fit over the rods without splitting the straw.I split one side and just slid them into one set of handles. I did not glue them, but they stayed in place while I did about 150 strokes on each side. The staw pieces stayed pu and the play certainly is reduced. I decided to try it like this for awhile. One concern that kept me from gluing the straws in place was that eventually they may well wear out. At which point it would be a PIA to remove them.
Anyway, thanks for the good idea. I ordered some new arms with the modded pivots. Between them (once I get them) and the straws, it will be interesting to see how much more precision I can wring out of the system.
Phil
03/23/2012 at 4:01 am #2156Just a thought, if you are using a wet lube to prevent binding then for those that use the diamonds they might be producing fine dust that could be attracted to the wet lube/grease. I have seen some dry lubes that go on wet and set dry. This resist water and does not attract dust/dirt as much. I think DuPont uses PTFE on theirs. I think some bicycle chain lubes are dry as well.
03/23/2012 at 10:51 am #2158I tried the straw bushing idea, too. By accident, I discovered something that works very well. I simply cut the length of the straws to fit the entire arms and slid them onto the arms (not into the stones). I didn’t slit the straws and I didn’t use any glue. I got these straws from a Subway Sandwich Shop and fortunately they are the perfect size to fit over the arms. I firmly pushed the end of the straws into the flat pieces of the arms that fit into the black part. The straws stay put very nicely. I just sharpened and polished a knife and the straws never moved from the arms – and I went through a total of 16 sets of stones, choseras, and strops. It may look like the stones might catch on the end of the straws when putting them on the arms but that didn’t happen. The stones all slide onto the arm/straw combo with ease. I’ll report how long the straws last before I have to replace them. Here are some photos. The last two are trying to show how the straws are pushed onto the flat part of the arms.


Note – I used alcohol swabs to wipe down the arms (to remove any oils) before sliding on the straws.
03/23/2012 at 11:46 am #2160Great concept. I just had one of those “DUH” moments.
Much easier than cutting emough straws for 10 pairs of paddles.
No need to glue anything.. that might be a PIA to remove later if wear becomes an issue…The straws that I got will not fit the rods without being split…
Off to Subway the next time I can get by there..Thanks for the concept!!
Phil
03/26/2012 at 12:51 pm #2182Thanks, but I’m not complaining about anything, just wondered what others do, and what would you fix? You can’t change the OD of the arm nor the ID of the paddle. I suppose the taper pins could be removed with a drift punch and small diameter non-metallic washers installed to take up the gap between the arm and link. Which end of the pin is the small end? 🙂
Otherwise, no worries.The big end is fluted so it cuts grooves in the aluminum when it’s pushed in. For the mod, I push the pins out, tap one side and replace the pin with a #8-32 button head cap screw and some very little washers. You’re right that there is not much to do about the OD of the arm vs. the ID of the paddle.[/quote]
Hey Clay, is this something I should try doing myself? I don’t have any experience using a tap die. I wasn’t having too much trouble with the slack in the joint because I was doing that same thing and holding the stones in at the bottom…
However, one of my pins just fell out on one arm so I’m going to have to fix it somehow and I will need to have both sides the same. Should I just call in and talk to someone? I think the pin must have been loose from the start because it just slides right out but the one on the other arm is in solid.
03/26/2012 at 11:23 pm #2183Thanks, but I’m not complaining about anything, just wondered what others do, and what would you fix? You can’t change the OD of the arm nor the ID of the paddle. I suppose the taper pins could be removed with a drift punch and small diameter non-metallic washers installed to take up the gap between the arm and link. Which end of the pin is the small end? 🙂
Otherwise, no worries.The big end is fluted so it cuts grooves in the aluminum when it’s pushed in. For the mod, I push the pins out, tap one side and replace the pin with a #8-32 button head cap screw and some very little washers. You’re right that there is not much to do about the OD of the arm vs. the ID of the paddle.[/quote]
Hey Clay, is this something I should try doing myself? I don’t have any experience using a tap die. I wasn’t having too much trouble with the slack in the joint because I was doing that same thing and holding the stones in at the bottom…
However, one of my pins just fell out on one arm so I’m going to have to fix it somehow and I will need to have both sides the same. Should I just call in and talk to someone? I think the pin must have been loose from the start because it just slides right out but the one on the other arm is in solid.[/quote]
You can put the pin in most of the way and then put a drop of Loctite in the hole before pushing the pin in the rest of the way. You can also send them in to us and we’ll make the modification for you.
-Clay
-
AuthorPosts
- You must be logged in to reply to this topic.