How Do You Handle The Plunge?
Recent › Forums › Main Forum › Techniques and Sharpening Strategies › How Do You Handle The Plunge?
- This topic has 19 replies, 7 voices, and was last updated 01/24/2019 at 11:25 am by
NorCalQ.
-
AuthorPosts
-
01/09/2019 at 3:30 pm #48984
I have a folding knife that I’m having trouble keeping the edge, right up to the plunge line. With the rounded corners on all the diamond stones, how do you get a straight edge, right up against that plunge line?
01/10/2019 at 12:49 am #48987You can’t get past the problem with the rounded edges of the stones without changing to one of the natural or synthetic stones with sharp corners. I suppose you could tape a high-grade sandpaper to a hard platen, like glass or metal.
In any case, you still have to solve the issue of the abrasive not working the heel (less than 3/4″ from the ricasso) as much as the rest of the edge. If you start or end your stroke at the point where you contact the ricasso (or plunge line), that last tiny bit will see effectively zero abrasive pass over it. The amount of abrasive seen increases up to the width of the stone. All points farther from the ricasso will see the same (more or less) amount of abrasive pass over them. You can solve this through a modified technique. As I approach or leave the heel, I move the stone in a circular arc, with the near quadrant at three or nine o’clock, depending on whether I’m approaching or leaving the heel. When the arc reaches the angle I want to sweep at, I switch to a tangent line. It’s actually a small part of the stroke.
This technique will leave a different scratch pattern in that last 3/4 of an inch or so which is very obvious. It’s important that you not focus on the scratch pattern, but rather on the width of the bevels – try to keep them equal. As you progress through the grits to the polishing stage, the scratch pattern that seemed so objectionable will disappear. It works pretty good for me.
2 users thanked author for this post.
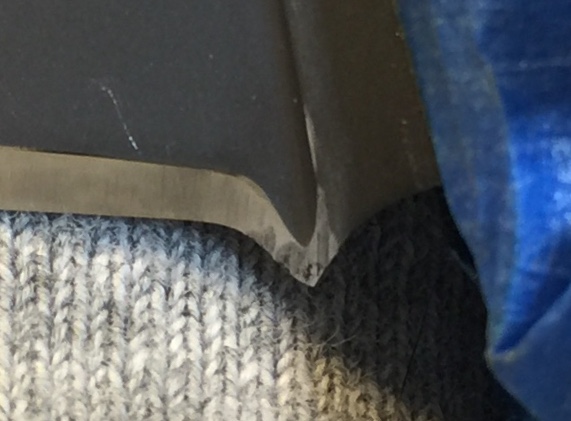
01/10/2019 at 7:50 am #48988Here’s what I’m talking about. This is my practice blade and as you can see, I’ve put it thru a bit of practice grinds, so the issue is exaggerated, however I can see that over time, the way I’m sharpening would have this same result with any blade where the factory edge comes right up to the ricasso.
Attachments:
You must be logged in to access attached files.
01/10/2019 at 8:28 am #48991NorCalQ, I have not done one myself. I have learned through forum participation that there are several different methods others have employed to work around that knife configuration.
One, tcmeyer has just suggested, to employ a different or modified stone stroke in close proximity to the “kick” to allow you to blend that less or differently sharpened area to the balance of the blade as you move up the grits.
Another method, he suggested, would be to modify the plastic Wicked Edge handles or paddles to remove the colored plastic frame around the stones so the stone side is exposed. In essence narrowing the paddles. This will allow you to work the knife edge much closer to the problem area. It introduces an added safety feature or concern.
Another method would be to remove that downward point, the “kick” and flatten it out to a continuous profile of the rest of the blade.
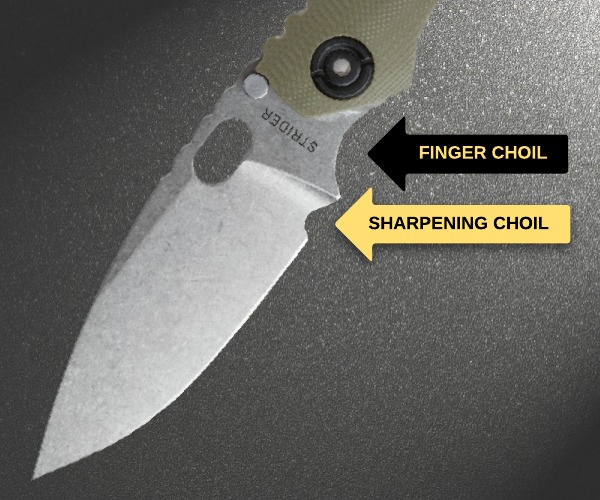
Probably the best solution is a combination of profiling or removing the heel downward point, or “kick” to be in line with the blade profile and add a sharpening notch, or sharpening choil, a rounded undercut little “U” right where the blade transitions to the tang, choil or Ricasso. This is often done using a small rat tail file or a dremmel tool. (I’m trying to use the correct terminology, I lack, with my lack of experience sharpening folders). This sharpening notch or sharpening choil that removes the blade material closest to the heel so it doesn’t require sharpening right against the Ricasso, finger choil or flipper. It does though add the hollow notch some knife users don’t care to have. See the images I have included to show my explanation.

Hope this helps.
Marc
(MarcH's Rack-Its)01/10/2019 at 9:50 am #48993I do like the sharpening choil. That looks like a good solution. I don’t think I like the idea of trimming back the paddles, cuz the stones are still curved on the corners, so the problem is still there, just smaller. I truly was not even considering the plunge line on the knife shown, as I was focused on stokes, scratches, etc. Now when I see it, I cringe, so I have to figure our how to keep the issue from happening in the future.
01/10/2019 at 10:20 am #48994This is a problem with many modern knife designs. It is my opinion that a properly crafted knife should include a sharpening choil to allow for the end user to easily sharpen the blade. Like Marc said, you can add a sharpening choil to the blade without too much effort, but it will change the look of the knife.
1 user thanked author for this post.
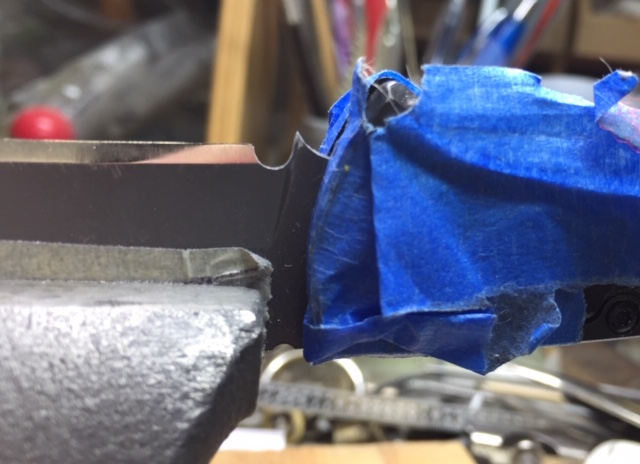
01/10/2019 at 11:55 am #48995Thanks for help here. I took your advice and added the sharpening choil. I think this will solve that dilemma for sure. Please let me know what you think of the size and shape of the choil I created. Should I leave that ricasso point?
-
This reply was modified 5 years, 3 months ago by
-
This reply was modified 5 years, 3 months ago by
Attachments:
You must be logged in to access attached files.
2 users thanked author for this post.
01/10/2019 at 12:55 pm #48999That will solve your plunge grind issue without a doubt. I think it is perhaps a little larger and deeper than I would have gone with, but it looks cleanly executed and like it could have been done that way from the factory.
I would leave the point for now. You have to be careful when doing these kinds of modifications to folders because sometimes the ricaso affects the closed position of the blade within the handle. Don’t remove that tip until you are sure that it won’t screw up the closed position of the blade.
2 users thanked author for this post.
01/10/2019 at 1:05 pm #49000Ah! Did not consider that at all, but I will now. I’ve seen some knives with the sharpening choil on the ricasso itself. I maybe could have gone half on the edge side and half on the ricasso, keeping your warning in mind. By the time I’m done practicing on this knife, I’ll likely be at the bottom of my newly created choil. :). Of course, that bevel has already grown to three times it’s factory grind.
Thanks for the advice.
01/10/2019 at 1:59 pm #49001One of the YouTube knife guys that I follow made me aware of that issue. He enlarged the sharpening choil on his Benchmade 940 and ended up ruining the blade because the edge was hitting the spine of the handle upon closure. He had to send it back to Benchmade to get a replacement blade (which they do for $25 if I recall correctly).
2 users thanked author for this post.
01/10/2019 at 2:39 pm #49002I would leave the point for now. You have to be careful when doing these kinds of modifications to folders because sometimes the ricasso affects the closed position of the blade within the handle. Don’t remove that tip until you are sure that it won’t screw up the closed position of the blade.
Organic, do you know a way of determining if the tip does indeed effect the knife closing.
Marc
(MarcH's Rack-Its)01/10/2019 at 4:44 pm #49003I took a close look and does appear that the point on the ricasso may be part of the stop. Either is the stop or the stop is just behind it, from what I can determine. Only way for me to know for sure is to disassemble part of the knife and right now, I don’t have that small a torx bit…yet.
01/10/2019 at 4:57 pm #49004I would leave the point for now. You have to be careful when doing these kinds of modifications to folders because sometimes the ricasso affects the closed position of the blade within the handle. Don’t remove that tip until you are sure that it won’t screw up the closed position of the blade.
Organic, do you know a way of determining if the tip does indeed effect the knife closing.
It is easier if the knife is a flow through design. In that case you just need good lighting and close examination. If the back of the knife is closed then it is more difficult and I don’t think you can know unless you take it apart or find photos of the knife disassembled somewhere online.
01/10/2019 at 5:58 pm #49005After giving it some thought: maybe close the knife on a folded strip or piece of paper inserted down into the blade slot and feel for resistance when the knife is folded closed. If the paper slides or slips under the point then I’d guess it doesn’t rest on it. You also should be able to ball up a really small wad of paper and shove it down in the bottom of the blade slot. If a really small ball of paper interferes with the knife closing then it probably rests against the point.
Marc
(MarcH's Rack-Its)01/10/2019 at 6:49 pm #49006You really got me thinking about this. I used a marker and marked the ricasso from the point, back as far as I could. I closed the knife a few times rather firmly. When I opened it back up, I could see a mark on the ricasso, about a mm from the tip of that point. It’s a good thing you said something, cuz had I trimmed it at all, I think I would have had a real problem. I have say it…thanks again! Nice save!
-
This reply was modified 5 years, 3 months ago by
1 user thanked author for this post.
-
This reply was modified 5 years, 3 months ago by
-
AuthorPosts
- You must be logged in to reply to this topic.