Ever wanted to measure and view a Edge Profile? Check this out!
Recent › Forums › Main Forum › Welcome Mat › Ever wanted to measure and view a Edge Profile? Check this out!
- This topic has 83 replies, 10 voices, and was last updated 04/29/2016 at 10:11 am by
 M1rrorEdge.
-
AuthorPosts
-
04/19/2016 at 10:38 am #33471
Great, I am looking forward to your results.
1 user thanked author for this post.
04/19/2016 at 11:31 am #33473WOW! Outstanding result! Have you done any measuments with your scope? I am presently in the Middle East it’s going to take more time to get to me via the military post office. This really looks great! Do you have any other observations? Time to cool? Ease of use? Reusability? Tell me more please please!

Eddie Kinlen
M1rror Edge Sharpening Service, LLC
+1(682)777-162204/19/2016 at 12:41 pm #33476Yes, just a quick measurement.
It is very easy and clean to work with. It does not stick to the blade at all. It cools quickly and I did not feel the need to cool it in icewater or the fridge. Once hardened, it is very easy to cut / shave and it will hold its shape. I have not yet tried to re-melt it but I have no reason to believe that would be difficult or give other results. You just need a small amount so even without re-melting you can do a lot of knives with 250 grams. The bubble gum sized piece in my previous post weights 1.54 grams.
Attachments:
You must be logged in to access attached files.
2 users thanked author for this post.
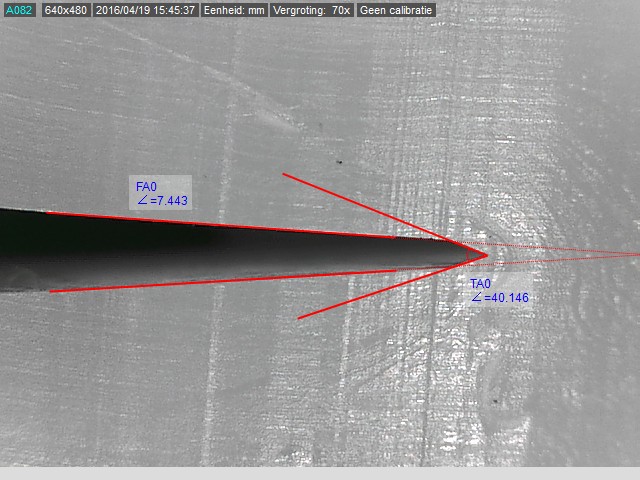
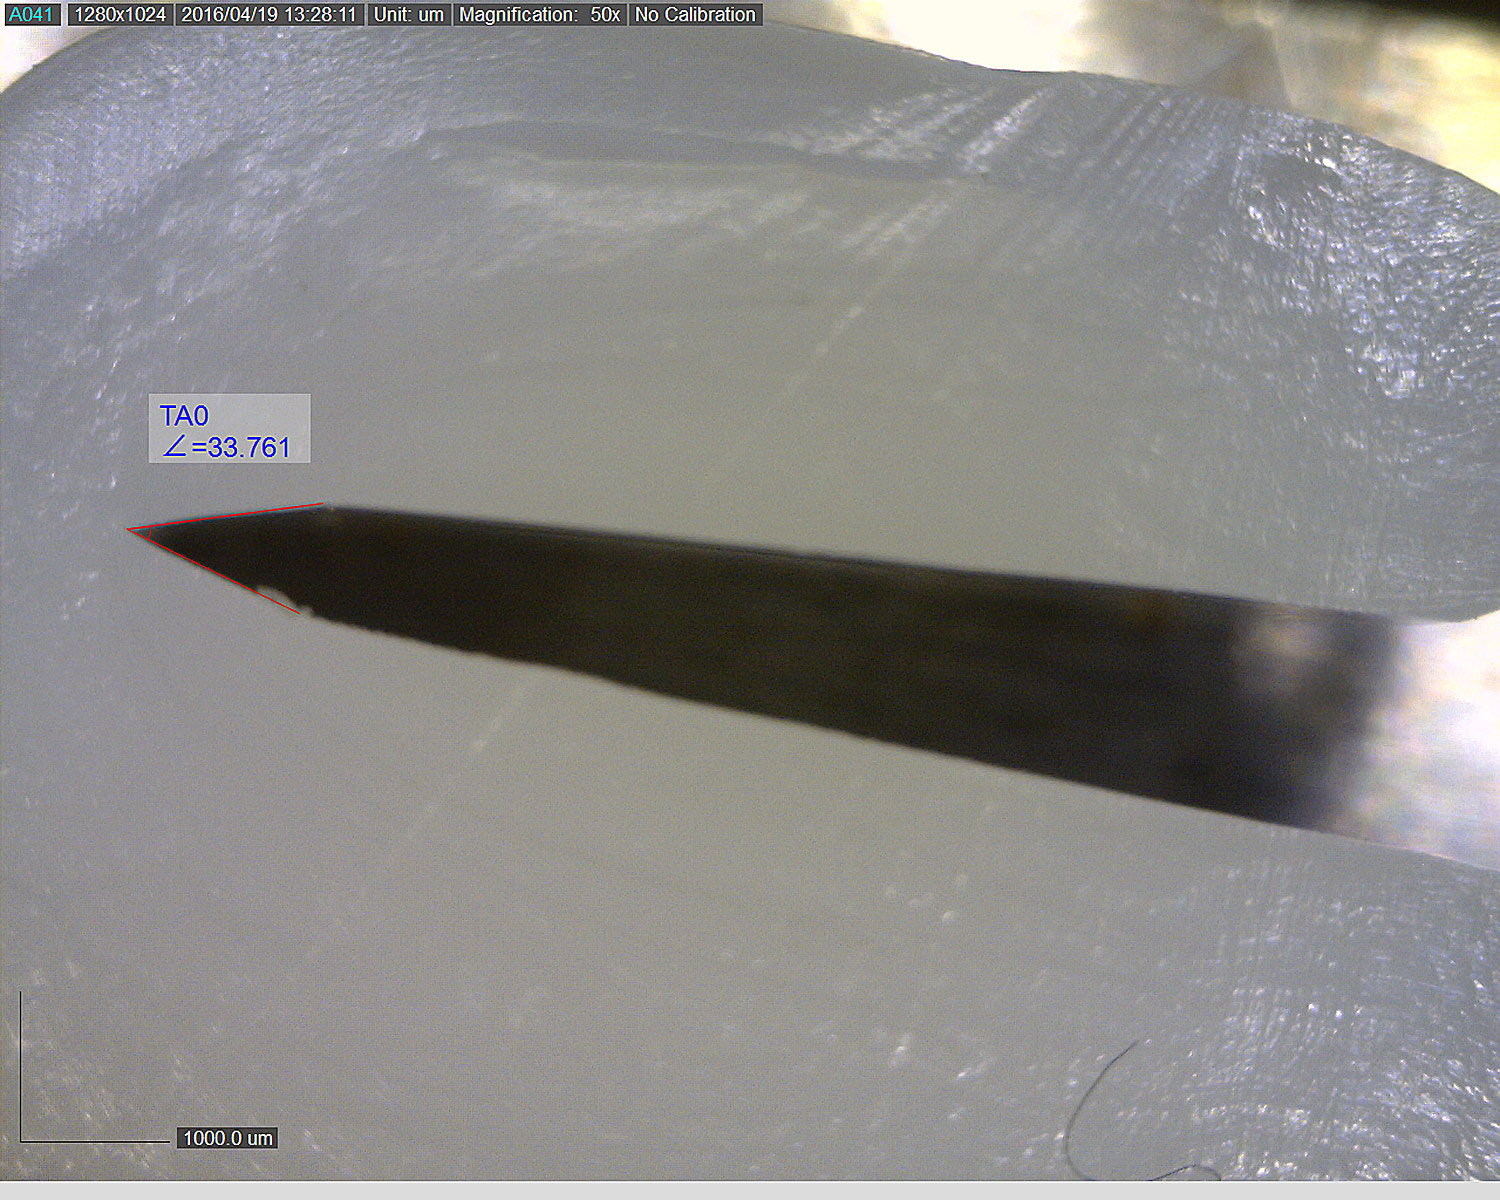
04/19/2016 at 1:23 pm #33478I had a go as well. My images aren’t nearly as pretty! Still it was pretty easy to do and I’m sure I can take more care to get better cuts and images. The magnification on the scope I was using is too high, so I’ll probably switch to the Dino-Lite in the 20x-50x range so I can see and measure the transition from bevel to micro-bevel more easily. Here is 80x:

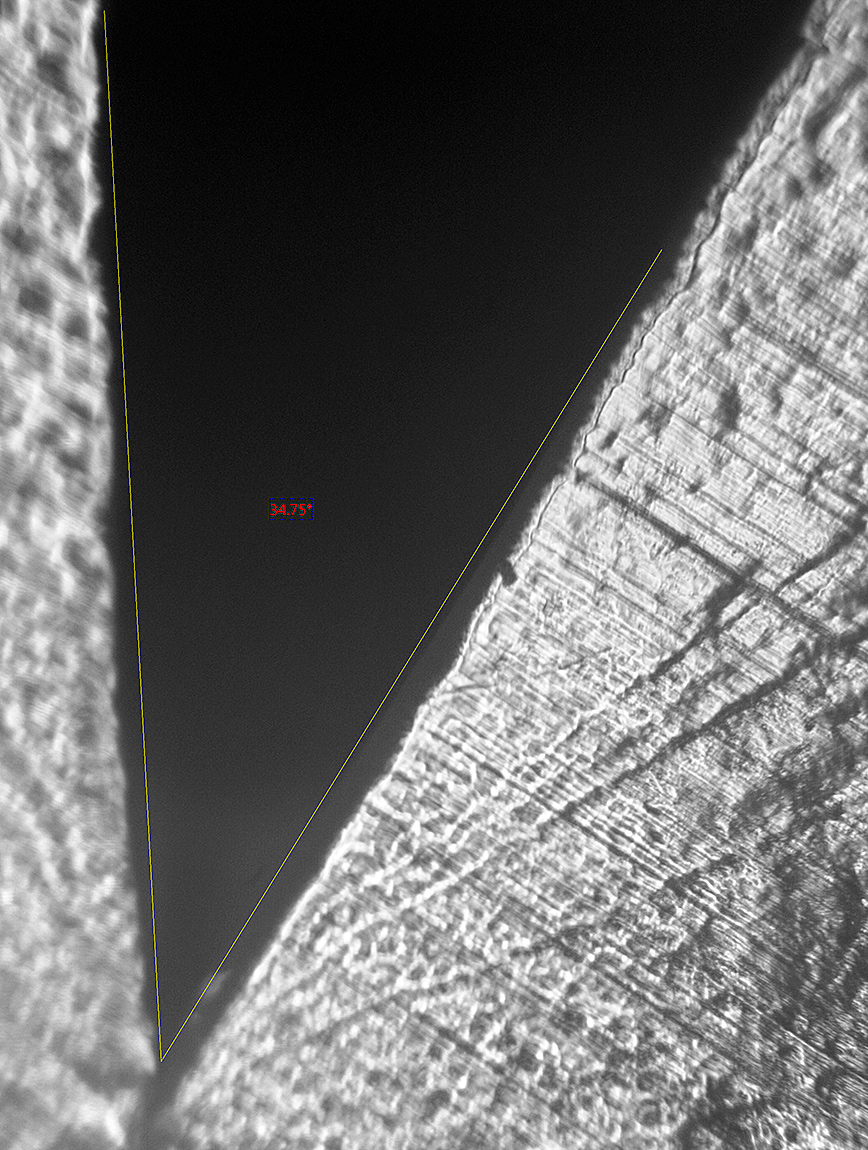
And here is 200x:
-Clay
Attachments:
You must be logged in to access attached files.
2 users thanked author for this post.
04/19/2016 at 1:30 pm #33481Outstanding! Even more excited now. Bye, Bye expensive goniometer that is hard to read. No more guessing the angles. WIN WIN! Are you seeing it guys? The Magic that has been revealed? You can see if the edge is centered on the blade. You can measure the whole edge triangle. No calipers needed or trigonometry to figure out the angles. I have a whole lot more. Think of the time savings? Before you even put stone to blade look at all the information you get. Not to mention multiple facit blades like making a convex. Think of the library of possibilities! We have been looking at drawings or PowerPoint slides of edge profiles, now, we can see our own, share them, and reproduce them.
Eddie Kinlen
M1rror Edge Sharpening Service, LLC
+1(682)777-1622Attachments:
You must be logged in to access attached files.
04/19/2016 at 1:35 pm #3348204/19/2016 at 2:15 pm #33486We can also perform blade life calculations based on the amount of metal removed. We can profile the whole blade geometry not just the bevel geometry. For those of us providing sharpening services, we can truly provide “precision” services because we can now measure it and save the images in customer blade databases. We can provide before and after shots of the work we do to justify and quantify the work we do. A picture is worth a thousand words. Us sharpeners have always had esoteric ways of explaining knife geometry. Now with this tool we can prove it and better yet document it. The “sharpy” is a great tool too, however, it”s gone as soon as you start scrubbing the blade. In the medieval times they used soot from burning candles to ensure perfect blade angles. We are in the age of the computer, we can leverage it’s power to bring credibility to the art of producing the best edge! Off my soap box now, but seriously, think about it!
Eddie Kinlen
M1rror Edge Sharpening Service, LLC
+1(682)777-16221 user thanked author for this post.
04/19/2016 at 2:22 pm #33487I would love to have a higher magnification microscope but it is wonderful that this works so well with cheaper, lower magnification microscopes.
I share MirrorEdge’s excitement 🙂
1 user thanked author for this post.
04/19/2016 at 2:26 pm #33488I have been posting stuff all week trying to make that exact point. It doesn’t have to be expensive. We just need to think outside the box and become proficient with the tools we have. Two weeks ago I was studying Todds blog the scienceofsharp and was honestly floored by what I saw and read. His SEM microscope cost between 50-100K. What it provided is something not seen by the medieval craftsman, journeymen and apprentice. Generations of blade smiths died never having the opportunity to see the actual edge of a blade. We have and must honor them for getting us this far. I use the medieval period as a example because they lived and died by the blade and the best we can do to prove sharpness is to shave arm hair. Their are other tools out their but they are expensive. Look how far we have come in two weeks puting our heads together.
Eddie Kinlen
M1rror Edge Sharpening Service, LLC
+1(682)777-162204/19/2016 at 3:22 pm #33489I use the medieval period as a example because they lived and died by the blade and the best we can do to prove sharpness is to shave arm hair. Their are other tools out their but they are expensive. Look how far we have come in two weeks puting our heads together.
It might be worth your while to build the sharpness testing jig that BassLakeDan worked on. If you’re interested, I’ll see if I can dig up the info for it. I made one and really like it. With it, you can document before-and-after sharpness so you have solid metrics that show the improvement provided. Plus, you can use it to test edge degradation so test different geometries and finishes to determine what works best for a given steel/usage. I think the cost of materials for the jig was less than $20 and the assembly time was pretty short too. I added a little micro compound table to make it easier to advance the cutting media to a new section in controlled increments, so that added a little cost to my set up but was well worth it.
-Clay
1 user thanked author for this post.
04/19/2016 at 4:00 pm #33490I’ll see if I can dig up the info for it
That would be great, I am certainly interested.
04/19/2016 at 4:13 pm #33491I’ll see if I can dig up the info for it
That would be great, I am certainly interested.
It looks like BassLakeDan has taken the site down. Basically, it’s like a triple beam scale where you slide weights along the beams. At the end of the beams is a tool head onto which is fastened a large stop collar. Beneath the moving tool head is a blade holder which holds the blade vertically, edge up. The stop collar is covered with a strip of tape and a lead is connected to it and runs to a battery and buzzer. Another lead runs to the blade and when the blade pierces the tape and makes contact with the steel tool head, the circuit is completed and the buzzer sounds. The blade holder sits on top of a postal scale and as force is applied via the beams on the tool head, it’s registered on the scale. You can be accurate to within a gram of force if you go slowly enough when sliding the weights over.
-Clay
2 users thanked author for this post.
04/19/2016 at 4:19 pm #33492Here’s a picture of it:
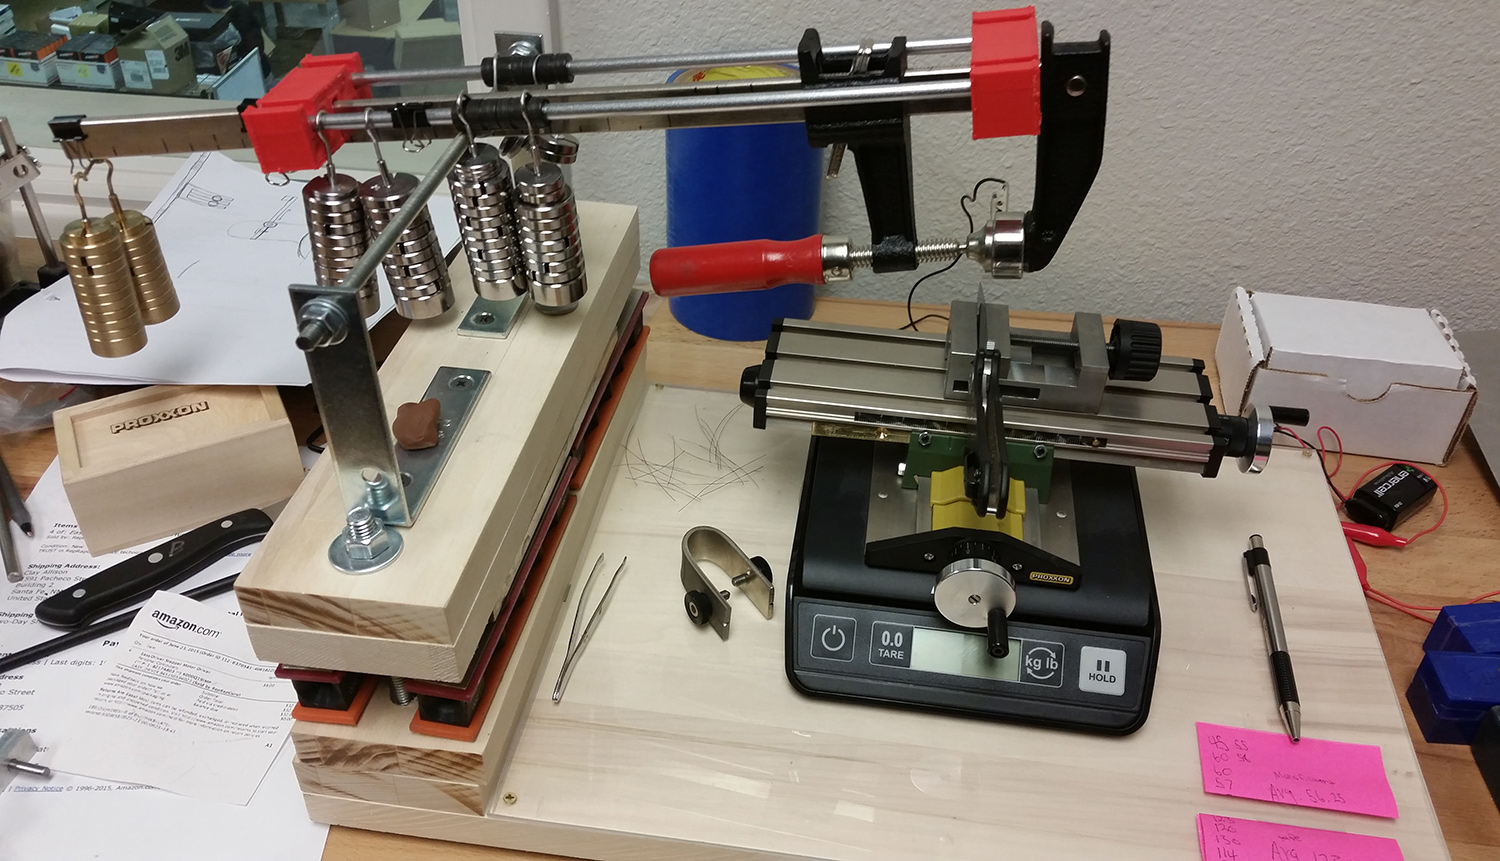
The central beam is just a clamp. I printed the two red plastic pieces that hold the additional beams and I used some weight sets I found on Amazon. The compound table is made by Proxxon and also available on Amazon as is the little vise holding the knife. The compound table makes the whole thing work a lot better because you can advance it by fractions of a mm at a time so you get a lot of tests out of one strip of tape. The buzzer and leads I picked up at Radio Shack for pennies. I drilled a hole in the clamp so it could pivot on the threaded rod and it’s held in place by some washers and nuts. My original build wasn’t tall enough to accommodate the compound table so I stuck some old stones in to raise it up. If I were to build it again, I’d just be sure to make that section taller by adding in more pieces of plywood, I think 6 instead of 4.
-Clay
Attachments:
You must be logged in to access attached files.
04/19/2016 at 4:39 pm #33494To build it, you need:
- A board that measures 12″x36″x.75″
- (2) 4″ L-brackets
- 12″ 1/4″ all-thread (threaded rod)
- (6) washers
- (6) nuts
- Clamp
- Weights
- Postal Scale
- Compound table – Optional
- Buzzer, batter holder, batter and leads
- 12″x18″ thin plexiglass – Optional
- (4) Rubber feet
- 1″ Hardened stop collar
The assembly is pretty straightforward. You can probably go by the image above and ask any questions as they come up. The exact dimensions are not critical. I’m remembering now that for the extra beams, I got some linear slides so that there was as little friction as possible when I was sliding the weights over. You can see the weights hanging from them. The beam in the front of the picture holds the heavier weight stacks and the one in the back holds a couple small weights for single gram increments. I bolted my stack of extra boards together so that i could change the height as needed, which worked out well when I added the compound table.
-Clay
2 users thanked author for this post.
04/19/2016 at 11:54 pm #33497Has anyone seen this? http://edgeonup.com/eou_new_2016_005.htm I had found this about a year ago and was wondering why I didn’t see it being used. I will create a new topic post for this here: Measuring sharpening progress without the Loss of Arm Hair!.
For what it’s worth, it’s inexpensive and the science appears sound if you use it to compare the blade to itself (Before and After Sharpening). It gets a little tricky to try to use this test to measure one blade with another, but why not the same blade before and after sharpening? Clay, can you post your rig to the new topic as a example of how to custom make something like this? I really want to know what you all think about this… Does anyone know why the sharpening community is ignoring this?
Eddie Kinlen
M1rror Edge Sharpening Service, LLC
+1(682)777-1622 -
AuthorPosts
- You must be logged in to reply to this topic.