Angle of the edge with Pro Pack II upgrade!
Recent › Forums › Main Forum › Welcome Mat › Angle of the edge with Pro Pack II upgrade!
- This topic has 27 replies, 6 voices, and was last updated 08/28/2012 at 9:30 am by
Jim Mitchell.
-
AuthorPosts
-
08/26/2012 at 12:45 am #4992
Hi Jim,
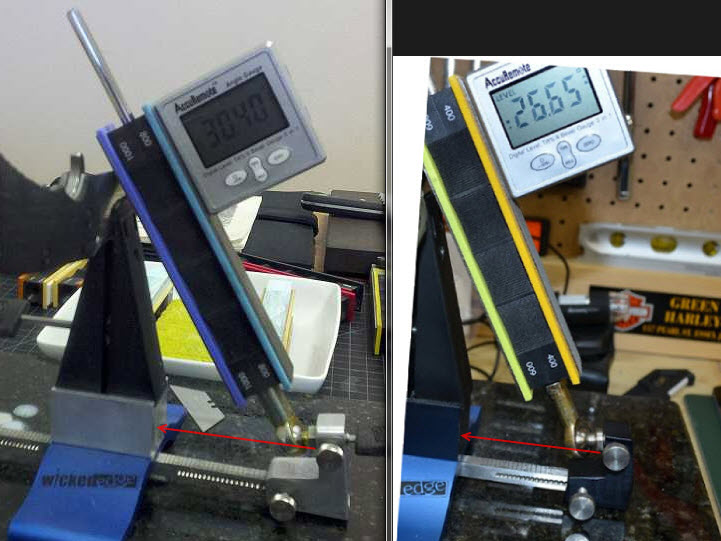
It’s not the angle bracket causing the difference. I’ll post pictures with brackets like you have. I’m pretty sure it’s your angle cube because both brackets have the same geometry meaning that the pivot point is the same relative to the knife. That said, I am getting ready to make a run of longer angle bars and get one to you once their ready. The riser in the new set does lower the angle, buy only by 2 degrees on average and pivot points still have the same relationship they’ve always had. You might be able to calculate your angles by measuring the distance from the center of the vise to the pivot point i.e. the center of the ball joint and then the height of the edge of the knife from the same elevation as the center of the pivot point.
Clay,
Take a look at the photo comparison Billabong posted. There seems to be a difference in your arm brackets and mine. It appears that yours are longer on the bottom, allowing for wider angles. I’m sure this is where the difference in angles is coming from.
Was the upgrade I received last week was supposed to have the longer brackets as shown in your photos?
I think either replacing the brackets or making a longer angle bar would solve the problem. I hesitate to go out beyond the small indents on the angle bar because the bracket screws don’t feel like they’re “biting” into the aluminum bar and could easily become loose. Whereas, with the indents, the bracket screws feel very secure and the brackets don’t loosen up as easy.
Have you thought about making a longer angle bar with indents along the entire side to accommodate a wider range of angles as well as keeping the bracket screws tight and secure?
I’d be happy to use the same angle brackets that you’re using and/or try a longer angle bar.
Thank you.
Jim
-Clay
08/26/2012 at 3:13 am #4998Clay,
It’s hard to tell angles and distances by looking at pictures.
But I’m thinking you want the two arrows to be the same length? (to ball pivot centres)I see you have added some more angle holes on the bar. (16 vs 19+)
Appreciate you letting us in on the development/improvement of the WEPS.
 Attachments:08/26/2012 at 10:17 am #5017
Clay,
It’s hard to tell angles and distances by looking at pictures.
But I’m thinking you want the two arrows to be the same length? (to ball pivot centres)I see you have added some more angle holes on the bar. (16 vs 19+)
Appreciate you letting us in on the development/improvement of the WEPS.
Thanks Billabong. I thought I noticed a difference in the angle bar but wasn’t sure. I’m sure the issue will be resolved with a longer angle bar and several more indents (angle holes for the screws).
08/26/2012 at 1:14 pm #5028Thanks Clay. I am looking forward to receiving one of the longer angle bars. Do you have an ETA on them? Once I receive it, I will take more photos and report the results back to you.
I re-calibrated my angle cube and used a square to confirm it is reading accurately. I really believe the longer angle bar will take care of the issue. If you can have the indents along the entire side of the angle bar to allow for a wide range of angles, that would be great. It will also help keep the arm brackets securely in place.
Thanks again,
JimHi Jim,
It’s not the angle bracket causing the difference. I’ll post pictures with brackets like you have. I’m pretty sure it’s your angle cube because both brackets have the same geometry meaning that the pivot point is the same relative to the knife. That said, I am getting ready to make a run of longer angle bars and get one to you once their ready. The riser in the new set does lower the angle, buy only by 2 degrees on average and pivot points still have the same relationship they’ve always had. You might be able to calculate your angles by measuring the distance from the center of the vise to the pivot point i.e. the center of the ball joint and then the height of the edge of the knife from the same elevation as the center of the pivot point.
Clay,
Take a look at the photo comparison Billabong posted. There seems to be a difference in your arm brackets and mine. It appears that yours are longer on the bottom, allowing for wider angles. I’m sure this is where the difference in angles is coming from.
Was the upgrade I received last week was supposed to have the longer brackets as shown in your photos?
I think either replacing the brackets or making a longer angle bar would solve the problem. I hesitate to go out beyond the small indents on the angle bar because the bracket screws don’t feel like they’re “biting” into the aluminum bar and could easily become loose. Whereas, with the indents, the bracket screws feel very secure and the brackets don’t loosen up as easy.
Have you thought about making a longer angle bar with indents along the entire side to accommodate a wider range of angles as well as keeping the bracket screws tight and secure?
I’d be happy to use the same angle brackets that you’re using and/or try a longer angle bar.
Thank you.
Jim
[/quote]
08/26/2012 at 1:23 pm #5029Hi Jim,
It’s a great piece of equipment and I respect Clay & Co. for engineering to this point without just leaving the previous buyers in the cold.
Great product, great people. 🙂
The adaption of a Heim joint is brilliant.
A longer bar would solve “this” issue regardless, as the added adjustment would suit any situation.
I’m sure the extra length wouldn’t introduce any flex while in use as the bar is made solid.I’m thinking a reversable bracket might be a way to keep the bar shorter.
But that means a total redesign.
All just thoughts.Thanks Clay & Jim, apologies for sticking my nose in here.
Just enjoying the experience as a WEPS owner. (addict) 😀08/27/2012 at 4:34 am #5042Jim,
Just a thought on using the machines dimples on the base (angle) bar. I think if you check the forume you will find that many do not use them at all. In my case I reversed the bar so the smooth side is facing me. I filed the screws used to tighten the slider flat on the ends. They tighten up and stay tight ( no bracket movement). In addition, doing this allows for fractional degree settings much more easily. I know that the angle adjuster on the new arms allows this sort of fine adjustment, but has its limitations as to the amount you can adjust. I use lots of different stones with widely varying thicknesses. Sometimes, trying to set the slider adjustment using an indent just does not give enough travel to allow me to adjust for the difference stones. Using the smooth side I can set a base setting that allows me to not have to move the main slider again, but still accomodate all of my stones using just the fine angle adjustment feature. I am just trying to point out that you do not have to be dependent on using the indents. In some cases, doing so can actually be a liability, rather than an advantage. Just flattening the screws and maybe putting a little purple locktite on the screws will give you plenty of security against the adjustment moving.Phil
Thanks Clay. If you can have the indents along the entire side of the angle bar to allow for a wide range of angles, that would be great. It will also help keep the arm brackets securely in place.
Thanks again,
JimHi Jim,
It’s not the angle bracket causing the difference. …
[/quote][/quote]
08/27/2012 at 8:35 am #5046Thanks Phil.
I really appreciate your input on this and I know exactly what you’re talking about. That’s a great idea to turn the bar around and file down the screws and I will definately try it out.
Thanks again,
JimJim,
Just a thought on using the machines dimples on the base (angle) bar. I think if you check the forume you will find that many do not use them at all. In my case I reversed the bar so the smooth side is facing me. I filed the screws used to tighten the slider flat on the ends. They tighten up and stay tight ( no bracket movement). In addition, doing this allows for fractional degree settings much more easily. I know that the angle adjuster on the new arms allows this sort of fine adjustment, but has its limitations as to the amount you can adjust. I use lots of different stones with widely varying thicknesses. Sometimes, trying to set the slider adjustment using an indent just does not give enough travel to allow me to adjust for the difference stones. Using the smooth side I can set a base setting that allows me to not have to move the main slider again, but still accomodate all of my stones using just the fine angle adjustment feature. I am just trying to point out that you do not have to be dependent on using the indents. In some cases, doing so can actually be a liability, rather than an advantage. Just flattening the screws and maybe putting a little purple locktite on the screws will give you plenty of security against the adjustment moving.Phil
08/27/2012 at 9:07 am #5048BTW Clay.
Edit. I went back and checked and noticed a couple of things. First the fine angle adjustment was not set to maximize the angle. The approximately 1 inch wide knife was set in the top depth holes.
I backed the fine adjustment out all of the way and set the knife in the lower holes. When I did that I got the revised numbers below (highlighted in color). Of course the device would be useles in this configuration because the slider bracket was not secure on the base rod and it would rock enough to cause almost a full degree of change in the edge angle.
I decided to check the maximum angle I can get with my present setup . This is the new arms and standard base bar.
I can get a max of about 29.35 + 0.9 degrees (the plus comes from the fact the slider rocks a bit when slid this far out) with the retaining screw about half off of the far end of the bar. I too went through the calibration procedure for the angle cube and verified it with a square.
There must be some difference between the bracket/sliders that are being provided with the new arms and the ones you are using.
I too will be up for one of the extended bars…
Phil
08/27/2012 at 11:03 am #5049BTW Clay.
I too will be up for one of the extended bars…
Phil
Put me down too please Clay, happy to pay the freight to Aus.
08/27/2012 at 11:34 am #5050I’ll take a look at the measurements tomorrow with one of the newest sets of joints and post some photos.
-Clay
08/28/2012 at 1:08 am #5076This was bothering me as well. In a past life I worked for a German industrial machine manufacturer and still have a calibrated set of jigs we used during the setup of molders. To start with I lied my tilt cube on the set and after cleaning off any shavings it was accurate +- .03 deg between 10 and 45 degrees. The knives I used were a Kershaw 1596 Spec Bump and a Chive.
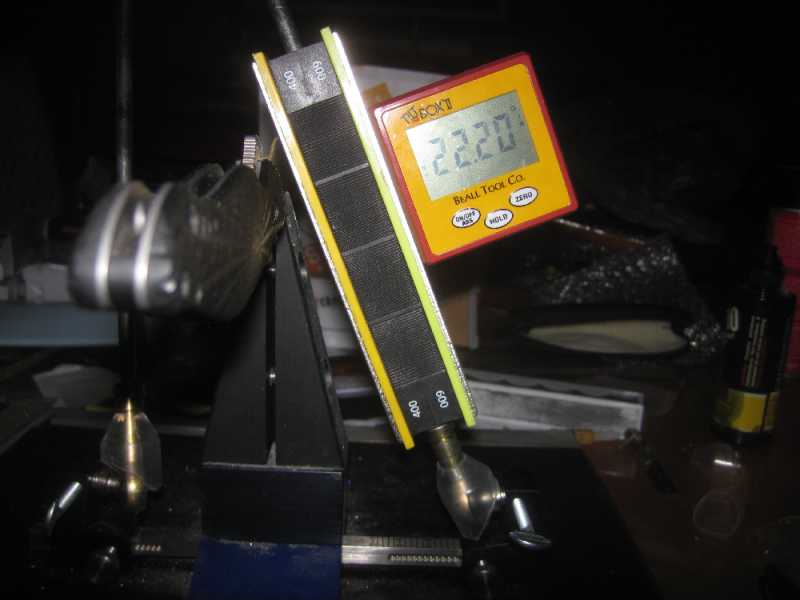
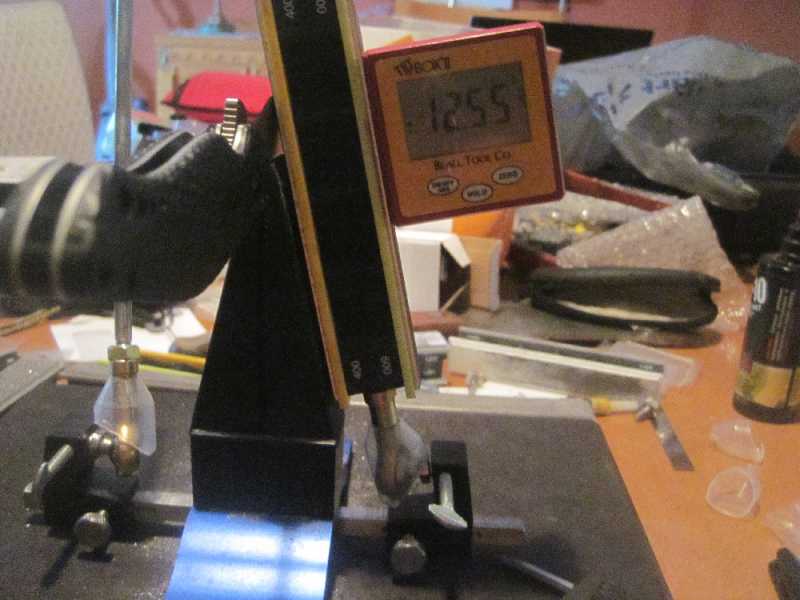
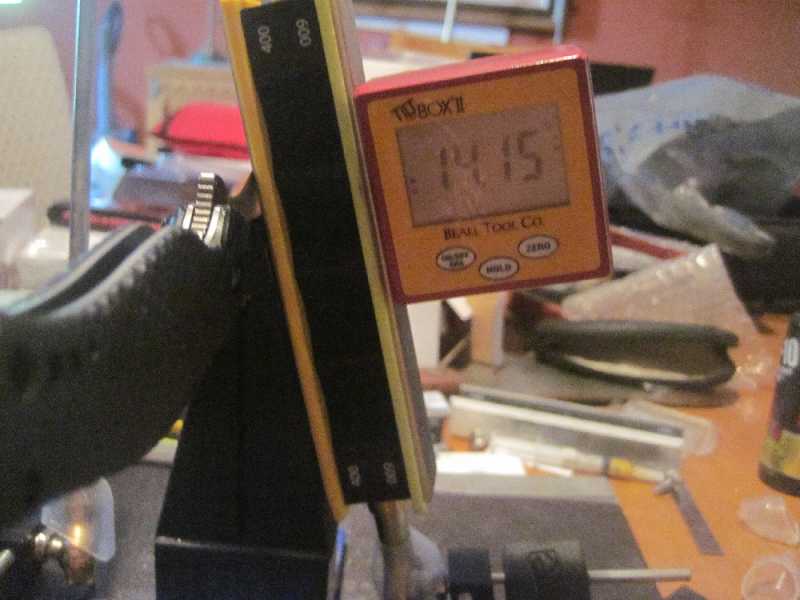
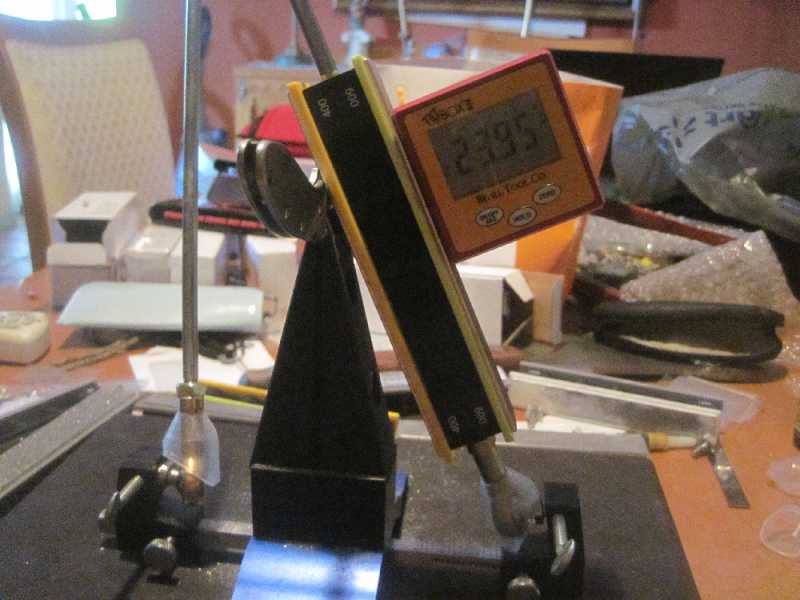
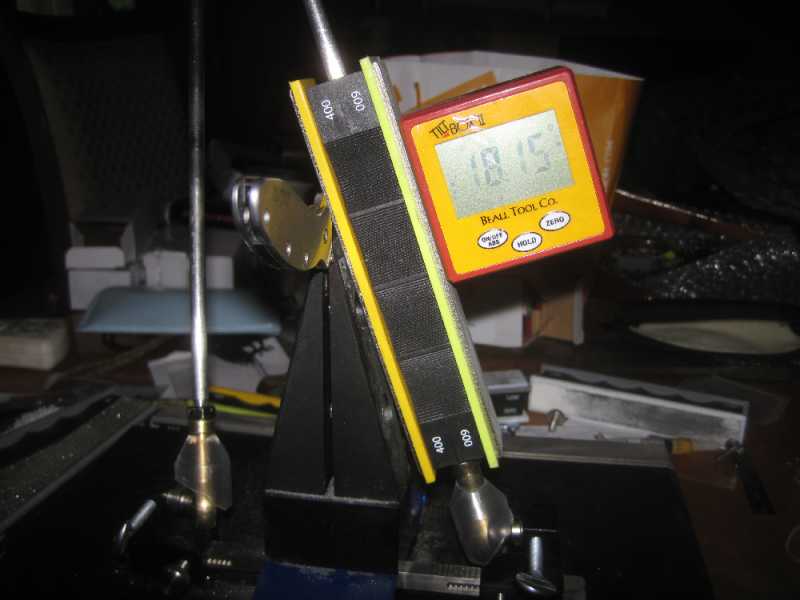
I cleaned and zeroed the meter between each measurement and choose a 25 degree standard to check my calibration in between as well. I jumped through these hoops so I could remove any doubt in my own mind about the Digital inclinometer aka The Tilt Box.The shots are of the Spec bump in both the upper and lower setting with min and max angles recorded and the chive in just the upper to see a smaller blade.
If there is a longer arm I want one, if not I’ll make one. But the geometry of the base with the riser is more of an issue on the low side. I don’t see any way around hogging out some metal. Has anyone done this? And what shape did you end up with?
Spec Bump upper max 22.20 upper min 12.55
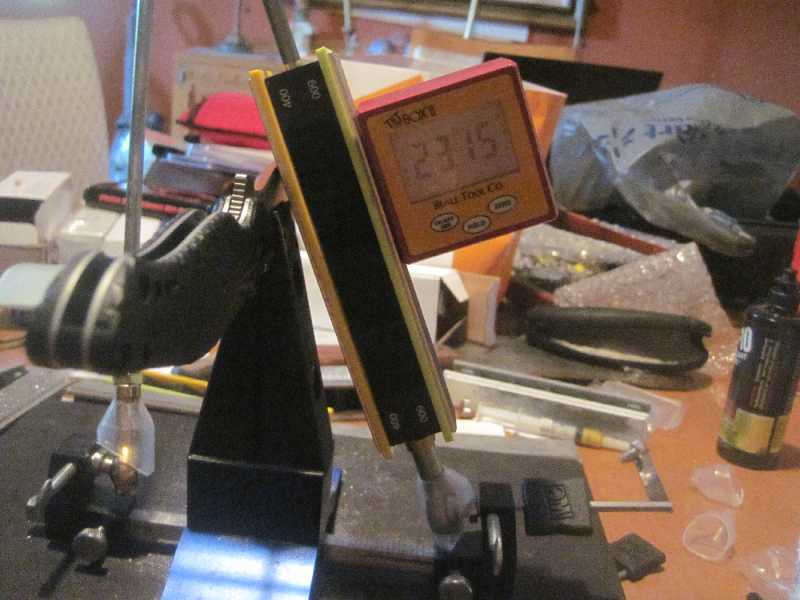
Spec Bump lower max 23.15 lower min 14.15Chive max 23.95 min 18.15
08/28/2012 at 1:36 am #5083Thanks for bringing this up guys! Now that I’m in the office and looking at the new iteration of the joints from the prototypes I’ve been using, I see the difference. I’m working fast and furiously today to get the new base rods designed and I’ll get the drawings off to the machine shop today.
-Clay
08/28/2012 at 9:30 am #5102Thanks Clay!
Thanks for bringing this up guys! Now that I’m in the office and looking at the new iteration of the joints from the prototypes I’ve been using, I see the difference. I’m working fast and furiously today to get the new base rods designed and I’ll get the drawings off to the machine shop today.
-
AuthorPosts
- You must be logged in to reply to this topic.