Advice for Disassembling the Gen 3 Pro
Recent › Forums › Main Forum › Advice for Disassembling the Gen 3 Pro
- This topic has 9 replies, 3 voices, and was last updated 07/07/2020 at 9:44 pm by
 000Robert.
-
AuthorPosts
-
07/06/2020 at 8:59 pm #54489
I’ve got the PDF for disassembling the vise, but it presupposes that it’s been removed from the base. The only thing I could find on YouTube was a dude who took apart his WE 130. I think I can handle the vise. I’m nervous about dismounting it from the blue, angle marked base plate because I don’t know what parts lie beneath. Truthfully, it all needs to be cleaned of diamond dust anyway. Any advice?
07/06/2020 at 9:43 pm #54490You are correct.
You’ll probably want to unscrew the ball ends with the guide rods to start, to get them out of the way. (Sorry about your blue locktite).
The blue half-circle like shaped base plate needs to be loosened and removed. That allows access to the vise attachment screws that pass up through the blue plate. The angle adjuster lever should be rotated all-the-way to the right, (to the widest angle setting). Then the four hex socket flat head screws, (at the corners), that hold the blue plate down need to be loosened and removed. The blue base plate lifts up and off from between the bracket ends. It may require you tilt it up one side first to lift it out.
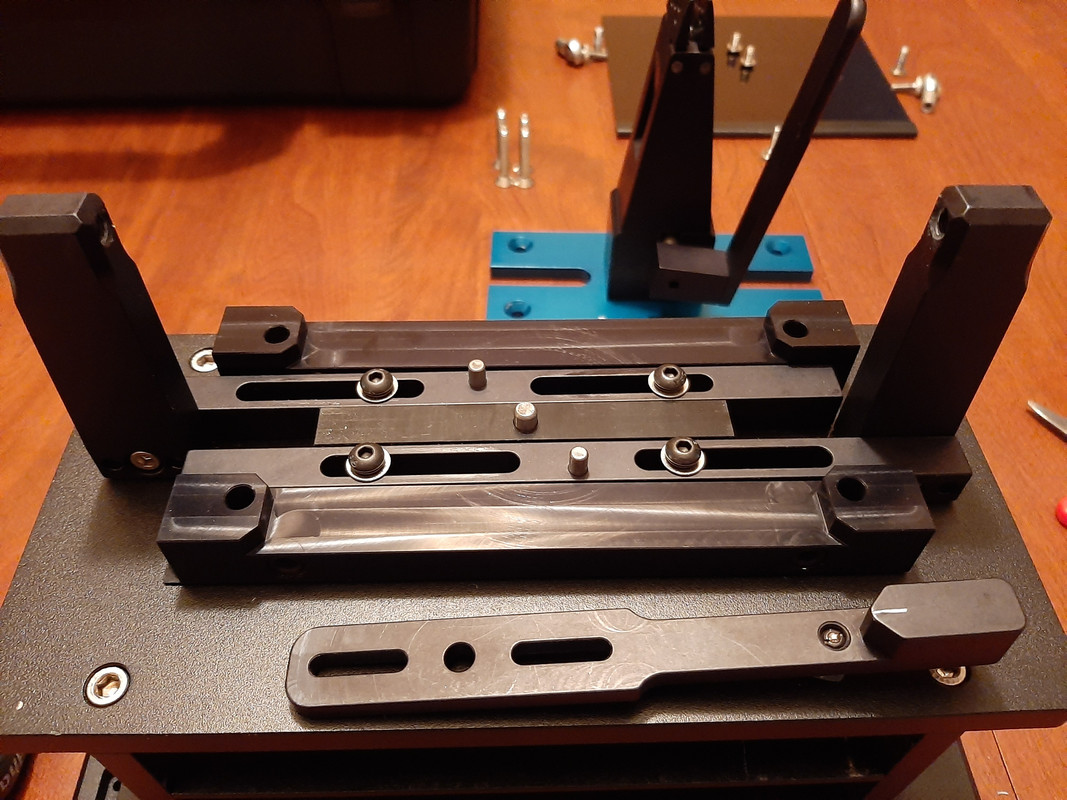
Under the blue deck plate are two black opposing sliding bars that loosely connect the rotating angle adjuster lever, by just fitting together. Every thing just sort of sits there, in place and fits together. The blue base plate lays down over the moving slide mechanism parts and holds it all down and in place. There are also couple of short round rod like pieces that just sit there like the slide bar mechanism, and they can become displaced. They are positioning spacers, locks or stops of sorts. They just sit there in their positions along with the slide bar parts until the angle adjuster blue base plate is screwed down over the top to sandwich down the moving parts in they’re operating positions. Make sure you lift the blue deck off slowly the first time you open it up so you can see where everything goes so you can put it back together. You may want to take a picture with your phone to help you put it back in place.
All the parts lift right out to clean out the dust. Canned spray air (like that used on computers) is handy here. The rotating angle adjuster lever arm interlocks with pins to drive the two opposing sliding bar bracket arms adjusting mechanism, left and right as the lever is rotated from far right to far left. The bars move the attached bracket ends in towards the center, closer together, to decrease the end bracket spacing for low angle settings, and the bars slide the opposite direction, moving the attached end brackets to the outside, spreading the end brackets apart for wide angle settings. Pins on the rotation lever arm fit down into grooves on the two sliding bars to make the simple mechanical connection. The rotation of the lever arm handle from far left to far right drives the two sliding bars left and right simultaneously to move the guide rod end brackets through the angle range.
(It’s a simple mechanical setup that converts the lever arm’s rotational motion into an opposing sliding motion. This motion is how the Gen 3 Pro controls the gross angle adjustments of the end brackets. The fine angle adjustments are done on each side’s end brackets, individually moving the ball ends in or out with the micro-angle adjustment screws.)
After you have removed the blue base with the attached vise, the vise is removed by loosening two flat head hex socket screws from underneath. Then you can disassemble and clean as the vise per the PDF, (below).
Reverse these steps to reassemble. Hope this helps.
WEClampCleaningSee photos in post by modernflame down below
Marc
(MarcH's Rack-Its)Attachments:
You must be logged in to access attached files.
3 users thanked author for this post.
07/06/2020 at 9:57 pm #54491I don’t have a Gen3 Pro but I would just mark it on two opposite sides with white-out or something easy to remove so that I could put the clamp back on the base at the exact location, just in case there are no locator pins. I am sure that someone with experience will chime in soon.
1 user thanked author for this post.
07/06/2020 at 10:10 pm #54492The screw tolerance is tight so the vise is pretty much self aligning as it’s locked in place. The two screws that secure the vise front the underneath are flat head screws that fit precisely in they’re counter sink holes to position it correctly.
Just like the WE130, that only sits in one position on it’s mount, the Gen 3 Pro was engineered to be essentially self centering, too.
Marc
(MarcH's Rack-Its)3 users thanked author for this post.
07/06/2020 at 10:17 pm #54493Sounds great, Marc. Thanks for helping us newbies out!
1 user thanked author for this post.
07/07/2020 at 5:38 am #54495Thanks, fellas. I’ll give it a shot. May snap a few photos for posterity.
1 user thanked author for this post.
07/07/2020 at 5:45 am #54496Thanks, fellas. I’ll give it a shot. May snap a few photos for posterity.
Taking photos is always a good idea.
07/07/2020 at 6:34 am #54497Another concern I have is reassembling the device in such a way that the guide rods remain in exactly the same relationship to each other. Right now, the measured angle on each side is within my angle cube’s margin of error. I don’t have a micro adjust feature. Am I in for more pain?
07/07/2020 at 7:04 pm #54502Success! I took a few photos, but this gen 3 Wicked Edge is remarkably well made. I admire anything that was engineered to be disassembled and maintained by the end user. Simple, durable components with a minimum of parts. I also got rid of the blue thread locker and am planning an upgrade. I believe the quality of this machine more than justifies its cost.
The outer horizontal brackets are secured by the vertical bolts that attach the semi-circular blue plate. Once the blue plate is off, you can remove and clean the lever as well as the outer brackets. The black screws with the washers provide the tension in the mechanism as you change angles. Take them out and clean the parts. When reinstalling, just move the brackets to the widest angle position and the screws fall right into place. Don’t over tighten, as this would prevent the brackets from sliding left and right. As far as the clamp, it was quite intuitive, even for a new guy.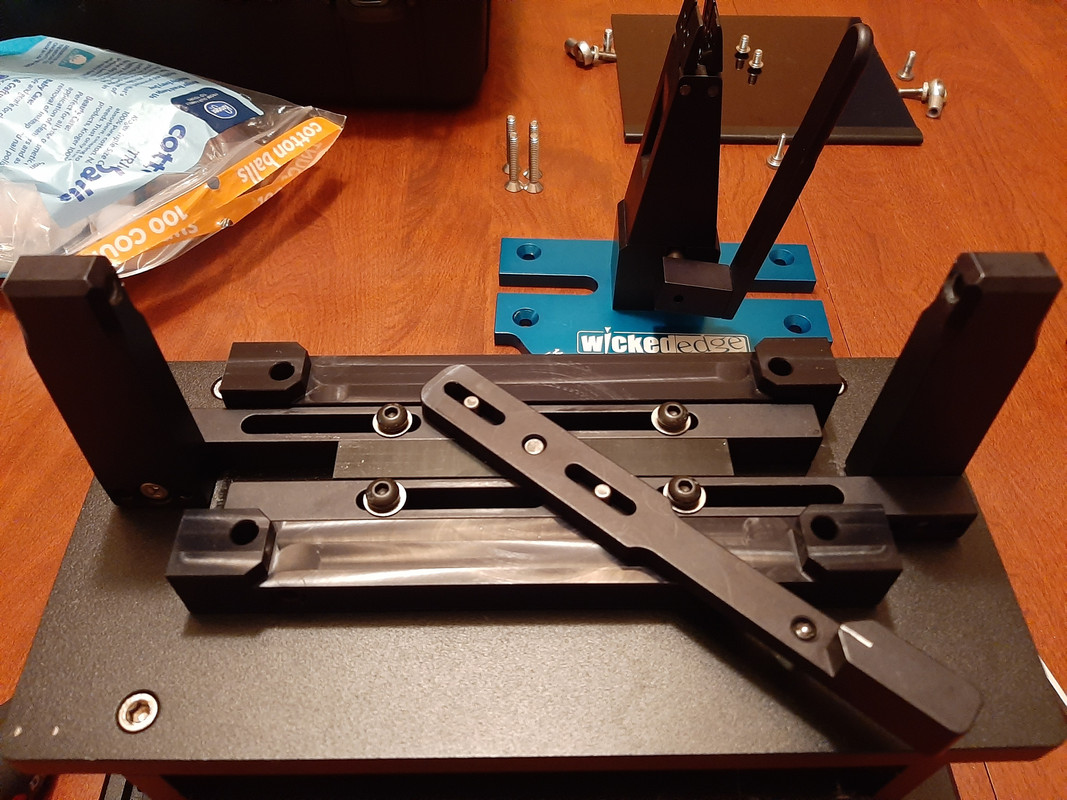

3 users thanked author for this post.
07/07/2020 at 9:44 pm #54505Cool! I’m glad that all worked out well for you.
-
AuthorPosts
- You must be logged in to reply to this topic.