Advantages and disadvantages of different sharpening techniques
Recent › Forums › Main Forum › Techniques and Sharpening Strategies › Advantages and disadvantages of different sharpening techniques
- This topic has 63 replies, 9 voices, and was last updated 11/20/2018 at 12:14 pm by
 wickededge.
-
AuthorPosts
-
10/04/2017 at 1:39 am #41353
We’ve discussed sharpening techniques in quite a few topics but, as far as I know, never devoted a single topic to this subject. The current discussion started in another topic (here) and Tom suggested we move the subject to a separate thread. I didn’t want to mess up that thread, so I quote a few people from that topic here.
The main sharpening techniques I know are edge leading, edge trailing and edge following (parallel to the edge). And they can be combined, of course.
Personally, when I reprofile a knife, I start with scrubbing (a combination of edge leading and edge trailing) on one side until I feel a burr and then do the same on the other side. I often start with 100 grit, but this may vary. I then turn to edge following strokes with the same grit, mainly to remove the burr.
What I do next sometimes depends on my mood (which is one of the reasons of this topic: I don’t have any exact reasons for particular techniques), but often I either continue for a few grits with the scrubbing followed by the edge following technique, or I immediately apply the edge leading technique. At higher grits I usually apply edge leading only, since I have the impression this reduces the chance of chipping (although I seldom encounter chips during sharpening). But sometimes I apply edge trailing, too.
In the other topic Clay gave a good reason for applying the edge leading technique:
In our testing, there is a very slight performance gain in sharpness when using edge leading strokes. To test sharpness, we measure the force, in grams, required to cut through a material. To start, we sharpen a sample blade to a specified grit level and at a specified angle and then measure the sharpness. In the case of stroke direction, we’ll sharpen two sample blades to the same grit level and at the same angle, but use edge leading strokes on one and edge trailing strokes on the other. A blade done with edge leading strokes to 1000# at 20 DPS might require 150 grams to cut the material. Its counterpart done with the same settings and edge trailing strokes might need 153 grams to cut the material. So it’s a slight improvement, only a couple of grams, but maybe worth the effort.
Tom also had a good contribution, advocating edge leading:
I had suspected for some time that when sharpening with relatively low grits stones, there was a tendency to break off pieces of the apex and that this seemed to be much worse when using trailing edge strokes. About a year ago (maybe a bit less) Clay showed us some microphotos of edges he was working on (I don’t recall the original purpose of his tests) and it appeared that leading edge strokes left a more uniform edge than when using trailing edge strokes.
After Clay’s photos, I started to go leading edge only. Up to a point. Above 400 grit, I’ll resort to scrubbing strokes, but I try to keep the up-strokes at a lower pressure. Of course, when you go to film, you are obliged to use trailing-edge strokes to avoid slicing the film. Hopefully, the grit at that point is so fine that edge breakage isn’t a factor. Or is it?
Tom also had another contribution:
I’ve settled in on a fixed pattern for each grit. 400 is down and toward me; 600 is down and away from me; 800 is down and toward me; 1000 is down and away from me, etc. If I decide at some point to pursue a mirror finish, I can tell pretty well which grits I need to concentrate my efforts with by the scratch patterns. If I need to concentrate on a specific area to remove more steel, I will use more vertical strokes, taking care to blend the steel removal with the rest of the edge. Often – especially with longer blades – instead of a single long diagonal stroke, I will use a series of shorter, diagonal strokes – imagine a saw-tooth pattern – to finish a particular bevel. Where I expect to need to remove a lot of steel, I may use a series of ten or fifteen diagonal strokes for each two inches of blade length. I’ll overlap those series of strokes to average out the scratch patterns. Whatever floats yer boat… or trips yer trigger…
So my question is: what technique do you use, when and why?
Molecule Polishing: my blog about sharpening with the Wicked Edge
10/04/2017 at 10:25 am #41356I use edge leading strokes mainly because I had read on this forum that edge leading is superior when compared to edge trailing strokes. At the end of the day I don’t think it makes enough of a difference to notice in the actual use of a knife, but neither do small differences in bevel angles from one side to another. I do use scrubbing strokes when I’m trying to remove a lot of material.
Another technique that I have seen people use is moving the stones in a small circular motion. It’s not all that common, but there is one video on youtube in particular where a Wicked Edge user does that.
10/04/2017 at 11:23 am #41359The video maker has included a lot of information dealing with a lot of different issues in his effort. Thanks for posting the video, David.
Marc
(MarcH's Rack-Its)1 user thanked author for this post.
10/04/2017 at 11:49 am #41360If I had to pick one technique and settle on it, I think I’d do the following:
- Set the angle in the usual way, using a marker for discovery of the angle and sweet spot
- Color the bevels with marker
- Make alternating, edge trailing strokes with coarse or medium stones until the marker is almost gone
- If I were using magnification diligently, I might switch to a higher grit stone at this point and proceed until I’ve removed all the marker. In that case, I would skip Steps 4-5
- Switch to the next higher grit and scrub on one side until I’ve raised a burr
- Scrub on the opposite side until I’ve raised a burr
- Switch to the next higher grit and start alternating, edge leading strokes. These strokes are usually mostly perpendicular with a slight bias of heel-to-tip (it’s important to grip the lower part of the handle and verify that your fingers will be below the blade if the stone comes off the tip of the knife.)
- If I’m pursuing a mirror finish, then I alternate the direction of the strokes at each grit change to help me ensure that I have removed the scratches from the previous stone e.g. edge leading, perpendicular with heel-to-tip bias then edge leading ,perpendicular with tip-to-heel bias. I also often use parallel strokes with the finer grits when pursuing a mirror finish e.g. 800# parallel to the edge until 600# scratches are no longer evident, then 800# perpendicular with heel-to-tip bias, then 1000# parallel until the 800# scratches are gone, then 1000# perpendicular again with heel-to-tip bias.
- Continue until I’ve reached the highest grit diamond stone I have
- Do light scrubbing strokes on each side, feeling for any little bumps or hitches in the action between the stone and blade. If I find a rough patch that indicates a scratch that hasn’t been removed, I concentrate there for a bit until it’s gone and then return to some alternating strokes to establish the final scratch pattern. I use progressively lighter strokes toward the end with the last few being whisper light.
-Clay
10/04/2017 at 12:26 pm #4136510/04/2017 at 12:38 pm #41366I have been at it for a couple of years now and use different strokes depending on whether it is the first time on WEPS for a knife or not. I have enough confidence in my data (attached), alignment guide and angle gauge now that I don’t bother with the sharpie or burr verification. I just go at it with the “jersey double stroke” for speed although films and leather go edge-trailing. I like using a lot of gentle strokes vs. fewer hard strokes to minimize edge stresses and its unknown specific effects.
If the knife is new to WEPS or being reprofiled, I like to use long up/down strokes as I progress down the blade (one side at a time). It seems like a more efficient removal of steel and helps longevity of the diamonds.
BTW how do you paste in the nice videos, I cannot find the instructions.
Attachments:
You must be logged in to access attached files.
4 users thanked author for this post.
10/04/2017 at 1:45 pm #4136810/04/2017 at 2:39 pm #41369BTW how do you paste in the nice videos, I cannot find the instructions. https://youtu.be/kN7g6Ygkq2o
To post the video directly, you paste the link between the youtube and /youtube commands like below, but using the regular [] brackets instead of the {} brackets.
{youtube}https://www.youtube.com/watch?v=kN7g6Ygkq2o&feature=youtu.be{/youtube}
10/05/2017 at 4:25 am #41387Thanks a lot, guys. It seems we all use similar techniques (scrubbing and edge-leading). What I learned from Clay’s description is that I sometimes need to pay more attention to removing the metal from both sides of the edge evenly. And, as I wrote before, when I can sharpen again, I intend to use the microscope more often to ensure I’ve completely removed the scratches from the previous grit. (This was a bit time-consuming in the time I sharpened 20 knives every other weekend 🙂 .)
What I don’t entirely understand, Clay, is why you include step 3 and don’t go to steps 4 and 5 (scrubbing) directly. Is this to make sure you remove the metal from both sides of the edge evenly or is there another reason?
And also thanks for the insight that stropping stretches the edge a little, thus making the knife even sharper. (You wrote this in another topic, but I cannot find it back.) It is not only about removing the final burr and making the edge even more smooth.
Funnily enough, there is a very similar discussion on Kitchen Knife Forums right now (here). The main difference is that the discussion there is about manual sharpening and it is interesting to see that most people there (including Jon Broida, whom I regard highly) prefer edge-trailing strokes in order not to bite into the stones. With the fixed angle the WEPS provides we don’t have that problem.
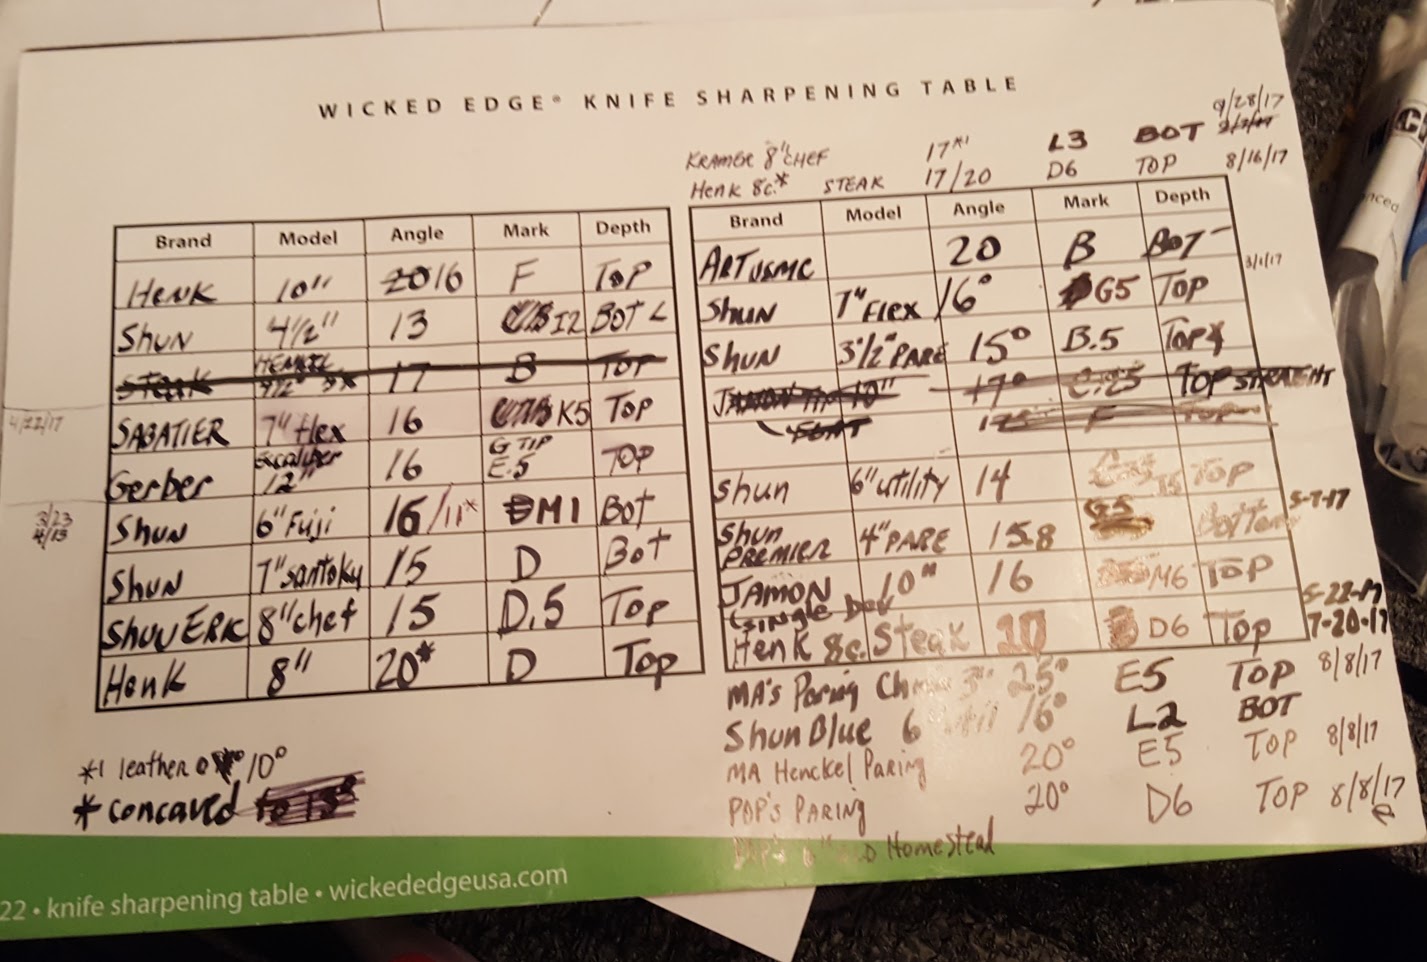
And since we’re good at being off-topic in this forum 🙂 , here is a part of the spreadsheet I use to record my settings, Readheads:

I hope it is a bit readable. You can increase the magnification in your browser, if necessary.
Molecule Polishing: my blog about sharpening with the Wicked Edge
2 users thanked author for this post.
10/05/2017 at 9:05 am #41398What I don’t entirely understand, Clay, is why you include step 3 and don’t go to steps 4 and 5 (scrubbing) directly. Is this to make sure you remove the metal from both sides of the edge evenly or is there another reason?
It’s to avoid creating a burr. If I can see clearly w/ magnification that I’ve reached the edge, then I can stop there without removing excess metal and drawing up the steel into a wire edge. It also helps minimize any potential tear-out at the edge from coarse stones.
-Clay
10/05/2017 at 9:15 am #41399Hmm, just a thought, it would seem to me that it might be best to reach the apex (ie. burr) with the higher grits which may leave a “smoother” apex once the inevitable burr is removed. In other words, the smaller the burr the better. Also, have you ever considered digitizing the WEPS to sense things like apex reached, previous scratches removed/minimized, built in angleometer, etc.
WDYT ?
10/05/2017 at 9:24 am #41400Hmm, just a thought, it would seem to me that it might be best to reach the apex (ie. burr) with the higher grits which may leave a “smoother” apex once the inevitable burr is removed. In other words, the smaller the burr the better. Also, have you ever considered digitizing the WEPS to sense things like apex reached, previous scratches removed/minimized, built in angleometer, etc. WDYT ?
I think we’re saying the same thing, minus the need to actually create a burr. If you’re a very experienced sharpener and have the benefit of good magnification, you can see that you’ve reached the edge without taking the time to stretch out a very prominent burr, which you’ll end up knocking off anyway and would be a waste of metal. Cliff Stamp argues (somewhere) that the work-hardening that happens by flipping a burr back and forth can eventually lead to stress fractures at the edge and he advocates for “destressing” the edge by grinding it flat and rebuilding the bevels. Probably some degree of work-hardening is actually beneficial, but can probably be overdone.
We’ve played with the idea of building in an inclinometer to the handles and we’ll continue to pursue that. I’d need to talk to someone much more knowledgeable about sensors for anything like apex detection.
-Clay
10/06/2017 at 11:21 am #41419With all due respect to Mr Stamp, I’ve never bought into the “destressing” theory. But that’s not the purpose of my post here. On reading Clay’s post, it occurred to me that if you’ve ground a flat on the edge, for whatever reason, stoning until you’ve got a burr will require that you stone well past your intended apex point. Once you’ve created that burr, you will have an apex that is way off center. Does this mean you shouldn’t file the edge flat if your only method of finding the apex is by feeling for a burr? I think so.
I often file edges (or sections of edges) flat, but only to remove the steel standing above the deepest point of damage. Usually, that’s the worst dent on the edge. I will file (I use one of my diamond stones) only until the line of the apex is continuous and not interrupted by the deepest part of the dent (or chip). This means that the outer parts of the dent might still be visible, but I know that those areas will be stoned away with the other steel outside of the bevel. This is really hard to explain – I probably ought to take a photo…
10/06/2017 at 11:42 am #41420Once you’ve created that burr, you will have an apex that is way off center. Does this mean you shouldn’t file the edge flat if your only method of finding the apex is by feeling for a burr? I think so.
Yes, I think that’s true if you’re using scrubbing motions on one side to draw a burr. If you’re using alternating strokes for most of it, you can keep it pretty centered but it would definitely take longer.
-Clay
1 user thanked author for this post.
10/06/2017 at 11:46 am #41421Tom, I’m under the impression that what you’re doing with diamond stones, “only to remove the steel standing above the deepest point of damage” is exactly what Cliff Stamp is doing, only using a file, but you’re doing it to a more limited or localized area of the bevel? I have done what you do Tom, many times. Observing the surface of the diamond stone, afterwards, I have seen localized scratches and wearing, where the stone abraded the damaged bevel, particularly when “distressing” chips from very hardened steels. I think I’ll use a less expensive file in the future.
Here’s a picture of the scratched Diamond Stone:
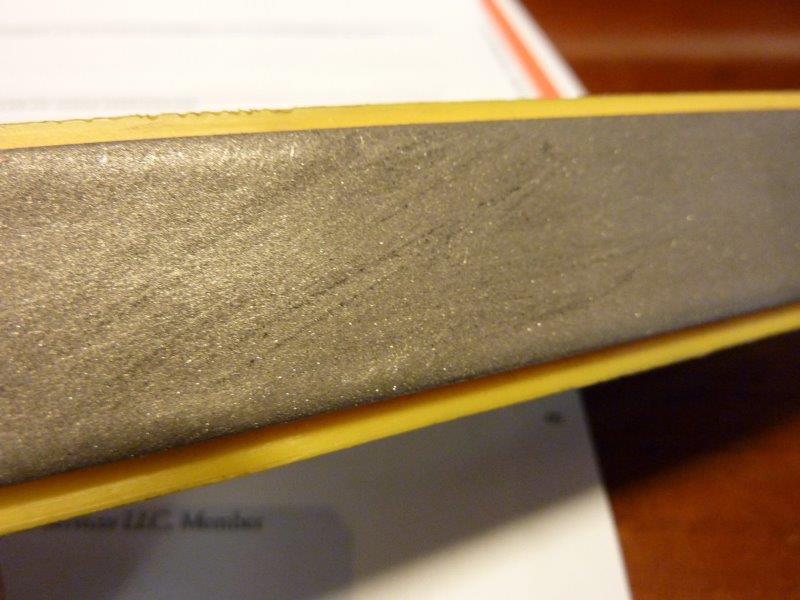
To prevent stoning well past your intended apex point, I stone one side then the other, alternatingly, with the intention of balancing the metal removal and maintaining a centered apex.
Marc
(MarcH's Rack-Its)Attachments:
You must be logged in to access attached files.
1 user thanked author for this post.
-
AuthorPosts
- You must be logged in to reply to this topic.