2016 Pro Pack 1
Recent › Forums › Main Forum › Getting Started › 2016 Pro Pack 1
- This topic has 39 replies, 6 voices, and was last updated 12/24/2021 at 12:19 pm by
 Marc H.
-
AuthorPosts
-
01/30/2021 at 4:52 am #55891
Thanks! Aside from any potential health risk, I assume the issue is that shavings could get into the ball joints and damage the mechanism. Do most of you cover the ball joints, add washers to the guide rods, add magnets to the base, soap up your stones, or just use the WE as shipped? I’ve seen a lot of posts and videos about this issue, but there seems to be a lack of consensus. Clay had one video recommending soap on the stones, but in no other video have I seen him using that technique. 😉
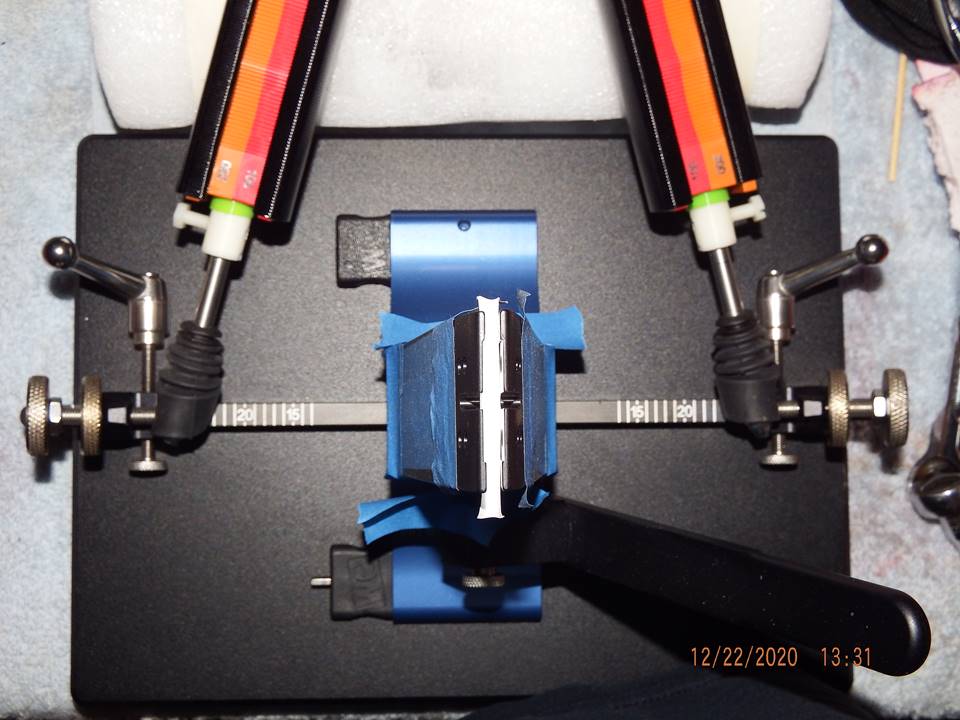
I cover my ball joints. I always wear a N95 face mask when sharpening knives. And I only use soap and water when I am reprofiling a blade or using the first stone during sharpening. I don’t use washers or magnets, I just vacuum the vise every now and then. But I tape up my vise with painters blue tape to help keep trash out of the inner workings of the vise.
Attachments:
You must be logged in to access attached files.
3 users thanked author for this post.
02/07/2021 at 12:03 am #55945I’ve got my WE120 set up and some practice knives ready to go. I have seen mention on other posts about not rolling the tips, and making sure that you go all the way past the tip, continuing along the same line, when doing a sweeping motion. However, this great video that MarcH recommended also shows circle and scrubbing motions.
Any advice for how to properly use those motions as you sharpen the tip when reprofiling a knife? Thanks for the help.
02/07/2021 at 8:41 am #55947Steve, I’ll try to keep this succinct. We have a stably clamped knife and abrasive sharpening stones. There are contact patches on both the knife edge bevels and the sharpening stones. The contact patch is where the two touch at a given moment for that position, on each of them, as the6y pass across each other as we sharpen the knives. As the stones move across the bevels, irrespective of the set angles or the sharpening strokes employed, the contact patches move along the stones and along the bevels, simultaneously. The size and the shape of these two contact patches, the stone’s and the bevel’s, change as these two surfaces slide across each other to different positions along the stones and along the bevels as we sharpen the knives.
It is incumbent on you the W.E. user to maintain full flat, complete and consistent contact between the stones and the bevels as the two pass across each other.
It doesn’t matter the grit, the bevel angle settings, the sharpening stroke being employed, none of these. To sharpen the knife well all we need to do is maintain this flat complete and consistent contact of these two contact patches as the stone’s contact patch slides across the bevel’s contact patch. No matter what we are doing.
Each and every sharpening stroke is just a way, a method, or a direction to slide the sharpening stones across the bevels. Each and every sharpening stroke direction whether it is edge leading, (down and onto the bevel), edge trailing, (up and off or away from the knife edge), round and around on the bevels, scrubbing up and down across the bevels or sweeping across the bevel’s length, doesn’t matter as long as it’s done well. Don’t get me wrong, the stroke style does contribute to the sharpening process and each stroke style yields it’s benefits. But what really matters is that the two contact patches, the sharpening stone’s and the knife bevel’s are kept in complete full contact as they move across each other, with consistent pressure, while utilizing these different style sharpening strokes. As long as this contact is flat and consistent the sharpening stones will grind the bevels at the set angle, and ultimately smooth and polish the bevels as it sharpens the knife.
The pressure applied, (firm or light) and the sharpening stroke used do affect the way the knife will be sharpened. This sharpening stroke order or routine that you choose to employ, that is, what you string together in a sequence are up to you. This preferred sequence is what we’ll call your sharpening routine, your technique. It’s up to you through practice and repetition to decide the sequence or routine of sharpening strokes that gives you the sharpness and polished results you are seeking.
Ultimately, to achieve these results only requires that whichever stroke you use, while using it, that the two contact patches stay in flat constant and consistent contact as the stones slide across the bevels and the bevels slide under the stones. Even at the knife tip.
As the stones pass off the knife tip, under the applied pressure, there is a tendency for the user to roll or push the stone in towards the knife’s centerline, as it slides across the knife tip. It’s is recommended that a conscious effort be made to follow through with the flat consistent sharpening stroke as the stone slides off the knife tip avoiding the inward push. Another good method is to lift the stone up and off or away from the bevel during the follow through to avoid rolling the sharpened tip.
It’s on the W.E. user with sharpening practice and experience to determine the best applied pressure and the best direction to move the two contact patches relative to each other. The amount and quality of effort extended, the consistency of your efforts, the attention to details and the order, or the sequence, of the sharpening strokes will determine the outcome and the sharpness of the knife edge.
Most of the knives we sharpen have two sides and two bevels, (although not every knife). To achieve the best sharpened edge, every thing we do to one side of the knife, that side’s bevel, must be done similarly in a balanced manner, to the other knife side’s bevel. This is why many sharpening strokes are done alternatingly, side to side. Where these two bevels intersect is the knife edge or the apex. The sharpness or keenness of the knife edge is determined by the precision of this intersection at the apex. Balancing your efforts side to side produces a sharper knife edge, and more even appearing bevels.
The balance of sharpening effort done to each knife side bevel, the angle of these applied bevels, the order and routine of the sharpening strokes and the sequence of abrasive grits employed, the effort expended with each grit, and your attention to details, all contribute to the knife’s sharpness and polished appearance. Knowing what to use when and with each knife and steel type can be a learned or experiential process. I like to call this the “art of sharpening”. Until you gain that experience simply start coarse and progressively move to finer grits as you try to make the bevels smooth and polished so they intersect precisely at your sharpened knife edge.
Marc
(MarcH's Rack-Its)5 users thanked author for this post.
02/07/2021 at 2:07 pm #55984Thank you for the detailed reply. It makes a lot of sense and I greatly appreciate the help. I hope that as I am learning, the USB microscope will help me see if my knife has a sharp tip or if it has rolled after each different motion to help me perfect my technique.
02/08/2021 at 1:28 am #56009MarcH, your suggestions above really helped me avoid rolling the tips on my first test knife with my new WE120. Thank you again. While I have a long way to go before I obtain that legendary “Wicked edge” on my blades, my first attempt was still far sharper than I ever managed to achieve with my previous sharpening system.
I was able to raise a burr with no problem on the 200, 400 and 600 grits. After that, I did not notice a burr when working with 800, 1000, or 1500 grit stones. Is that what should be expected or did I not work the higher grits long enough (or possibly not detect a smaller burr)?
Thanks again for all of the help.
02/08/2021 at 9:36 am #56011Steve, I find that a ‘burr” forms with each and every grit I use. No matter how fine the grit. Even with sub-µ lapping films, if my stone set angles remain precise and consistent and my stone work is done well and thoroughly, I get a ‘burr”. Albeit a tiny one. It may even require a high powered USB scope to see it.
For me the “burr” is not my intentional end point but simply the results of consistent stone work. Others may do their stone work with the intention to produce a well formed “burr” as their endpoint or indicator that they’ve done enough steel work. Some users may look to form a standing burr along the entire length of the knife edge, on both sides. Then they’re ready to move on to the next grit.
Whereas, another group of W.E. users prefer to form a “burr” only with the initial, or coarsest grits and they avoid it with subsequent finer grits. They try to do their stone work right up to the point just before the “burr” forms. Then they move on up a grit. Their thinking is any “burr” formed may be steel wasted. Again, using the USB scope does help you monitor your progress. With practice you should be able to visually discern your desired endpoint.
Just be clear, even if you have a burr verify that the bevels are complete and fully formed down below the edge to the bevel shoulders, and all across the length of the knife on both sides.
Marc
(MarcH's Rack-Its)1 user thanked author for this post.
02/08/2021 at 2:03 pm #56016I check for a burr with every grit change on both sides. I use a piece of paper towel to check for the burr. If there is a burr, it will catch the paper towel or feel a resistance going across the burr. Of course, if there’s no burr the paper towel will just slide on off of the edge.
1 user thanked author for this post.
02/10/2021 at 6:59 pm #56071I’ve started on another test knife. This one is an 8” chef’s knife, and I’ve run into some trouble. The angle from the manufacturer edge seems to be 14.5 per side. I tested with a marker along the edge to find the sweet spot, which was about 2” from the tip as best as I could tell. I started with the 100 grit diamond stone (I’m breaking in my stones) and noticed that I am severely scratching the sides of the knife. I tried painters tape, but the stones just cut through it. I’m not slipping below the knife edge with the stone on the downstroke (I bottom out on a rubber axle boot I am using before the stone goes that low). I’m using the standard length arms. Have a reached a blade length where I will need to clamp this knife twice and sharpen it in sections? Does the blade need set deeper into the clamp (I used the lower set of guide holes, but did not go down to the screw). Any advice is greatly appreciated. It’s not a big deal on this test knife, but I certainly don’t want to do this kind of damage on one of my better knives. 😉
Attachments:
You must be logged in to access attached files.
02/10/2021 at 7:43 pm #56073A wider photo, from further away, so we could see how the knife is clamped in the vise, would be helpful.
A knife that’s clamped, positioned higher in the jaws will allow the end brackets with the guide rods to be position on the square bar further out and away from the vise/knife center-line, to achieve the same angle setting. Because of Pythagorean Theorem, as any one leg of the triangle is increased, The other legs have to increase proportionally. That should in turn move the stone further off of the knife sides.
Also, scratched knife sides when the stone’s top edge hasn’t been slid down below the knife edge may suggest the bevel angle setting is so acute that it’s setting the stone almost parallel to the knife sides. Close enough to scratch the knife sides.
Also, dragging your finger tips that may have the stone’s abrasives on them, across the knife sides as you hold the stones while you are sharpening can also impart side scratches. The wispy, curved appearing scratches I see on the knife side suggests that’s a possibilty. I wouldn’t expect that to scratch through tape applied to the knife sides, though.
Last, I would expect you to be able to sharpen that knife with the standard rod length if the knife was clamped more centered.
Marc
(MarcH's Rack-Its)1 user thanked author for this post.
02/10/2021 at 8:12 pm #56074In getting the additional photos you requested and reading your response, I’ve figured out what the issue is. I was incorrect when I said I bottomed out before slipping off the edge. At the heel of the blade, that statement was not true and I am clearly doing so.
I feel like the knife is mounted too far forward. I ended up here based on a Sharpie test. The test strokes at the tip were not reaching the edge and we’re hitting lower on the shoulder. I kept pulling back a little at a time until the stone reached the edge, leaving me at the position seen in the photo. Did I do something wrong to end up clamped there?
Attachments:
You must be logged in to access attached files.
02/10/2021 at 8:49 pm #56076I look at that knife blade, in it’s entirety, considering it as though its a gentle curve from tip to heel. I try to clamp it centered to the curve.
I also imagine a straight line running between the knife’s tip and knife edge at the heel. Then I clamp the knife roughly centered, to the curved edge, fore and aft while I rotate the handle slightly down so the imagined line is horizontal roughly parallel to the vise’s flat tips.
For the 14.5° angle setting you seek, I’d clamp the knife up high in the vise, to use the top depth key pin holes. The spine will most likely rest just on the rear pin as the spine is tilted slightly up off the forward pin as the knife is rotated handle down around the rear pin.
In summary, I clamp it so it’s positioned high up in the vise to make an imaginary line, from tip to heel, roughly horizontal or parallel to the top of the jaw line, with the blade’s length split, centered to the jaws.
Marc
(MarcH's Rack-Its)02/11/2021 at 6:37 am #56079I played around with your suggestions today, and (as always) it was great advice. I was under the impression that the objective was to always clamp the knife with the spine parallel to the two pins in the depth key. I had been wondering how this would work with knives (such as the Ka-Bar USMC fighting knife) that have a much more pronounced curve to the tip. Rotating the knife did allow me to be able to clamp it more toward the center, while still reaching the apex near the tip. Thanks again!
03/29/2021 at 6:42 pm #56518I have continued practicing on a variety of cheap knives and learn more with each one that I do. I have now had two knives where I am having a hard time determining the angle. I’ve followed the process outlined in the link below to use a marker and test where the stone contacts the bevel. I think that I understand the process as far as it goes. However, on two (admittedly very cheap) knives the stone removed the marker in the middle of the bevel, leaving plenty of black marker both above and below the area the stone is hitting. I’m not sure why that happens or how to adjust the angle when it does. Any thoughts on what I am doing incorrectly or what part of this process I misunderstood? Thank you for the help.
03/29/2021 at 7:01 pm #56519First question I have, are you using a lighted magnified device of some sort to help you to see the bevel well? Many of use work with a USB microscope. Also, I use a red or blue colored Sharpie. The colors stands out and they are easier to see where the ink is removed, then the black color.
If it is as you describe, you may be sharpening a knife with a convex bevel.
Your observations suggests you might be in the center of the curved convex bevel.
Marc
(MarcH's Rack-Its)1 user thanked author for this post.
03/29/2021 at 8:51 pm #56520I am using a USB microscope and confirmed where the marker is being removed. I will try blue and red to see if that changes the observation.
I bought a bunch of the cheapest kitchen knives I could find to practice and some of them have been great examples of problems with mismatched bevel angles, etc. So when I had this issue the first time I just reprofiled the knife and moved on. But now that it happened again I’m trying to understand it. The convex edge makes sense and I appreciate the insight. If it happens again I will take a few screenshots with the microscope and post them. I’ve already flattened this one out with the 100 stones.
-
AuthorPosts
- You must be logged in to reply to this topic.