2000x Microscope
Recent › Forums › Main Forum › Techniques and Sharpening Strategies › Abrasives › 2000x Microscope
- This topic has 41 replies, 10 voices, and was last updated 10/04/2012 at 10:44 pm by
Anthony Yan.
-
AuthorPosts
-
09/29/2012 at 6:40 am #5757
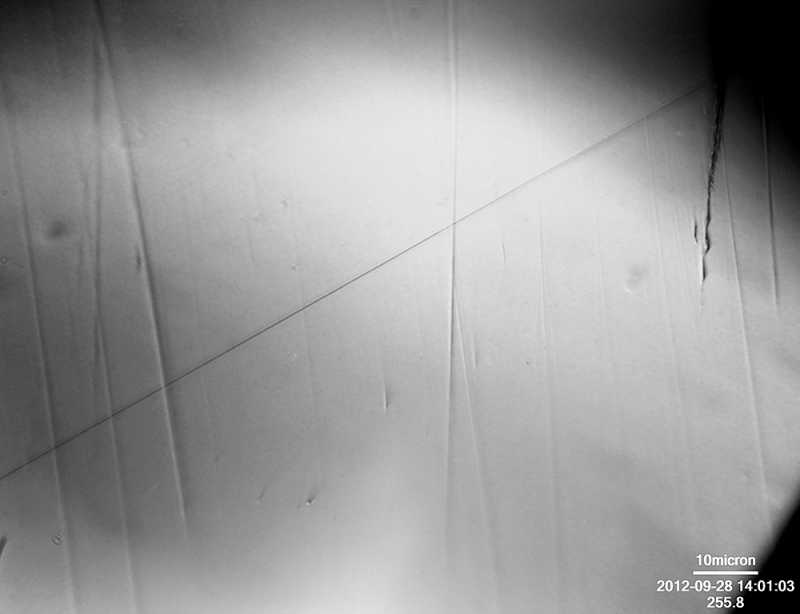
First image at 2000x and only a few seconds in which to post it:
The long diagonal scratch measures between .15um and .20um. I will have to work on making the annotations and measurements show up more on Monday, but for now, I’m really excited that I’ve got it operable at last.
Attachments:-Clay
09/29/2012 at 11:08 am #5760Hi Clay,
Wow, very cool!
btw, I’m not a microscopy expert. But as a physics major, I’m not sure that you can reliably measure features smaller than about 0.2 microns.
The resolution limit of optical microscopes is around 0.2 microns (which is 1/2 wavelength of visible light which is 0.4-0.7 microns). A conventional microscope cannot resolve smaller features. It’s a limitation of the physics of light. Basically, light is a wave, and so it will diffract. Light diffracts slightly when going through a microscope objective, and that diffraction causes some blurring that cannot be removed by any standard optics.
There are some non-standard optics which can get past this resolution limit, but they are very fancy, very expensive, and very technical. Computer chip manufacturers use some of these super-fancy techniques to optically stencil the patterns for transistors etc. And fluorescent microscopy can do some interesting stuff. Also, there is high-end research into microscope resolution. But all that aside, it seems very difficult to get to 0.2 micron resolution not to mention finer resolutions. The actual theoretical limit can be finer than this, but I have heard that 0.2 microns is basically the practical limit.
Some references:
http://en.wikipedia.org/wiki/Diffraction-limited_system
http://www.microscopyu.com/articles/optics/mtfintro.htmlI very much like Nikon’s webpage on general microscopy:
http://www.microscopyu.com/articles/optics/index.htmlIf you know someone who is more deeply familiar with the technical aspects of microscopy, maybe you can ask them? Or maybe you can ask the manufacturer of your microscope too.
Sincerely,
–LagrangianP.S. For those of you with a technical background: The diffraction basically causes the “true image” to be convolved with an Airy function. Conceptually, this is simlar to applying a Gaussian Blur in Adobe Photoshop (which is also a convolution). Using Fourier analysis, one can look in the frequency domain, where this is like applying a low-pass filter, after which, all the high-frequency details cannot be recovered. Some of the semi-technical details for this are discussed in Nikon’s webpage in the links above. For more technical details, one can go to undergraduate physics textbook on wave-mechanics, or a textbook on optics.
09/29/2012 at 2:29 pm #5761Lagrangian,
Thanks again for the informative post! I’m certainly no expert in microscopy either but I’ve read a few things here and there that agree with what you’ve said, especially about the limits of what can be achieved with optical scopes. I think you can see features below .2um but they are fuzzy at best, you just get the hint of them and I’m sure you’re right that you can’t state measurements in that range with confidence. For my purposes, I’m pretty content with this level for now as it at least helps me visualize more clearly what’s going on with some of the finer grits. It’s also helpful for analyzing different techniques like edge-leading vs edge-trailing. Once of these days, I’ll have to scheme regular access to and SEM 🙂-Clay
09/29/2012 at 11:01 pm #5764Once of these days, I’ll have to scheme regular access to and SEM 🙂
While that would be interesting, I think you may get beyond what you’re trying to “see” (from a practical stand point) Looking at the surface of polished steel where the grain structure looks like the surface of the moon may not actually be helpful in terms of sharpness. It would be interesting to figure out how much is enough, though.
For me, I find other elements like focus and depth of field to be more helpful than magnification.
Ken
09/29/2012 at 11:10 pm #5765Hey Ken,
My interest in the higher magnifications is to better understand what is happening with super fine polishing grits and substrates e.g. cow leather vs kangaroo vs horse vs nano-cloth etc… The studies I’ve already done have told me a lot, but I want to keep learning. I also want to be able to view and measure the edge end-on after it’s been sharpened with various media.
Once of these days, I’ll have to scheme regular access to and SEM 🙂
While that would be interesting, I think you may get beyond what you’re trying to “see” (from a practical stand point) Looking at the surface of polished steel where the grain structure looks like the surface of the moon may not actually be helpful in terms of sharpness. It would be interesting to figure out how much is enough, though.
For me, I find other elements like focus and depth of field to be more important than magnification.
Ken[/quote]
-Clay
09/29/2012 at 11:21 pm #5766Understood Clay, and I think that’s a great thing. Just pointing out there may be (I don’t really know) a point where more magnification isn’t more helpful.
But you’ll figure it out if true.
Ken
09/30/2012 at 1:07 am #5767First image at 2000x and only a few seconds in which to post it:
I was going to say you’re just a big tease… but in this case, I guess you’re a little one! :cheer:
09/30/2012 at 2:23 am #5770Hi Clay,
Have you considered a contact profilometer at all? It’s a device used to measure surface-roughness, and is typically used in some metal-working and/or machine-shops. It runs a tiny stylus over the surface and reports back a numerical measurement. The “advantage” is that while it is very expensive (thousands of dollars), it is not insanely expensive (like an scanning electron microscope). The downside is that it returns numbers, not an image. Or, I suppose, it may return a single line of data as a graph (ie: a 2d plot where x-axis is horizontal position of the stylus and y-axis is the stylus height). So it’s not as simple to interpret the results. And if the surface is directional (like lots of parallel scratches), then the scanning direction will affect the results.
There are non-contact profilometers; they’re typically based on light scanning. But non-contact profilometers are insanely expensive (at least from what little I’ve heard).
I know almost nothing about profilometers, except what I’ve read on wikipedia:
http://en.wikipedia.org/wiki/Profilometer
http://en.wikipedia.org/wiki/Surface_metrologyExample of a contact profilometer by Mitutoyo (high quality Japanese company):
http://www.amazon.com/Mitutoyo-178-561-02A-Surftest-Surface-Roughness/dp/B003Y74RE6/ref=pd_sim_sbs_indust_1Probably not worth buying. But if you have any friends who work in a lab for manufacturing, machining, or metrology, it might be worth asking them for a favor? 🙂
I kind of got curious about metrology in general, and got sucked into browsing Wikipedia for hours and hours.
Sincerely,
–Lagrangian09/30/2012 at 7:53 am #5776This is fascinating. I’d never even heard of a contact profilometer before. It might be what CoorsTek uses for their stones since they measure in RA (roughness average). I’ll definitely check them out. Thanks for the tip!
Hi Clay,
Have you considered a contact profilometer at all? It’s a device used to measure surface-roughness, and is typically used in some metal-working and/or machine-shops. It runs a tiny stylus over the surface and reports back a numerical measurement. The “advantage” is that while it is very expensive (thousands of dollars), it is not insanely expensive (like an scanning electron microscope). The downside is that it returns numbers, not an image. Or, I suppose, it may return a single line of data as a graph (ie: a 2d plot where x-axis is horizontal position of the stylus and y-axis is the stylus height). So it’s not as simple to interpret the results. And if the surface is directional (like lots of parallel scratches), then the scanning direction will affect the results.
There are non-contact profilometers; they’re typically based on light scanning. But non-contact profilometers are insanely expensive (at least from what little I’ve heard).
I know almost nothing about profilometers, except what I’ve read on wikipedia:
http://en.wikipedia.org/wiki/Profilometer
http://en.wikipedia.org/wiki/Surface_metrologyExample of a contact profilometer by Mitutoyo (high quality Japanese company):
http://www.amazon.com/Mitutoyo-178-561-02A-Surftest-Surface-Roughness/dp/B003Y74RE6/ref=pd_sim_sbs_indust_1Probably not worth buying. But if you have any friends who work in a lab for manufacturing, machining, or metrology, it might be worth asking them for a favor? 🙂
I kind of got curious about metrology in general, and got sucked into browsing Wikipedia for hours and hours.
Sincerely,
–Lagrangian-Clay
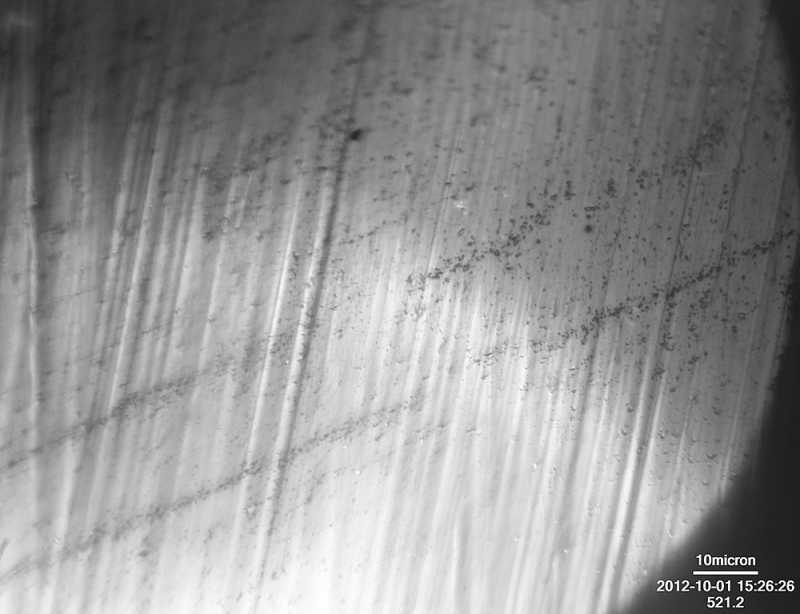
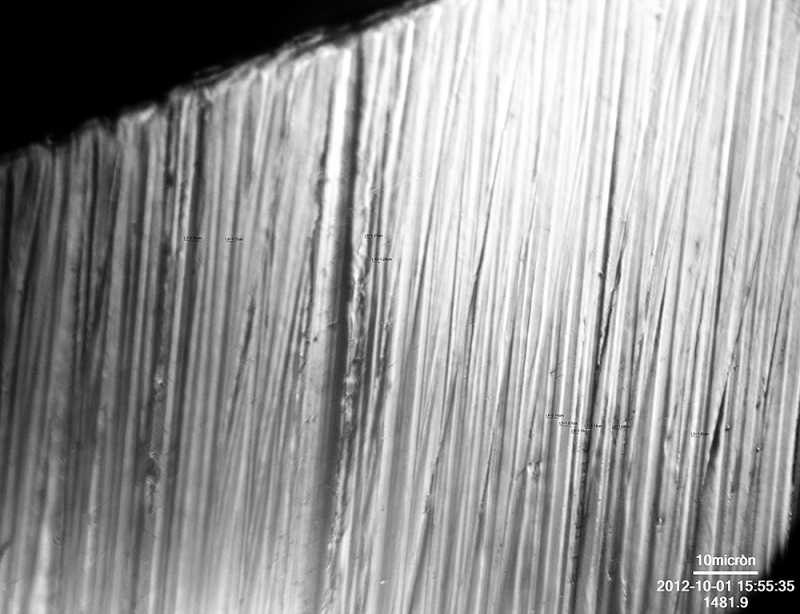
10/02/2012 at 4:29 am #5799While not pretty to look at at 2000x, here is another image of a blade that I polished mostly smooth and then used the fine side of the Micro-Fine ceramics to lay in a a scratch pattern:
The fine scratches going from lower left to upper right are left over from the kangaroo strops with .5um diamond spray. The couple of big scratches coming from lower right to upper left are from the Micro-Fine stones. I took 4 measurements: .57um, .64um, .68um and .72um. I calibrated my scope and the lens with a NIST traceable stage micrometer so I feel confident about the accuracy of the measurements inasmuch as I could find the correct edges of the scratches to measure. As can be seen in the photo below, those edges can be tricky to choose and can affect the measurement by +/- .05um:
I really wanted to verify the grit of these stones since I’ve had questions since they came in. I’m happy to report that they look spot on to my amateur eyes.
Attachments:-Clay
10/02/2012 at 5:31 am #5803Awesome! The one I’m curious about though is the MicroFine – Coarse. I think that’s the one that seems rougher than rated.
10/02/2012 at 5:39 am #5804Awesome! The one I’m curious about though is the MicroFine – Coarse. I think that’s the one that seems rougher than rated.
That’s next on the chopping block 🙂 I’ll go back through with the kangaroo strops and smooth out the bevel and then use the Micro-Fine – Coarse stones and see what we get.
-Clay
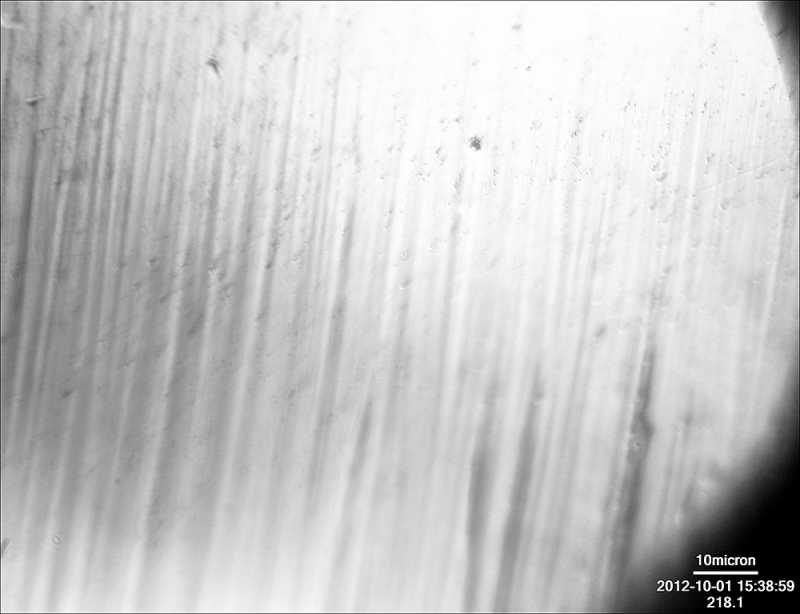
10/02/2012 at 7:31 am #5809Here is the first look at the Micro-Fine – Coarse stones:
I’m surprised not to see more work done and I’ll have to go back and get after it a little more. I did complete 50 strokes, starting from a very smooth bevel. In this photo, you can still see bits of Sharpie marker in the low places since I didn’t clean it with alcohol before putting it under the microscope. I measured the largest of the scratches and they averaged between 1 and 2 microns.
Attachments:-Clay
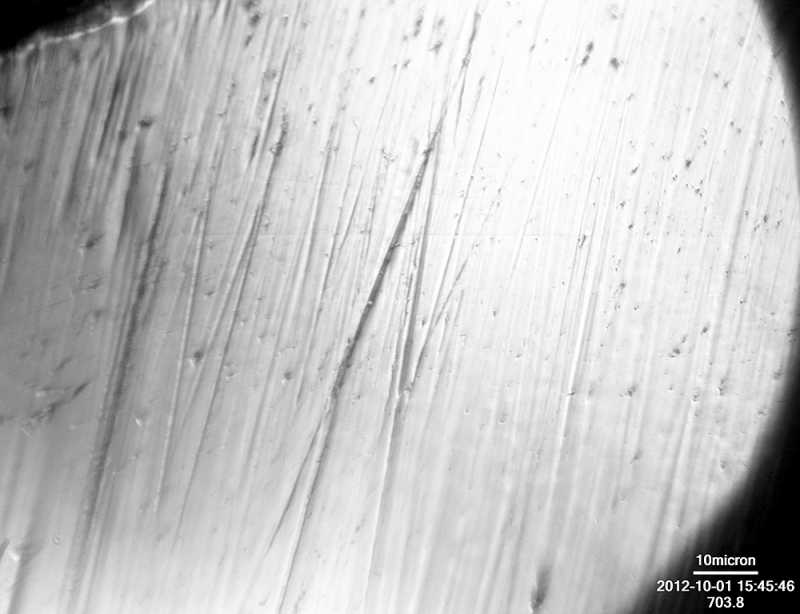
10/02/2012 at 7:49 am #5814These next two images explain a lot:
Above – 150 strokes with the Micro-Fine 1.4um Coarse Side stones LAPPED to 3um on diamond plates
Above – 50 strokes with the Micro-Fine 1.4um Coarse Side stones NOT LAPPED
The scratch size is in the right range with both stones but the depth of the scratches is greatly exaggerated with the unlapped stones.
Attachments:-Clay
10/02/2012 at 8:02 am #5816I’m getting better with the software provided with my scope. Here is a shot of the blade after the Superfine – Fine stones, 50 strokes:
The scratches are in the 1.5um-3um range.
Attachments:-Clay
-
AuthorPosts
- You must be logged in to reply to this topic.