What's the most important thing you've learned (about sharpening with the WE?)
Recent › Forums › Main Forum › Welcome Mat › What's the most important thing you've learned (about sharpening with the WE?)
Tagged: sharpening tips, wicked edge
- This topic has 35 replies, 19 voices, and was last updated 12/24/2017 at 4:07 am by
SalisburySam.
-
AuthorPosts
-
07/28/2017 at 2:28 pm #40371
If you were to mentor someone just starting out with the Wicked Edge, what would you say is the most important thing you’ve learned about sharpening with your machine? As we build out the Knowledge Base, I’d like to include these little kernels of wisdom for new users.
-Clay
07/28/2017 at 3:04 pm #40372I’ll give you 3 that I see “go wrong” in the forums…. 🙂
- Start with a “practice knife”, not the one you care about above your first born.
- Mark the edge with a Sharpie, match the angle already on the knife, and learn the dynamics of the sharpener (like angle change…. ). In particular, where to position the knife in the clamp front to back. Mucho important, (and as is repeatedly shown… a bit counter-intuitive).
- In other words, don’t make your first sharpening a major reprofile job… you’ll get frustrated and probably mess up the knife. (I see this a lot).
- Don’t let the stone rotate around the tip… you’ll sharpen it off or alter the blade profile.
6 users thanked author for this post.
07/28/2017 at 3:10 pm #40373I still recall when I first had a WEPS and Leo helped me a lot. His main point was the burr. I learned a lot about it because before that time I even had trouble feeling a burr after 100 grit stones. Leo helped me in many other respects too and I am very grateful to him.
Molecule Polishing: my blog about sharpening with the Wicked Edge
2 users thanked author for this post.
07/28/2017 at 3:14 pm #40376I am a new user. Having only sharpened a handful of knives, perhaps I have not learned the important lessons that more seasoned users can share, but I can share what I view as important in learning the machine.
First and foremost, I’ve found it important to take my time when sharpening. Patience is truly a virtue as a newcomer to the Wicked Edge. Attempting to do things quickly at first will only lead to mistakes. Take a deep breath, relax, and make sure you have the time to focus on what you’re doing.
Second, don’t go into your first sharpening blindly. Do some research. These forums are full of knowledge, and YouTube videos are invaluable in educating yourself before your stones touch a blade. I was able to produce a shaving-sharp edge on my very first attempt – with brand new stones – on a $1 Walmart steak knife. Not because I’m gifted, but because I followed time tested advice from veterans who shared their expertise. The knowledge is there – use it.
Finally, don’t expect perfection immediately. You bought this machine to achieve certain results, but it’s going to take time. You will make mistakes and you will learn from them. Enjoy the journey.
A couple machine-specific things I’ve learned about my 2017 Gen 3 Pro:
The set screws on the angle adjustment knobs like to come loose on their own no matter how hard I tighten them. Every time I change stones I check to make sure they’re still tight.
10″ arms are a damn good upgrade over the stock arms. I’d encourage anyone buying a Gen 3 Pro to pick them up. In fact, I think WE should make these the stock arms on the unit. So much easier (and safer) to learn when there’s no risk of overextending the stone on the rod.
The ball joints on the Gen 3 Pro are mounted very high in relation to the clamp, which makes using the entire surface of each stone impossible. While you’re in the process of breaking in the stones, remember to flip them each time you sharpen a knife to ensure the entire stone breaks in evenly.
Lastly, the angle cube is an absolute must. I can’t imagine learning this machine without it. Mark with a sharpie, find your angle, and raise a burr. Those are the three most important steps when you begin sharpening.
If I think of anything else as I go I’ll be sure to share it. Love the machine, Clay. Keep up the good work!
2 users thanked author for this post.
07/28/2017 at 3:43 pm #40377I try to share with new users:
- Start with a knife that’s not special to you. Your results will improve with time and experience.
- There’s a learning curve and it does take time and practice to achieve the results you’re expecting.
- New stones don’t work as well as they will when they’re broken in. Expect it to take a minimum of 6-8 knives before you see pretty good results.
- Take your time on the basics, it’ll become clearer to you what you’re doing in time.
- Use the information at hand especially this Forum. Don’t be afraid or ashamed to reach out for help. We’re happy to lend you a hand. Don’t be afraid to reach out to individuals on the Forum via “Private Message”. No one has every turned down my request for help or failed to answer my questions. Everyone of us, including the designer of the Wicked Edge System was once in your same position.
- Watch video’s they’re very helpful.
- There are really no absolutes. The Wicked Edge System is a tool. How you choose to use this tool is your technique. Take your time, go slow, it’s not a race. Try and use methods that others before you have used and suggest. Pick and choose what works for you, and what you like. Eventually you’ll put it all together to develop your own technique. It will change with time and experience. Nothing is set in stone. As your experience grows your technique will improve. Enjoy your journey. You’ll look back a year or two from now all this will be perfectly clear.
Marc
(MarcH's Rack-Its)5 users thanked author for this post.
07/28/2017 at 3:48 pm #40378Learn to feel for and identify the burr, and don’t progress to the next higher grit stones until you’ve reached it.
Alan
2 users thanked author for this post.
07/28/2017 at 5:37 pm #40381As others have said
- Develop a burr. Learn what a burr is, how to develop a burr, and how to tell if you have one. If you don’t raise a burr on both sides of the blade, your knife will not get sharp. Exception: Some advanced sharpeners choose to determine that they have reached the apex of the edge by close inspection with a microscope. These experienced individuals intentionally refrain from drawing a sizeable burr in order to prevent excessive metal removal. If you’re not an advanced sharpener yet, you need to develop a burr.
- Use a sharpie to determine if you have clamped the knife in the sweet spot, to match bevel angles, and to determine if you’re still reaching the apex along entire length of the blade at each grit level. The sharpie is perhaps the most useful accessory.
- There’s nothing wrong with a well executed 600 grit edge. If you’ve invested in a Wicked Edge, chances are you’re going to purchase additional stones / strops / lapping films / etc., but a more refined edge doesn’t always equate to preferable cutting performance. Mirrored edges are cool, but they are not the be all end all of sharpening.
- Record you depth key and position settings before un-clamping the knife. You’ll save a lot of work the next time you want to re-sharpen that knife and it only takes a few seconds to do. The ability to repeat your precise clamping position is a big part of what makes the WE superior to other sharpeners on the market. Why not take advantage of this design feature?
9 users thanked author for this post.
07/29/2017 at 1:13 am #40384As I wrote before: the burr is I think the most important. But to elaborate on it a little more:
For people who “just” want a good edge (which is 99.9% better than nearly every free hand edge), I wouldn’t start with things like an angle meter. (Although I wouldn’t classify most people on this forum as people who just want a good edge
 .) I’d recommend to them some tips some of which have been suggested above already:
- make sure you achieve a burr over the entire length of the blade; make sure you can feel it with your fingers;
- use a sharpie;
- use some tape to prevent the vise leave scratches or marks on the blade;
- get the 100 grit – 600 grit stones;
- let the stones break in; both the diamond stones and the ceramics.;
- don’t use any special knives to you for the first 5-10 sharpenings;
- read at least the basics of the Knowledge base;
- don’t be afraid to ask questions to forum members.
For people who want even more, I’d recommend:
- record your settings for repeatability; in the beginning, I’d put my knife absolutely straight in the vise and not tilt it yet, simply to easy repeatability;
- invest in the 100-2000-400-600-800-1000-1500 stones and maybe the 1400/1600 ceramic stones;
- invest in diamond lapping film if you want to go even further; it’s the best thing to happen to the WEPS stones since these before mentioned stones (but think about what you want – a very smooth and maybe a mirror edge or a more toothy edge);
- use an angle meter.
And then:
- if you want a true mirror edge, use some kangaroo leather strops or nanocloth strops with fine stropping compound and the WE diamond pastes, which still work great;
- if you want an edge as even as possible, you may also want to tilt your blade when clamping; make sure you record those settings too;
- a USB microscope.
Molecule Polishing: my blog about sharpening with the Wicked Edge
5 users thanked author for this post.
07/29/2017 at 5:48 am #40387I’m not a real fan of using the burr as an indicator, except at the first grit level. Even then, if the grit is above 600, it may be very difficult to feel the burr along the entire edge. This may be peculiar to me, as I am on a nerve suppressor – Tramadol ER – so my sense of touch may be compromised.
The most important thing I learned was to get a USB microscope. Being over 70 years old, it’s difficult for me to see clearly with a loupe. The ‘scope was a huge eye-opener for me.
7 users thanked author for this post.
07/29/2017 at 6:31 am #40388I’ll add something that wasn’t mentioned already, maybe a counter intuitive one.
I know for the more expensive knives it is tempting to tape the blade or the jaws. But I’ve learned it is best not to use anything between the vise and the blade, as anything used will compromise the grip of the blade. So if you must protect the blade from scratches, I found that the best option is to use thin sheet of paper.
3 users thanked author for this post.
07/29/2017 at 10:32 am #40391Not to be flip but, when I started the most important lesson was safety. I cut myself a dozen times before I learned to organize my stones and tools so I didn’t have to reach across the clamped knife. I walked around for about 3 weeks with at least 2 bandaged fingers! Haven’t cut myself since. Also don’t leave a knife in the clamp and walk away unless your sure that NO ONE will be able to get to it.
I can’t add to what has already been posted other than to say that don’t be afraid to ask questions and for help. All the points made above are valid and important to get results.
It is also important to keep in mind, I think, to do what works for you and that will come with experience. Don’t expect to much on the first few knives, all though I was impressed with the results, your results will get much better for a number of reasons all ready stated.
Take your time and don’t hurry, have fun with it and you won’t be sorry.
5 users thanked author for this post.
07/31/2017 at 10:51 pm #40422Identify and control the variables while systematically changing one thing at a time to learn its impact on your sharpening process.
As somebody with advanced terminal cancer, there will be dark days when I complain about things you say for no apparent reason. Please consider this my apology in advance for such times. There will be days that what I say is clearly wrong, making no sense: on these days I will often be argumentative. Please do not "let me slide" at such times, but rather call me out, point out what is factually wrong, and demand I explain my position. Please also consider this my apology in advance for such times.
5 users thanked author for this post.
08/01/2017 at 8:38 pm #40438For me probably what Tom said, I have learned so much through my usb microscope and different grit progressions, what certain techniques and mediums do it has helped immensely. Also, people must realize that there is a learning curve to any system, and not only that, but each jig sharpening system has it’s strengths and weaknesses. It’s up to YOU to put in the time to learn and adapt to the system to make it do what you want it to with what you have.
5 users thanked author for this post.
08/02/2017 at 6:14 pm #40443A little late to the party here but from a newbie perspective the one thing that I learned (the hard way), is safety.
Over the weekend I was using the WE to sharpen a family member’s knife when I mistakenly left my left ring finger stray over the sharpening stone. Got a decent cut on the tip of my finger and learned a big lesson in the process. All my fault, as I was not paying attention. Real stupid on my part.
Working on a good, safe technique is very important. I will not wear gloves either. I didn’t as a butcher and I won’t sharpening a knife.
2 users thanked author for this post.
08/02/2017 at 8:36 pm #40445A little late to the party here but from a newbie perspective the one thing that I learned (the hard way), is safety. Over the weekend I was using the WE to sharpen a family member’s knife when I mistakenly left my left ring finger stray over the sharpening stone. Got a decent cut on the tip of my finger and learned a big lesson in the process. All my fault, as I was not paying attention. Real stupid on my part. Working on a good, safe technique is very important. I will not wear gloves either. I didn’t as a butcher and I won’t sharpening a knife.
I found it difficult to sharpen wearing gloves. I came up with this “safety device”, pictured here,
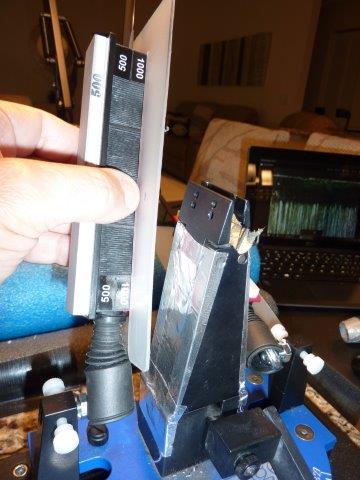
coincidently, the same time as Wicked Edge released there “Safety Shields”. I too cut my ring finger tip while sharpening. My fault too. I lost the very tip of that finger. Just after that I started using these safety shields and haven’t cut myself again, since. I won’t sharpen anymore without using them. Now it’s second nature. I find they have also helped my sharpening technique by distributing the finger pressure due to their width, stabilizing the stone and keeping it flat with even pressure against the bevel. When I feel my fingertips against the plastic I know I’m protected. The shields are wide enough to protect that dangling finger when I’m, zoning out, or zoned in, (whatever the case), on my sharpening rhythm and not paying close enough attention to the digit tips. Safety first.
Marc
(MarcH's Rack-Its)Attachments:
You must be logged in to access attached files.
4 users thanked author for this post.
-
AuthorPosts
- You must be logged in to reply to this topic.