How to improve USB-microscope photographs?
Recent › Forums › Main Forum › Techniques and Sharpening Strategies › Thoughts/Theories/Science Related to Sharpening › How to improve USB-microscope photographs?
- This topic has 15 replies, 2 voices, and was last updated 03/18/2022 at 3:53 am by
 tcmeyer.
-
AuthorPosts
-
11/03/2017 at 6:05 am #41900
It is my impression that most of us who own a USB-microscope have one that allows you to make photographs at a 200x magnification (as well as a lower magnification). I have such a microscope, too (a Veho), as well as a microscope with a 500x magnification (a Dino-Lite–thanks, Clay!).
In my experience there are two major challenges in making good microscope photographs of edges:
- getting the light right;
- getting a good focus/sharpness.
In practice, I fiddle around with the microscope and the light until I have some decent photographs. I don’t have a fixed procedure for doing so. Is there anyone who has tips, tricks or even a procedure to improve the lighting?
In another topic Clay showed us some great photographs using the EoDF function of his microscope software. I googled it and the EoDF function appears to be a feature of some high-end Dino-Lite microscopes, allowing you to stack multiple photographs taken under different lighting conditions. But Clay wrote it can also be accomplished using Photoshop. Is there anyone (Clay?) who knows how to do this using Photoshop?
Also the sharpness of Clay’s photographs is great. Does anyone have tips or tricks to improve the sharpness of microscope photographs, perhaps again using Photoshop? (It is my experience that the lower the magnification, the higher the DoF. But the photographs in that topic have both a great sharpness and a high magnification.)
All other tips, tricks and procedures to improve the quality of microscope photographs are welcome as well, of course!
Molecule Polishing: my blog about sharpening with the Wicked Edge
11/09/2017 at 7:45 pm #42024Reprint form my old post (not sure how to link it):
I have used my new Carson and find it a great deal at $37. Software is basic but works fine. Focus knob is full circle and smooth. Pic taking with capacitive button or software. Goose neck holder allows for pretty repeatable viewing between sharpening strokes. It also displays nicely on my laptop and phone. Pics are as clear as I need to see scratch patterns and they stack up nicely for edge views. Attached are some pics of the scope, hi/low mag on PC and phone. I also cut a notch on both sides of the scope shroud as a position guide, it sticks sometimes due to edge sharpness but facilitates positioning well. Like all these scopes actual mag is function of your display also. These were saved on my laptop (then resized from 100 to 25 in paint to reduce filesize). Best I can tell was that on my laptop screen size the lo mag was ~35x and the hi mag ~150x (~4 times the difference —- which is what the 75 to 300 scope spec says). With a bigger/better monitor I think I would get closer to the spec. However, what I got was more than enough for scratch pattern patrolling. I will save the home built electron microscope for another time LOL.


Stacked image compilation (using freeware) 5 images plus Stacked in this post plus the next one


last one plus stacked image


5 users thanked author for this post.
11/09/2017 at 11:59 pm #42035Thanks, Readheads! That Carson images indeed look pretty good. And the example of stacking images you showed is pretty impressive. Can you tell us what freeware you used? Something tells me this could be very similar to what Dino-Lite calls their EoDF function.
Molecule Polishing: my blog about sharpening with the Wicked Edge
1 user thanked author for this post.
11/10/2017 at 8:40 am #4203911/10/2017 at 10:02 am #42040Thanks Clay, that’s a very clear video! I didn’t know Photoshop had this powerful function. I’m definitely gonna try it once I have one of my microscopes working. (The one I got from you worked fine, but the computer I installed the software on has gone to the computer heaven. My new computer has some problems with the software.)
Molecule Polishing: my blog about sharpening with the Wicked Edge
11/11/2017 at 3:42 am #42056MarcH sent me an interesting PM. Since I thought it might be of interest to other people as well, I post it here.
He often does not use the highest resolution the microscope image software offers, since lower resolutions show image changes quicker. Is this also the experience of other people?
I addition he wrote something that I interpreted as that lower resolutions also offer a larger depth of focus. I asked him whether this is a correct interpretation of mine. (It seems a bit odd to me, since I thought the DoF was purely determined by the microscope, not the imaging software.) In addition, do more people have experience with this?
Molecule Polishing: my blog about sharpening with the Wicked Edge
11/11/2017 at 8:08 am #42059MarcH sent me an interesting PM. He wrote something that I interpreted as that lower resolutions also offer a larger depth of focus. I asked him whether this is a correct interpretation of mine. (It seems a bit odd to me, since I thought the DoF was purely determined by the microscope, not the imaging software.)
Mark76 I’m not sure how you got that implication or interpretation from what I wrote you in a “PM”.
I did not state, imply or mean lower resolution gives a greater depth of field. I have no knowledge of DofF. I did mean, in my experience at lower resolutions my images paint or appear faster on the screen. With this “USB digital camera/microscope” software “live” images that appear, showing my movement like a TV as I slide the microscope along the bevel I believe, are as a series of photographs quickly taken one after the other. At higher resolution software settings, it uses more pixels and requires more time for the USB Microscope to capture then paint the image to the monitor, (this is also a function of the Monitor’s Screen Resolution Setting). I do all my USB Microscope viewing while hand-holding the microscope against the clamped knife’s bevel. If the software is set at a higher resolution setting, it is taking a more detailed image, (more pixels used) requiring more time. In that length of time, required to capture the high resolution image, it is difficult to maintain the placement or position of the microscope against the knife bevel, so often the microscope has wiggled or moved causing a change to the subsequent image. For me the monitor flashes and stutters as it attempts to paint the moving picture. At lower resolution software settings the time required for the software to capture and paint the image to the monitor screen (I am using a med speed/power laptop) is quicker, (using less pixels) and also the detail is less. For me it was a balance between speed to see a focused image, detail, and closeness that I used to decide which resolution gave me the image I could best use and work with. The USB Microscope software also allows viewing the image in a TV style view within the software to allow access to software buttons or in “Full-Screen” view, image only with no borders and no software settings access.
I am using the normal recommended monitor screen resolution, (1366 X 768) for everyday computer uses and USB microscope uses. I do not play with the computer screen resolution any. My USB Microscope software offers resolutions from (160 X 120) on the lowest end to (3200 X 2400 interpolated) on the highest end. The USB microscope software higher resolution settings are a closer in view, “a close-up” picture of the area of the bevel photographed with more pixels used. With lower software resolution settings the same image is seen as a wider view, not as close up, using less pixels. In essence the higher resolution is a cropped/enlarged picture of a portion of the lower software resolution photograph. The larger number of pixels used allows for the picture to be enlarged, viewed closer and thus with more detail.
Besides the software there are two image power settings controlled by the manual focus ring surrounding the lighted camera lens. Low power is, with the focus ring almost all the way to one direction, then turned slightly in or out as with any manual focus camera, as needed to finely focus the image. It is a wider view that can be viewed with any of the software settings discussed above. The higher power is a macro-focus setting by turning the focus ring almost all-the-way the other direction, then slowly manually adjusting the camera lens to bring the focused view sharp. Again this close-up macro-photo can be viewed with all the software resolution settings discussed earlier.
I generally use the Plugable USB Microscope or sometimes the Carson USB Microscope . Both these devices use the same software, under different ‘brand” labels, that functions exactly the same. For me a software resolution of (800 X 600) with the close-up or macro-focus of the camera lens gives me a fast, close-up, focused view that is quick to lock-in, therefore easy to hold to take photographs. I like the close up viewing. Others here on the Forum, fellow WEPS users, prefer to work with the lower focused image with the wider image and less detail. They are correct when they state that the close up view is only a really tiny portion of the bevel and it does take a bit of time to slide the USB Microscope/Camera along the bevels length to inspect the entire bevel on both sides. Whereas the lower power with it’s wider view would allows a faster scan down the bevels lengths, quicker, all-be-it in less close-up detail. It’s all about what your comfortable using.
This is what I do for daily use, to visually monitor my WEPS knife sharpening progress. If I were trying to take high resolution, close-up, highly detailed, full focused, depth-of-field photographs for publishing purposes I would probably utilize higher resolutions, better cameras and better more easily manipulated software, with photo stacking capabilities.
Marc
(MarcH's Rack-Its)11/11/2017 at 11:11 pm #42063Thanks for the extensive reply, Marc.
Mark76 I’m not sure how you got that implication or interpretation from what I wrote you in a “PM”. I did not state, imply or mean lower resolution gives a greater depth of field.
I guess I got this idea, wrongly, from what you wrote later. But of course this is my misinterpretation: I think I got the idea from the advantages you described of using a lower resolution:
If the software is set at a higher resolution setting, it is taking a more detailed image, (more pixels used) requiring more time. In that length of time, required to capture the high resolution image, it is difficult to maintain the placement or position of the microscope against the knife bevel, so often the microscope has wiggled or moved causing a change to the subsequent image. For me the monitor flashes and stutters as it attempts to paint the moving picture. At lower resolution software settings the time required for the software to capture and paint the image to the monitor screen (I am using a med speed/power laptop) is quicker, (using less pixels) and also the detail is less. For me it was a balance between speed to see a focused image, detail, and closeness that I used to decide which resolution gave me the image I could best use and work with.
This, got me thinking. I usually use the software at a high resolution setting and press a button to take a photograph. But of course I’m often just too early or too late for that perfectly focused image or an image with good lighting. Is there no software available that allows you to make a film? With very simple (even freeware) video editing software you could then extract the best images from the film.
For me a software resolution of (800 X 600) with the close-up or macro-focus of the camera lens gives me a fast, close-up, focused view that is quick to lock-in, therefore easy to hold to take photographs. I like the close up viewing. Others here on the Forum, fellow WEPS users, prefer to work with the lower focused image with the wider image and less detail. They are correct when they state that the close up view is only a really tiny portion of the bevel and it does take a bit of time to slide the USB Microscope/Camera along the bevels length to inspect the entire bevel on both sides.
I primarily use my USB scope for making pictures I publish at my blog or on my site. Hence I am willing to invest some extra effort in making very good pics. I also use the scope simply to inspect edges, but only those sharpened at high grits (where 60x is not sufficient anymore) and I use a high magnification and high resolution for this. Just to inspect edges sharpened at lower grits and to see whether I removed all scratches from the previous grit I normally use a tiny non-USB microscope (at, I think 60x). This works fine, except, as I wrote, at the very high grits.
Molecule Polishing: my blog about sharpening with the Wicked Edge
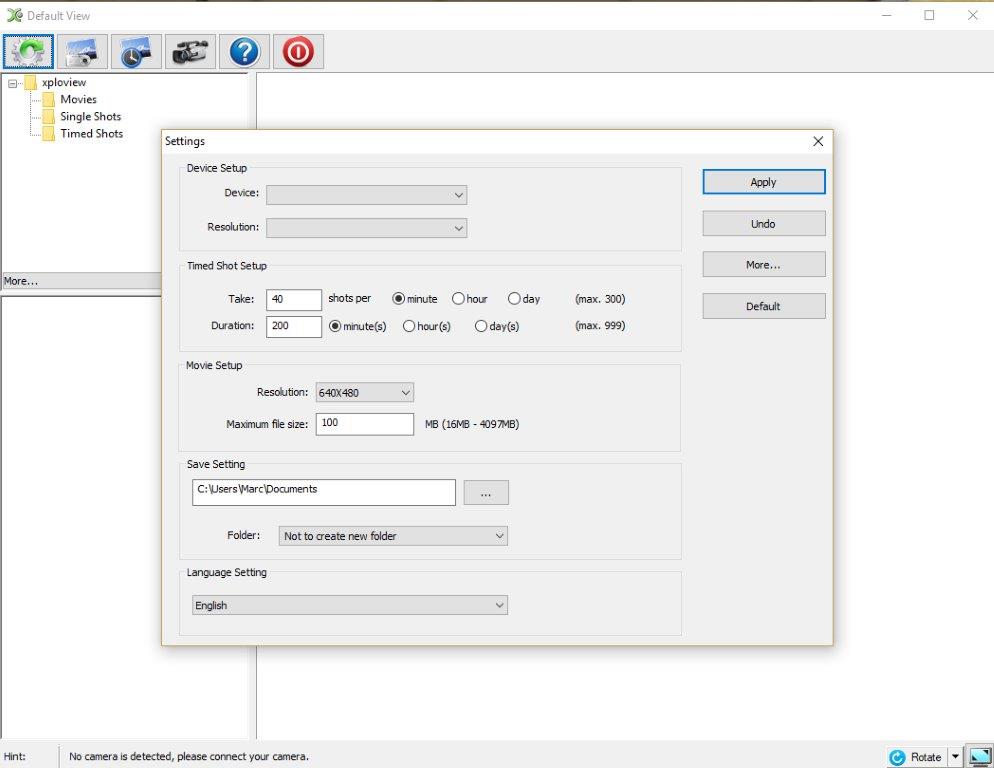
11/12/2017 at 9:47 am #42068Mark the Carson Software allows you to take videos, although at fairly low resolution. Also timed shots which seems like what your looking for. It will at preset timing and preset numbers take sequential photos automatically. That way you should be able to capture a picture or two out of the sequence that will be of good quality and usable for posting. Here’s a screenshot of the Software:
Marc
(MarcH's Rack-Its)Attachments:
You must be logged in to access attached files.
1 user thanked author for this post.
11/12/2017 at 11:30 am #42070I wonder if the stuttering in the videos is less about your computer CPU/memory and more about limitations of the interface (i.e. which generation of USB).
Sometimes, even if the device is capable of a higher generation of USB, which USB input you choose on your computer will limit it to a lower/slower generation. For example, I have an input on my computer that is labeled as USB3, and when I connect an external USB3 hard drive dock to it, it’s always very slow. But when I instead used the USB3 input right next to it, I get the expected fast transfers.
1 user thanked author for this post.
11/12/2017 at 12:59 pm #42075I installed the software on my more powerful Desktop PC with USB3 ports. I no longer experience a slow down with increased resolution. The only difference I can see is as the resolution is increased the file size markedly increases.
800 X 600 = 451.1KB, 1600 X 1200 = 1.7MB and 3200 X 2400 = 4.3MB
The problem now is to utilize a file size as large as the high resolution file is , it needs to be reduced in size. If you’re going to reduce the size then you may as well use the lower resolution in the first place so as not to need manipulating software to try to achieve the same results. I have taken three photos of a fine point sharpie marked on the knife bevel at the three resolutions in order of increasing resolution. All three files were reduce to 800 X 600 picture size for uploading to this post. The first photo on the left was a bad picture attempt. The next three are for comparing resolution differences.
The three photos were taken one at a time, after changing the software resolution setting, with a hand-held USB Microscope (Camera) so the pictures composition and quality may vary some. I believe the difference in the photos is very little so there’s no advantage to take a photo at higher resolution if you can’t utilize the file size anyway.
Marc
(MarcH's Rack-Its)Attachments:
You must be logged in to access attached files.
1 user thanked author for this post.
11/12/2017 at 1:33 pm #42080I believe the difference in the photos is very little so there’s no advantage to take a photo at higher resolution if you can’t utilize the file size anyway.
If you do any post-processing (for example, adjust shadows, highlights, exposure, contrast, clarity, etc. in Adobe Lightroom), it’s advantageous to start with higher resolution, then reduce the file size after you’ve finished your post-processing.
Lightroom is a great software package for still images, if you’ve not tried it. But especially in a case like a USB microscope where you have little control of exposure and imaging parameters, like you do with a full-function camera. Come to think of it, I first bought Lightroom maybe 5 years ago via a black friday sale on Amazon where, if I recall correctly, it was around 40-50% off the regular price.
11/12/2017 at 10:53 pm #42081Thanks guys, if I need a new microscope (still trying to get the older ones to work), the Carson software, in combination with Photoshop/Lightroom (which I own) looks very good, I have never seen any “knife microscope” reviews, but how do you think the Carson comparises to other ones, like Dino-Lite models?
Molecule Polishing: my blog about sharpening with the Wicked Edge
03/11/2022 at 1:44 pm #57662MarcH sent me an interesting PM. Since I thought it might be of interest to other people as well, I post it here. He often does not use the highest resolution the microscope image software offers, since lower resolutions show image changes quicker. Is this also the experience of other people? I addition he wrote something that I interpreted as that lower resolutions also offer a larger depth of focus. I asked him whether this is a correct interpretation of mine. (It seems a bit odd to me, since I thought the DoF was purely determined by the microscope, not the imaging software.) In addition, do more people have experience with this?
Mark: As a photographer, I hope I can help with the DoF question.
DoF is a function of resolution (image size), magnification (macro, micro, telephoto or wide-angle) and f-stop. It’s all an illusion, really, as the DoF will always be limited, but the resolution not high enough to see it. In other words, a 4X5″ print may look like everything is clearly in focus, while an 20X25″ enlargement will clearly show a shallower DoF. If you want to risk further confusion, Google “Circle of Confusion” for a full explanation. Basically, the higher the f-stop # (smaller aperture), the smaller the CoC, therefore the more you can enlarge the picture (increase the resolution in digital realm) without the CoC being obvious. Of course, with a cell phone or some digital microscopes, you have no actual control of f-stop, so this is more a real camera thing.
03/15/2022 at 6:27 pm #57691I just got my Pluggable USB scope today. I can see there’s quite a bit to learn about using it, even with years of technical photography under my belt.
Some notes on stacking images:
There are two thing I’ve used stacking techniques for. One is High Dynamic range, where the shutter speed is changed between the images to render a much greater difference between bright white and solid black. The other is High Depth of Field, where (in macro photography) the camera is mounted on a focusing stage and physically moved to change the plane of focus, then the stack is combined to render a much deeper DoF than could be achieved with a single picture at the same resolution.
The program I used for HDR rendering is Photoshop–version 6.0 and above have this feature. I don’t recall the software I used for HDoF rendering, as it’s on another computer that isn’t here.
This is my new USB scope mounted on a focusing stage (Novaflex Castel-L) and tripod:

Here’s an example of HDoF rendering from a stack of eight photos–the frame is 2 cm on a side and part of the original images:

Getting more than about 1mm of depth in a single image at that resolution would be impossible.
The reason for the focusing stage is that changing the focus on the lens is imprecise and also changes the image size–if only a tiny bit. For landscape photos, changing the focus will matter little, but for macro work, it’s a killer.
I’d like to try some HDR rendering for knife edges, but the USB scope doesn’t seem to want to let me change the exposure–and I need 16 bit for Photoshop. Maybe I need a better app to run it? using Windows Camera App right now, as it came with the computer.
Just for fun, here’s an HDR rendering of nine exposures:

The light and contrast up at 8,000′ feet in mid-summer are extreme. I also like what I can do with the flowing water using this technique.
-
AuthorPosts
- You must be logged in to reply to this topic.