Height Modification to Gen 3 Pro Vice (2017)
Recent › Forums › Main Forum › Sharpener and Accessory Maintenance › MODS › Height Modification to Gen 3 Pro Vice (2017)
- This topic has 14 replies, 4 voices, and was last updated 04/14/2018 at 1:53 pm by
 Marc H.
-
AuthorPosts
-
07/31/2017 at 1:44 pm #40410
I started with a “Wicked Edge Pro Pack 2” several years ago. I have been able to take advantage of each offered upgrade as the Wicked Edge Systems have evolved and IMHO, improved. As part of my original set-up a “Riser Block” was used between the blue anodized aluminum mount and the screw wedge style vice. My original Pro Pack 2 was what is now called the WE120.
When I upgraded the Pro Pack 2, (WE120), vice with the self-centering, cam action, 2016 model Gen 3 Vice, the riser block was removed and no longer needed. I’m glad I saved that riser block.
In 2016, I purchased the Gen 3 Pro Setup without the storage shelves, when it was introduced. Then in 2017 the newest rendition Gen 3 Vice was released. I upgraded to take advantage of the enclosed cam vice with the split jaws and clamping tension adjustment.
A height issue, was discovered, on the newest Gen 3 Pro Vice. It hindered the ability to utilize the full length of the sharpening stones. Only about ½ of the stone length was sharpening the knife. This is a modification or work-around I applied to my System to allow me to regain the efficiency lost or limited with the newest vice upgrade. I have regained the ability to use the entire stone spreading the wear evenly across the full length.
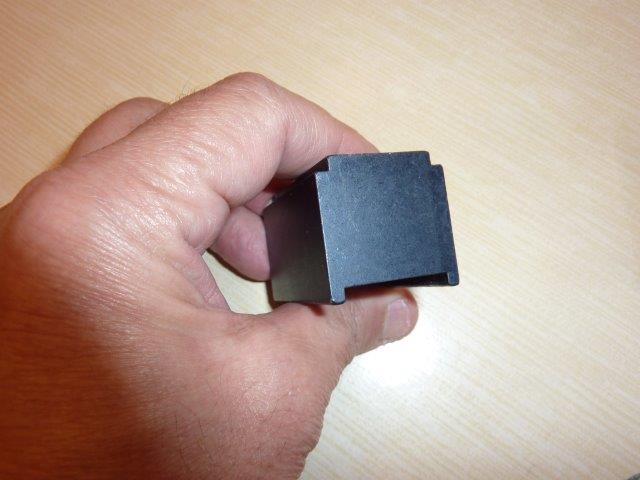
I utilized the removed “Riser Block” from the original WE120. This riser block only had one hole in it for the attachment of the earlier model vice. I disassembled my Gen 3 Pro, (2017 model vice) and placed the riser block on one of the vice mounting screws to align it and mark the block to drill a second screw mounting hole. I drilled the anodized aluminum block with successively larger drills till I reached the necessary hole side. I did drill this second hole a little larger than necessary to allow for any inaccuracy in where I marked the hole to drill.
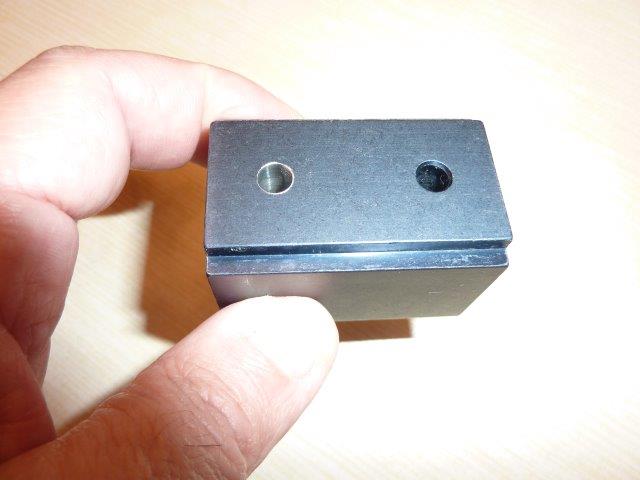
Longer screws where needed to mount the riser block. I replaced the factory screws with 10/32” Fine Thread Flat Head Phillips Screws. I reassembled the Gen 3 Pro with the Riser Block in place. The Riser Block does have notched edges that rest flatly so they were not an issue. The outside dimensions of the block fit the vice without an issue allowing for a flat stable secure attachment.
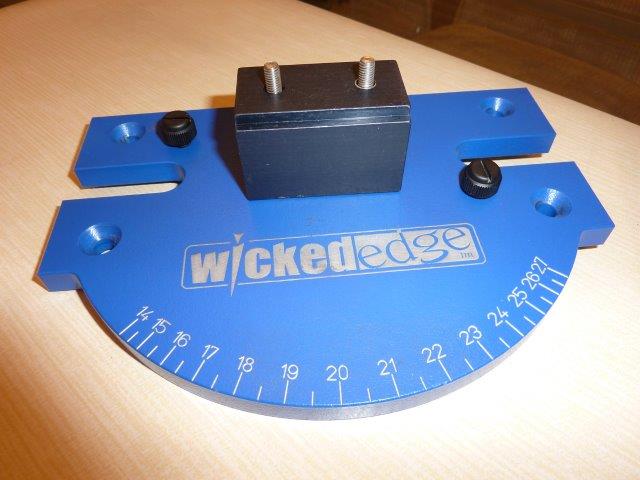
I clamped a knife to see if I’d met my objective and it couldn’t have worked any better even if I had a block made to specifications. Now I can fully utilize the length of the whole stones. With the micro-adjustment screws backed all-the-way in I placed an angle cube on both sides of the knife with the angle set as low as I could without the stone hitting the vice jaws and both sides read the same 10.8 degrees. I am using the new 12 inch rod arms and these allow for almost full movement of the stone across the knife bevel without sliding off the rod ends. Longer rod arms would be better.

Marc
(MarcH's Rack-Its)Attachments:
You must be logged in to access attached files.
4 users thanked author for this post.
07/31/2017 at 3:52 pm #40418Very cool. I have been using the new Gen 3 Pro for a couple weeks now, and while I absolutely love it, this is one of my biggest gripes.
Nice qork! Hopefully WE releases a similar retrofit for the 2017 Gen 3 Pro.
07/31/2017 at 4:02 pm #40419This retrofit (modification) I made was to the 2017 Gen 3 Pro, for all intents and purposes. The only different on the newest 2017 Model is the rod arm attachments and micro-adjustments. The vice and base are the same on both models.
I have spoken with Kyle about having Wicked Edge’s machine shop make me a riser block to do just what I did. I got impatient waiting for them to get to it so I utilized what I had in hand. I don’t know if they have any “old style” riser blocks left in their inventory, that could be purchased.
Marc
(MarcH's Rack-Its)08/01/2017 at 4:11 am #40424Nice work there, Marc! On a side note, I would like to dismantle my 2016 Gen 3 Pro for general cleaning. Any advice or tips from someone who’s taken theirs apart?
Alan
08/01/2017 at 7:47 am #40425Alan,
- remove handle and rod arms with small allen wrench
- remove 4 socket flat head cap screws from top of blue base with large allen wrench
- unscrew by hand two black screw knobs from top of blue base and retain
- Lift blue aluminum base off with vice attached
- Remove Vice from underneath blue base with small allen wrench by unscrewing two flat head hex cap screws
- Notice how angle adjustment handle just sits down on three pins, a center fixed pin and a pin to the rear slide and one to the front slide. As you rotate the handle left and right to lower and raise the angle setting it rotates around the center pin while sliding the rod arms further apart and closer together.
- After you’re familiar with this adjustment motion, simply lift the handle up and off. The black arm slide mechanism just comes apart for easy cleaning.
- I don’t recommend doing anything but dry cleaning. I didn’t apply grease or oil because I felt it may be a grit magnet.
- If the vice is working smoothly I don’t think it’s necessary to disassemble it. You can blow any dust off the cam mechanism with compressed air spray used for computer cleaning. I did apply a Wax Lubricant to the cam action. This really works well to maintain it’s smooth action. It doesn’t trap dirt.
- Use care to tight all screws securely when reassembled in the opposite order you disassembled it. Pay attention that the angle adjustment arm is sitting over all three pins. The large round black screw knobs are screwed into the top of the blue base to hold the arm slides steady and take any wobble out of them.
I use Shapton’s Glass Stones, whetstones, with almost every sharpening job. It really was less dirty inside than anticipated. I did apply some foil aluminum tape to the outside of the vice to cover the open cam action and protect it from any metal and stone dust.
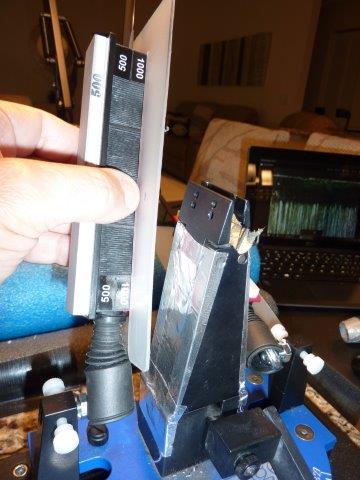
This picture was with taken of the pre-2017 Gen 3 Vice before I added the riser. You can see how high the stone sits at rest.Marc
(MarcH's Rack-Its)Attachments:
You must be logged in to access attached files.
1 user thanked author for this post.
08/01/2017 at 9:20 am #40427Marc, where did you get the black rubber gaskets covering your ball joints? Those look great.
08/01/2017 at 9:48 am #40428Greg, they were a mod a Wicked Edge Forum participant posted way back a couple years ago:
They have worked well for me. I did cut a notch in the side to allow them to slip down over the ball joint to provide better coverage.
Marc
(MarcH's Rack-Its)08/01/2017 at 9:58 am #40429Marc –
Step by step directions to disassemble. So helpful for me to clean my sharpener. Thank you very much!
Alan
1 user thanked author for this post.
08/01/2017 at 12:12 pm #40430Greg, they were a mod a Wicked Edge Forum participant posted way back a couple years ago: Amazon Axle Boots They have worked well for me. I did cut a notch in the side to allow them to slip down over the ball joint to provide better coverage.
Wonderful! Thank you. I had been using rubber fingers cut off a dishwashing glove, but these look much better.
1 user thanked author for this post.
04/12/2018 at 11:16 pm #45955This retrofit (modification) I made was to the 2017 Gen 3 Pro, for all intents and purposes. The only different on the newest 2017 Model is the rod arm attachments and micro-adjustments. The vice and base are the same on both models.
So Marc, is this height issue something I’ll have to contend with on my soon to be ordered WE130? Or is it exclusive to the Pro? Also what are the little boots on your ball joints, actually where’d you get them? I’ve also seen little rubber grommets on the rods that people seem to install to keep stones at more or less the same position on the rods and perhaps even act almost as shock absorbers. Can you clarify? George
04/13/2018 at 8:45 am #45966The height issue for me was more a problem with my Gen 3 Pro, not with the WE130.
The stone stops are simply rubber washers I found at Home Depot in the Plumbing dept where they have various plastic boxes hanging with “Sink Faucet” repair kits. I just saw these washers a size and shape that looked like I could utilize and that was what I used. Simple improvising.

I used the same washers above and below the stones to limit the range of stone movement up and down the guide rods.Since then I have started using these plastic shaft lock collars. Depending on your guide rods, these may need to be drilled out slightly.
The rubber dust covers I use over the ball joints are Radio Control Car tie rod ends for Baja Buggies .
I appreciate you taking the time to search out earlier Forum Posts!! Thanks
Marc
(MarcH's Rack-Its)Attachments:
You must be logged in to access attached files.
1 user thanked author for this post.
04/13/2018 at 9:12 pm #45995Muchisimas Gracias! Duly noted and added to my “save for later” list on Amazon…gotta love the ingenuity of Edgers…boy do I feel stupid, I read the OP about height issue and failed to see the all the questions/answers about the boots in subsequent posts. I appreciate your patience Marc
PS love Zorro almost as much as McMasters-Carr!
PPS Are those Chosera 5K & 8K Stones on WE handles?
-
This reply was modified 6 years ago by
 NickedEdge.
-
This reply was modified 6 years ago by NickedEdge.
-
This reply was modified 6 years ago by NickedEdge.
-
This reply was modified 6 years ago by NickedEdge.
04/14/2018 at 8:34 am #46013PPS Are those Chosera 5K & 8K Stones on WE handles?
The Choseras and Shaptons are available at these two sources:
http://www.oldawan.com/ speak to BOB and https://jendeindustries.com/
Both Bob from Oldawan and Tom Blodgett from Jende have an array of YouTube Videos with lots of helpful info for the WE user
Marc
(MarcH's Rack-Its)04/14/2018 at 1:24 pm #46018Ah you rascal Marc, for once I’m ahead of you! Found Oldawan and Jende from your earlier threads, as usual thanks! Now tell me what are those stones on the WE handles in your pic? 😎 Have to think they might Shapton Glass considering your earlier reply to me on “Organics”.
04/14/2018 at 1:53 pm #46020That picture is from when I was still using Shapton Pro Stones before the Glass Stones were available. All the Glass Stones are white except the very coarse ones. The Pro Stones are like the Choseras with different colors for different grits
Marc
(MarcH's Rack-Its)1 user thanked author for this post.
-
AuthorPosts
- You must be logged in to reply to this topic.