Extended Depth of Field Image Stacking
Recent › Forums › Main Forum › Welcome Mat › Extended Depth of Field Image Stacking
- This topic has 104 replies, 11 voices, and was last updated 05/23/2016 at 12:44 am by
 M1rrorEdge.
-
AuthorPosts
-
05/18/2016 at 5:51 am #34044
Here is a recent focus stack of a 50 Grit WE Stone.

Final Render- I think a higher resolution camera would provide better results.

Eddie Kinlen
M1rror Edge Sharpening Service, LLC
+1(682)777-16222 users thanked author for this post.
05/18/2016 at 11:53 am #34049I have been very busy at work lately and I still am, but I just wanted to say: WOW!! I am seeing things I never saw before. Those pics are awesome, both those Cliff made and those Eddie made. Great! The colors even add beauty to a knife edge…
I’ve got many questions, like why the polarization makes the diamonds black/darker and not the glare in the binding material (does it?) or what we are seeing in the razor edge pics (water?). And I love the video, it certainly adds value to pics, particularly at the higher magnifications. I don’t know whether it can replace still, every time I watched the “looking through the microscope” video I wanted to press “pause” at the moment of best focus. But wow, this is great stuff gents.
Molecule Polishing: my blog about sharpening with the Wicked Edge
05/18/2016 at 1:49 pm #34050Thanks for the inspiration. I decided to give it a go and post a quick video:
This is unedited except for the addition of an audio track. This is one of my sample blades, sharpened with the 800# stones and then the 9µ diamond lapping films though not quite enough to remove all traces of the 800# scratches so that it would interesting to look at.
-Clay
2 users thanked author for this post.
05/19/2016 at 1:36 am #34053One of my latest observations is that when looking at the diamonds, I think we have a new variable other than depth to add to our list of variables and that is, the translucency of some of the diamonds. I am not sure if you saw it, however, in one of the diamonds in the above video (Forum Page 6 At minute marker 2:07 (Here) and better at the 10:00 (Here) ***Note: By “Clicking” on the links to the left will take you to the target video section so you do not have to watch the whole video) it was almost like we where looking under the diamond at that specific focus depth and then later I zoomed out and saw the surface of the diamond. I am not sure if my observation is correct yet and will need to see it again (Reproduce the observation). It may have just been a reflection off of the lens or some other aberration.
This too would make focus stacking of this subject and at this magnification very difficult, It would add a variable that the software algorithm in Helicon Focus 6 and Adobe isn’t programed for during focus stacking render. I am quickly discovering we are exploring new territory or learning esoteric knowledge held by a few. I am sure some gemologist has seen this but may have not documented it because he was seeing it all the time and may not have been able to record it like we can today. We are learning or seeing this for our selves for the first time.
On blade edges we only need to worry about two or three angles, with diamond stones the variables are staggering to comprehend. That is why I am leaning towards video for the diamonds. Also, the value of the microscopic video is in the replay. With a “still” image, you can’t go back and review your work at a later time and the chances of seeing that same diamond again is slim among the millions of diamond fragments. Especially, when we start breaking them off during the sharpening process
 . Video capture will allow us to study our captured images and see details we may have missed the first time we observed it (It is much easier to hit play than to pull out the microscope again, position, illuminate, and pray) I will try to take some shots of blade edges today. Compared to the diamonds, that should be easy LOL.
I wrote on this topic earlier. I have learned a way to extract multiple images from video for focus stacking. This procedure can be done now or 20 years from now once the video has been captured. For print and magazines, I would need something higher than 1.5 Mega Pixel camera to get a good still image. See Example Photo below: The image has been extracted from Clay’s video above and then imported into Adobe Photoshop as layers, these layers where then converted into individual images (486 of them to be exact) then I imported the images into Helicon Focus 6 and then rendered them using Method A, Radius1, Smoothing1. Once the focus stacking render completed, I then cropped the result in Adobe Photoshop and the aberrations where removed for presentation.
Due to our limitations at the microscopic level this may be the only method we have, however, a “purist” may argue that we are editing the photo too much. I say absolutely and why not, other than video this is our only choice we have to produce a assembled image of our subject due to our limited field of view. Compare Clay’s video to this and ask your self, does it represent the intent of the image and object well? I am looking for input here. HD video may be the answer. If captured in HD and then exported like this, we can make as many focus stacked images that we want with the added benefit that we can record multiple subjects in one microscope sitting.. I can take the video and then superimpose the focus stack into the video.

That is where the microscope attachment that Cliff is playing with comes in. Mine is presently in Texas or I would have used it by now. I am going home in August, I will bring it back with me when I return. For now, we get to watch Cliffs results.
Also on the polarization of the diamond plate. This all comes down to the angles of the light. In all reality, if I spin the Diamond Stone on a central plane, at each angle observed, the image would be different. The reflections coming off the diamond surfaces would change and the colors would be altered as well. Diamond plates are a very complex object to photograph now that I see them for myself. This is all new to me as well.
I think I referenced my day job in a different post, I have used a microscope to observe two dimensional fingerprints on a finger print card, not four dimensional diamonds (length, width, height and depth). This is all crazy when you really start thinking about it. The variables that need to be considered to get the best representation of the object captured in pixels is tremendous. Cheers!
Late Minute addition: The 2000x dry lens seems to work just as well as the other lens on the scope without the need for oil. This is great for blade edges. I will have a video out soon (“Click” Here and Here for two short examples without having to watch the whole video). One of the biggest obstacles in my environment presently is the vibration. I am presently working in a elevated trailer with construction going on all around me daily. If it isn’t a earth mover, it is something else…
Eddie Kinlen
M1rror Edge Sharpening Service, LLC
+1(682)777-16222 users thanked author for this post.
05/19/2016 at 6:23 am #34054Interesting results, in the stacked image above it almost looks like its reversed(deeper scratches sticking out), must be an optical illusion.
If you havent ran across these videos yet they have helped me a lot. Best taken in small doses as the material is heavy duty but it does apply to what we are trying to do and how to do it for highest clarity, resolution, and maybe most importantly without introducing artifacts. Fair Warning: This link is an entrance to a rabbit hole of epic proportions but with much usful info if you can sort past the big words they love to toss around.

https://www.youtube.com/watch?v=n2asdncMYMoIm much more of a hands on kinda guy and without a manual (yet!) Im learning my scope 1 day at a time, as scary as it sounds by disassembling and examining the functions of the different components while cleaning the optics like I did today in response to getting a better grip on Kohler Illumination which apparently is a foundation principle for getting good lighting on a subject(according to another 20min video) and involves beams of light, phase shifts, quantum flux, & possibly dilithium crystals!

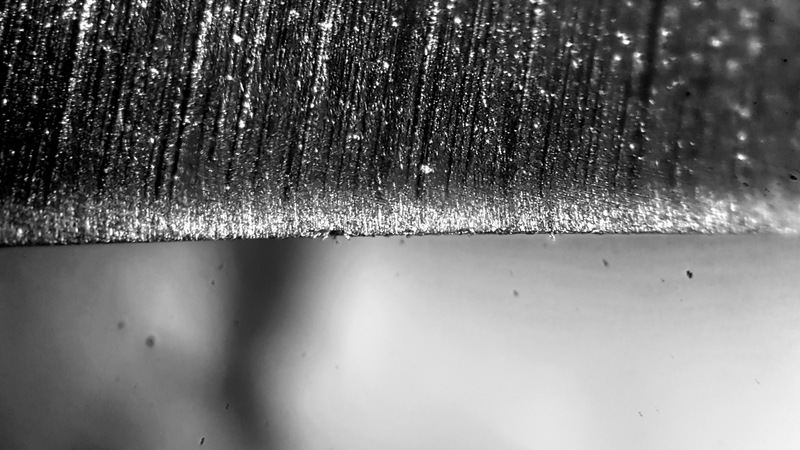
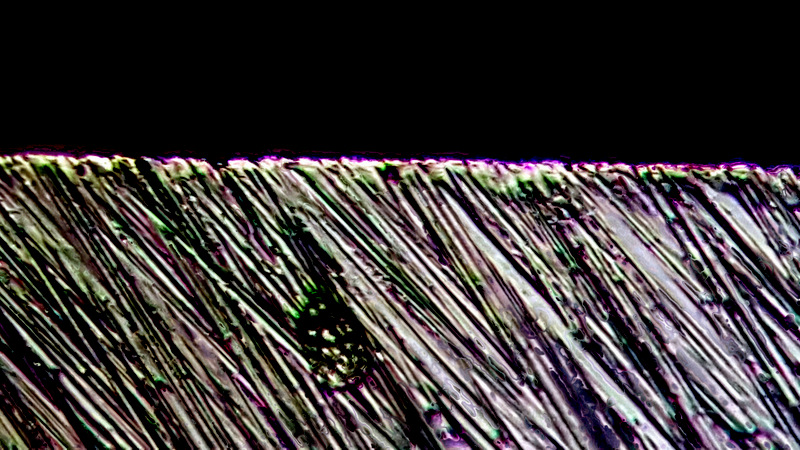
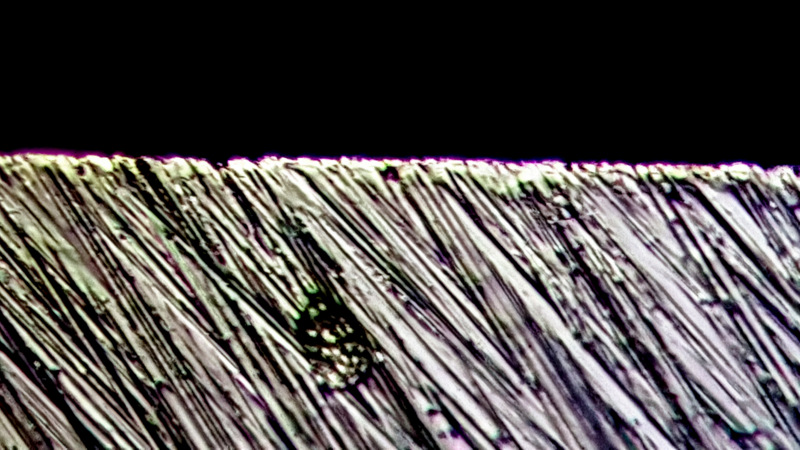
I already put the scope up for the night after taking some more test shots tonight on a stock factory edge. The subject was a Brous Bionic and reasonably sharp but not hair shaving really. Its clear they did a 2 part sharpening process consisting of first a course grit abrasive to profile the secondary bevel and then a heavy stropping step to remove the burr(as well as any tooth) before sending it out the door:
First stacking is worst of the bunch. I was playing around with a small flashlight/diffuser and you can really “see” details but taking a series of photos is really hard. There is a microscopic ding barely noticable with a fingernail.
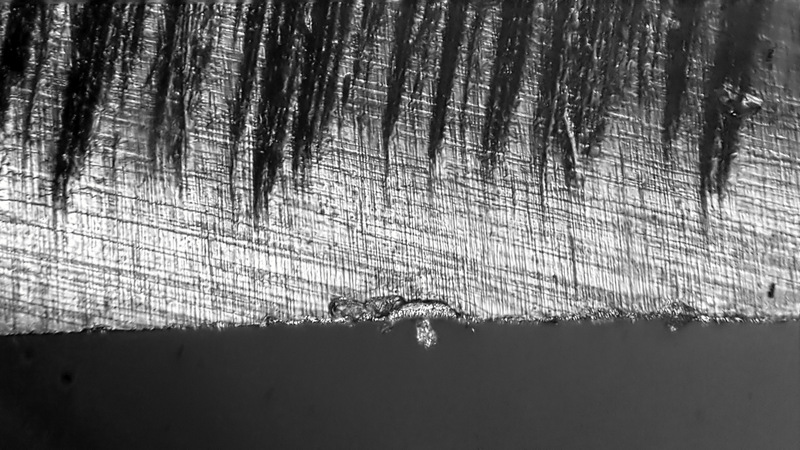
Next one is closer and better. Having a 16mp camera allows for alot of zoom. I was playing around with lower objective lens and higher camera zoom and visa versa. Also whatever I did to try and get Kohler illumination seems to have worked?
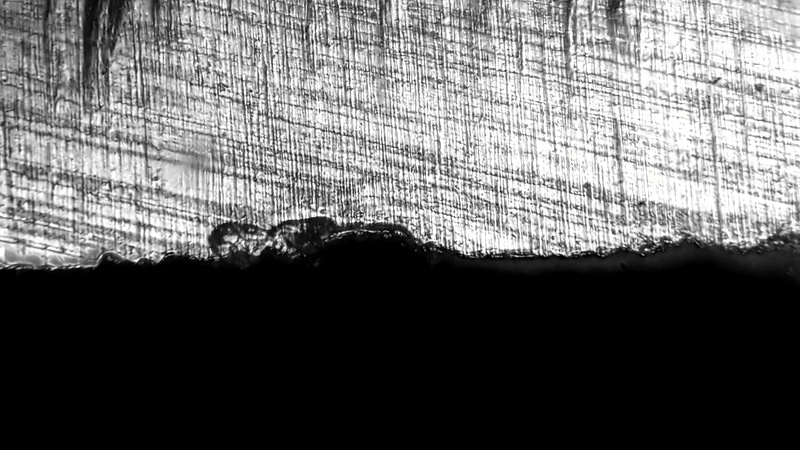
Coming in closer by increasing the objective to x40, the eyepiece x20, and the camera x2 zoom. Next experiments were comparing the Helicon image stacking Weighted Average VS Depth. Justs out on this one still but heres my favorite.
And finally highest mag/zoom I attempted. Not as thrilled tonight as last time. Maybe this is where a HD video slowly focus shifting could relay more info to the viewer.
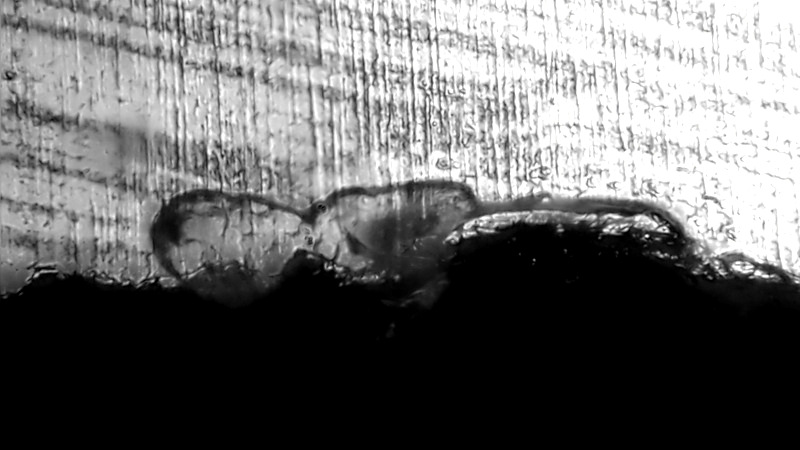
What I am seeing under the scope is the apex of the knife has been dinged hard enough to crumple the apex and actually bunch the metal up over to the right and to the left this caused small pieces to flake out as well….seeing this close can be kinda depressing when thing you thought were flawless turn out to be not so much. Even the metal itself reveals flaws in its basic structure and you realize that perfection is a joke the closer to infinity you get.
Attachments:
You must be logged in to access attached files.
2 users thanked author for this post.
05/19/2016 at 8:04 am #34059See my latest video of a Blade Edge… ZT0770CF under 2000x (Dry) Objective Lens viewing the blade edge from the edge down to the spine. Oil on the blade is clearly visible. I will attempt to remove this for future videos prior to production. Damage or rolled edge can be seen with the naked eye towards the heel of the knife. Depth of field and total field of view difficult to adjust for. Any movement I make, “jerks” the field of view from one side of the frame to to the other. I may have to disassemble the stage to lubricate the teeth. I believe this will make easier to make small adjustment from the top of the stage to the bottom
 .
.Eddie Kinlen
M1rror Edge Sharpening Service, LLC
+1(682)777-16221 user thanked author for this post.
05/19/2016 at 6:50 pm #34086I agree with Cliff, Eddie, your latest stacked image, made from a video is great. It shows all the details Clay’s video also shows, but now in one picture.
And what strikes me about your pics, Cliff, is how much edge damage they show. Did you pick specific blades for this or is this stuff that’s often there, but we don’t see with the naked eye or low-magnification microscopes?
Molecule Polishing: my blog about sharpening with the Wicked Edge
05/19/2016 at 11:23 pm #34089I agree with Cliff, Eddie, your latest stacked image, made from a video is great. It shows all the details Clay’s video also shows, but now in one picture. And what strikes me about your pics, Cliff, is how much edge damage they show. Did you pick specific blades for this or is this stuff that’s often there, but we don’t see with the naked eye or low-magnification microscopes?
The last one was of a Brous Bionic. It was given to me as a thank you for sharpening work and I would swear it has never left the shelf since I got it and was virtually brand new.
Im trying desperately to get up this learning curve and out of the theoretical stuff back into the practical “get stuff done” zone I like to be in so I can do some real world testing and edge analysis.
Today I took comparison pics between the usb scope, the 2 meg camera on the new scope, and finally with the cell phone mounted on the new scope. I took photos of the test reference slide with all 3 “cameras” and then with the cell phone zooming in. I think the cell phone won for highest overall magnification, but for easy of use the 2meg camera may also be a contender. I also compared the above 3 imaging options on a real knife blade that I had quickly belt sanded at 220 grit to show some tooth.
In general, what I have learned so far is, just because you can see down at x1600 doesn’t mean you need or want to because everything indeed does look slightly damaged even if never used. For example, I don’t want to look at an individual tooth on the apex, but the teeth formation as a whole and in clear focus at high resolution.
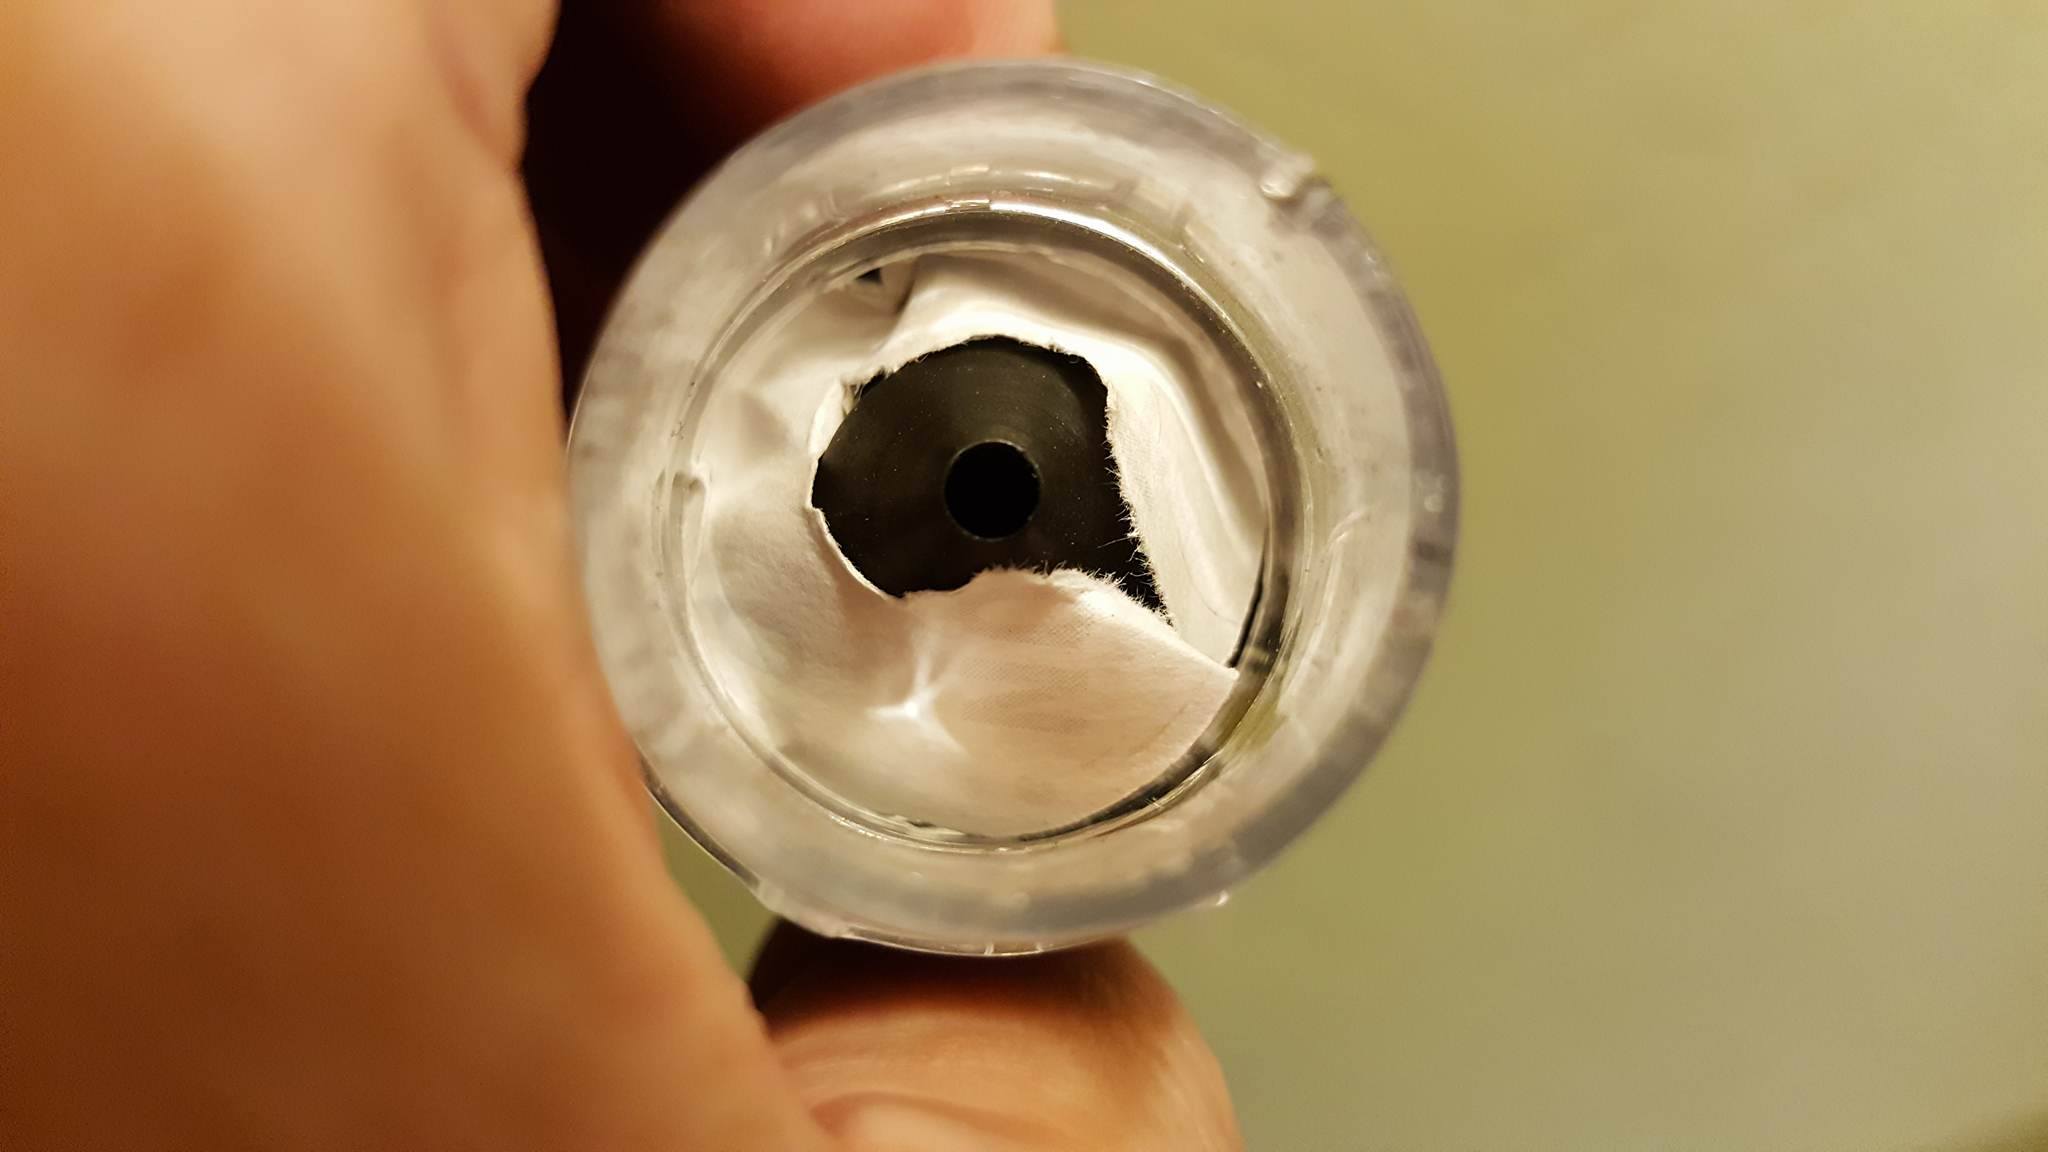
Again on a practical side note, I used a diffuser inside my cheap usb cam like Eddie suggested and the results were 100% better. I just grabbed a piece of light density paper and made a small doughnut shape piece and stuck it in there. Im still a huge fan of the usb scope directly on the blade for quick visual examinations. It does chew up the clear plastic ring a bit though.
Im going to start a new post tonight after kids go to bed showing my own comparisons, results, and individual tests as this thread is getting rather long and keeps branching off.
Great stuff and I cant thank Eddie enough for his parallel process at the same time, pretty cool synergy stuff!05/19/2016 at 11:42 pm #34090I just grabbed a piece of light density paper and made a small doughnut shape piece and stuck it in there. Im still a huge fan of the usb scope directly on the blade for quick visual examinations. It does chew up the clear plastic ring a bit though.

Should I interpret this as if you cut off a part of the plastic ring with a knife or removed the ring by force? I’m still wondering how I can make a diffuser for my Veho with a non-removable cap.
Im going to start a new post tonight after kids go to bed showing my own comparisons, results, and individual tests as this thread is getting rather long and keeps branching off. Great stuff and I cant thank Eddie enough for his parallel process at the same time, pretty cool synergy stuff!
The synergy going on now is really great indeed! I hope to participate again once I have my new scope. And I’m looking forward to your comparisons!
One more question: how come some of your pics show a lot of color and others don’t?
Molecule Polishing: my blog about sharpening with the Wicked Edge
05/20/2016 at 12:39 am #34092Well my cap ended up coming off with force applied but I dont think its needed at all to get a filter in place. I cut out the circle of paper and cut a hole in the middle, Id cut the middle hole a bit bigger next time.
Then simple stuff it down in there all cozy like so the cone protrudes past. Good to go. Doesnt help the resolution but cutting down on the glare can let you see the true nature of you pics.
The color thing is a good question. I love the colors but also like the uniformity of black & white to focus on image clarity and focus. I had been converting images to b&w before image stacking in an attempt to get a cleaner end result.
Also I think I have evidence of alot of artificial data being inserted into photos and other details being left out. Im gonna start on that post now. Kids just got tucked in…amen. 🙂
Attachments:
You must be logged in to access attached files.
05/22/2016 at 4:33 am #34157Eddie have you looked under the hood in Helicon much? I started tonight by playing around with the 3 basic stacking methods offered. Also in the preferences “light adjustment” is turned on by default. Since I adjust pre-stack I turned that off. Also there is a rather important looking setting for DPI that is set to 300 by default, shouldnt that be much higher or as high as possible? Lots of questions but getting some results as well.
Here are examples of the 3 stacking methods. Not the super best quality focus(was getting vibrations like you mentioned) but submitted for review so we can come to a better understanding of what looks best by group consensus.
Weighted Average:

Depth:
Pyramid:
Just for reference this is 600 grit edge leading strokes at x400 digitally zoomed to around x1600. Pyramid is my least favorite. Weighted average seems most accurate and depth seems to enhance…well…depth.

Attachments:
You must be logged in to access attached files.
05/22/2016 at 6:47 am #34174My opionion: they all three look great. Image stacking really works, it is almost as if I can see the pics in 3D. I can hardly see any differences between the different methods. Maybe you can see them if you know what to look for, but to a layman like me all three of them look great.
Molecule Polishing: my blog about sharpening with the Wicked Edge
05/22/2016 at 9:22 am #34184I agree with Mark. In the example provided they all look pretty good. I prefer method B with a smoothness of 1 and a radius of 1. It all depends on the image. The cool part with Helicon Focus is that you can run them all and choose the one you like the best after they each render. Adobe doesn’t have that option. DPI would be something to consider if you are stacking a 2 MP photo or a 16 MP photo. DPI stands for dots per inch. It is really important for the printing of images, however, on a computer more resolution in my experience just takes up hard drive space if you are planning to post them on the web. Once you capture a 16MP image you can always reduce it to web appropriate sizes after render but before render I would keep it big with all the details. The casual web observer is limited to seeing the resolution of their monitor and nothing more. Images on my Ipad look 10 times better than images on my laptop at the same image resolution. I am not sure if you have one but send a 16 MP image to someone who does and take a look. You will see an immediate difference. I have owned a MAC book pro and I saw a noticeable difference when I went back to PC in Image quality. I did it mostly because of Cost. My kids get the best stuff these days, I am opting for “cheaper” as they get older. LOL.
Eddie Kinlen
M1rror Edge Sharpening Service, LLC
+1(682)777-162205/22/2016 at 3:43 pm #34193It seems that the process requires isolating the variables and then adjusting individual items one at a time.
The tormek mount allows for blade rotation to find a good reflection but it also created a crazy sensitive “earthquake” detector! Seriously I could “see” even the faintest sound vibrations from the road or people talking in the next room. Thats why I lost clarity at high mag.
Im wondering if this is what Eddie was describing when a truck was driving by outside his station area and I am guessing it has something to do with the arm mounts and possibly inherent in the length of them?
Vibration needs to be eliminated to get good focus, then blade angle for good lighting, then light levels for good images, then proper use of software…and the list goes on but thats the order of operation Im currently holding to. I cant see going forward in image improvement until the basics are locked down for consistent results right?
05/23/2016 at 12:44 am #34200I’m wondering if this is what Eddie was describing when a truck was driving by outside his station area and I am guessing it has something to do with the arm mounts and possibly inherent in the length of them?
Yep, that is what I was talking about. I don’t use the “helping hands” often, just because of the reasons you have indicated (Earthquake Detector!!! LMFAO). Lately, I have been just using the “Play dough” under the blade edge because it also has the effect of reducing or dampening the vibrations as well as providing support of the angle I am trying to achieve. As I am not going anywhere, I will just have to work with what I have for now. I will try the hinge tonight after a visit to my local Japanese Dollar Store. I think it will provide support and effective vibration reduction.
I am wondering….Maybe if I set the hinge on the play dough if it would add additional dampening of the vibrations. Or maybe it will add positive contact with the scope stage and if the scope moves, the hinge will move with it thus eliminating some of the “Shake” from the images. Something to try.
Eddie Kinlen
M1rror Edge Sharpening Service, LLC
+1(682)777-1622 -
AuthorPosts
- You must be logged in to reply to this topic.