Extended Depth of Field Image Stacking
Recent › Forums › Main Forum › Welcome Mat › Extended Depth of Field Image Stacking
- This topic has 104 replies, 11 voices, and was last updated 05/23/2016 at 12:44 am by
 M1rrorEdge.
-
AuthorPosts
-
05/14/2016 at 5:04 pm #34010
I agree with Eddie, Cliff. Great pics and a big improvement over the previous ones! And do I understand it correctly you didn’t use any filters? I’m particularly curious how the polarization filter will work. And what other filters do you have?
Thank you Mark. My next free hobby night after kids go to bed I want to try n get the calibration scale working for accuracy and reference and then I can dig into the box of filters as well….pretty sure there is a yellow, green, and a smoky looking one that may be *fingers crossed* a polarizer.
My setup has other issues but what I expected for buying second hand and suites me fine. The table has a fine X/Y axis control knobs that werent engaging the gears fully. Disassymbled and a 5min repair which also allowed me to inspect the viewing area and gave me the idea for an alligator clip 3rd arm to position and hold the blade.
Next issue is something is out of whack in the lighting module that attaches in the middle. That is why the first images were so bright to the right side and when I close down the “iris” its off center. I know there are adjustment screws for that, just havent found them yet to calibrate….Also still no manual so flying blind as it were.
Shout out to Eddie for fueling this fire. Cant wait for you to get your gear up n running n share more insights. Lighting seems to be the key to many digital image quality issues. 05/14/2016 at 11:41 pm #34011
Mark; My new dino-lite hasn’t come in yet, hopefully, this weekend. The previous dino-lite had a polarizer, HDR, EDOF, and Long Working distance all in one camera (I no longer have it). I have been using my “VEHO” equivalent scope that says it is 400x for all these videos. The polarization will work on your scope too and all cameras as well. The angles are still important, like Cliff has observed, the lighting is critical. I am still using modelers clay under the blade and spine to adjust the angles just right. If we put garbage (Rubbish in Europe) into the computer than we will get garbage (Rubbish) out. I am starting to believe that lighting is more “critical” than the camera itself, unless you need to see the very small details and then you need more magnification (From a multi objective lens microscope like the one Cliff and I are playing with). I believe for your application you should start with the diffuser and then work with the polarizer to reduce the glare. I am finding that the LED light on these USB scopes is very harsh and they cause a lot of reflections. In fact, careful observation of my previous images leads me to believe what we are seeing is direct reflection off the blade of one of the LED’s on the camera/Scope. In this image after I stacked it and performed HDR compositing and if you look closely at the images, you can see the blinds on my rooms window. Diffusing the light coming off the LEDs at these small distances from the subject of observation is important and then polarizing any residual glare. Doing these two steps alone will help everyone greatly.
Reflection from outside my window

Reflection of the LED ring on the camera

Reflection of the LED Ring on the camera

Reflection of the LED Ring on the Blade Tip

Eddie Kinlen
M1rror Edge Sharpening Service, LLC
+1(682)777-162205/14/2016 at 11:55 pm #34012That is why the first images were so bright to the right side and when I close down the “iris” its off center. I know there are adjustment screws for that, just haven’t found them yet to calibrate….
Cliff, I had a similar problem with my scope. You will always have a spot in your video when you adjust the iris. I had to rotate the whole housing to center it. I expect that this may be the best we can get. It does bring out the colors and depth a lot, however, the field of view is diminished significantly as a consequence. I will try to take a photo of what I am seeing. Maybe others have had this experience too.
Eddie Kinlen
M1rror Edge Sharpening Service, LLC
+1(682)777-162205/15/2016 at 8:40 am #34014Your photographs are quite revealing, Eddie. At the time I used my Veho scope a lot (about 4 years ago already), there were not many other people using USB scopes for this purpose, let alone people who could tell you about LWD, EDOF or polarization. Often taking these pictures was quite frustrating, because of the glare in the photographs. I had no clue where it came from and it was a process of trial and error to get proper pictures.
Now I realize better where this glare comes from: mainly the LEDs of the scope, but also some outside light. And apparently this little bit of outside light, as well as the angle of the scope, can make a huge and unpredictable difference. At least I found that sometimes when I took pics in a nearly dark room (so hardly any outside light) there was a lot of glare, whereas pics taken in broad daylight sometimes showed much less glare. So I wonder how you can so precisely determine the source of the light on your bevel (like the outside window or the LED ring on the camera). I assume you used the LWD and your diffuser, but for the rest?
My mind is still dazzling with all of the Dino Lite models and type numbers, but it actually sounds as if your previous model (assuming that’s the AM4815ZTL) had all the features one needs for edge photography, with the exception of LWD and polarization. But since it has a removable cap, I wonder why you didn’t keep it and use “simulated LWD” and a separate polarization filter you showed before.
I took a look at my Veho scope and found out it doesn’t have a removable cap (at least not without the use of force). The good news is that a very nice gentleman is sending me a Dino Lite scope that’s a lot better than my Veho. I don’t know what features it has, except for that it’s rated 500x magnification, but I’ll soon find out. That should give me a proper tool and inspiration for new experiments. One of the things I want to do is take pictures of the scratches the various stones and stropping compounds leave on the edge. I still don’t know whether counting the number of scratches per mm is the best technique for determining the grit rating of a stone or stropping compound (there are more variables at play in how abrasive a stone or stropping compound is), but at least it should give us a clue next to the rating a manufacturer gives.
(And funnily enough in Dutch English – I’m Dutch and we’re taught British English at school – we use the phrase “garbage in, garbage out”, not rubbish
 ).
).Molecule Polishing: my blog about sharpening with the Wicked Edge
05/15/2016 at 11:28 am #34015My mind is still dazzling with all of the Dino Lite models and type numbers, but it actually sounds as if your previous model (assuming that’s the AM4815ZTL) had all the features one needs for edge photography,
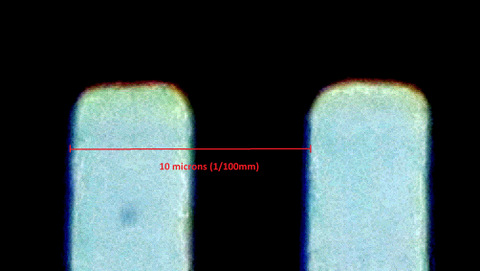
Exactly, I thought that too and that is why I bought it. However, 140x magnification isn’t enough for “Edge Photography” It is O.K. for Bevel photography ONLY (Big difference). We need a magnification of at least 450x to see the edge and 2000x to measure it and see it very well. (See all Clay’s photos). A bevel may be 1 mm wide whereas the edge of the edge may only be 1-3 micron (1 Millimeter is 1000 microns). (See photo from Todd’ Sciencofsharp Blog here) The AM4815ZTL just isn’t enough magnification for what I want to see even though the features (EDOF, HDR, polarizer, and long working distance) is what I was looking for.
When I spoke with Dino-Lite engineers they improved the software for the AM4815ZTL to allow 30 images for EDOF when it was artificially limited to only 11 (This was just published in their recent software update). I asked them to send photos of their 900x scope (AM4515T8) at 50x increments (They couldn’t). That is when I discovered this limitation. We are basically using only one Objective lens and the 900x scope can only see from 700-900x. Missing everything from 10X through 600x (Bummer). So ….I would still need two scopes. One for the higher magnification and one for the lower…
So I started looking at used Metallurgical microscopes with multiple objective lens to fill the gap. Fortunately, I found it. So I traded the AM4815ZTL in for the two different products (A lower magnification scope and an Eye piece camera for my Radical India metallurgical microscope).
I realize how confusing it can all be. When I decided to purchase it, I ensured I under stood the return and warranty policy. Sunrise Dino honored my trade in request and now I have moved into a similar but different direction. They actually have outstanding customer service and support. I spoke with several of their engineers and as I stated because of my concerns (maybe others too), they upgraded the software for the AM4815ZTL because I was providing user feedback that they appreciated. They offered to let me try the new options with a AM4815ZTL for 30 days for free. However, by that point, through this forum, I discovered Helicon Focus 6 and I already knew that Adobe Photoshop could do focus stacking (EDOF).
I also asked the dino-lite system engineers to put HDR, EDOF, and LWD in a scope that has a magnification from 50x through 400x. If they did that, this would be a perfect combination for blade edge and bevel photography. However, it doesn’t exist yet.
So, I wonder how you can so precisely determine the source of the light on your bevel (like the outside window or the LED ring on the camera). I assume you used the LWD and your diffuser, but for the rest?
In my case, I closed the blinds and saw them close in the bevel reflection on the camera (It was a WOW moment). The glare and reflection I saw went away immediately. Unfortunately, I was so frustrated and excited with my new observation that I moved the blade before I got a before and after photo (I have done this often lately and is very frustrating). Microscopic changes make a big difference and are often hard to duplicate easy. It is moments like that, that I love. (Observation and wonder lead to new discovery and understanding).
It’s better to share them with others than to keep them to yourself. In fact, through my new understanding, I discovered that in product photography of reflective surfaces, they intentionally place dark objects in reflective photos to bring out the “curves”.
(And funnily enough in Dutch English – I’m Dutch and we’re taught British English at school – we use the phrase “garbage in, garbage out”, not rubbish ).
Languages differences and each countries phases are so funny from place to place. I have lived outside the U.S. for 20 years now. I get a kick out of it….It never gets old to learn something new. LOL
Eddie Kinlen
M1rror Edge Sharpening Service, LLC
+1(682)777-162205/15/2016 at 2:24 pm #34016I now realize I wasn’t just confused by all of the Dino Lite models, but actually mixed up models in my previous post.
What I meant is that I thought that the AM4515T8 (and hopefully the 500x scope I’m getting) would be ideal for our purposes. The AM4515T8 has got 700-900 magnification. It doesn’t seem to have EDOF, a LWD or polarization. But I was thinking:
- I think I personally could live without EDOF. (The examples with image stacking shown here show a noticeable improvement in image quality, but for my purposes I could probably live with only a small part of the edge in focus.)
- a LWD could be simulated in the way you have done with your Veho-like scope, because this scope does have a removable cap.
- polarization could be achieved with a separate filter like the one you showed.
What do you think of this, particularly about the last two points? And do you have any further experience with the polarization filter? What you showed in the video was impressive.
Molecule Polishing: my blog about sharpening with the Wicked Edge
05/16/2016 at 1:04 am #34018What I meant is that I thought that the AM4515T8 (and hopefully the 500x scope I’m getting) would be ideal for our purposes. The AM4515T8 has got 700-900 magnification. It doesn’t seem to have EDOF, a LWD or polarization.
I looked at this scope “hard”. I almost purchased until until I realized the lower magnification limitation. I believe it will work well for seeing the edge of the edge. That is what Dr. Matt has and he love’s it. These are images from this scope (Here)
I think I personally could live without EDOF. (The examples with image stacking shown here show a noticeable improvement in image quality, but for my purposes I could probably live with only a small part of the edge in focus.)
I agree with your observation. With a third party software program you can always add it later if you want more.
a LWD could be simulated in the way you have done with your Veho-like scope, because this scope does have a removable cap.
Yes, by removing the cover you can add more light at different angles and add filters of your choice. However, from your posts, I believe you don’t have a stand. In order to keep the scope still (motionless) and to get control of the focus at the higher magnifications, especially 900x you will need it. It has the added benefit of giving you a “third hand”. Later you could always add or make a “Helping Hands” setup like mine to hold other lights or filters. You don’t need the expensive stand I purchased (Here). You could probably easily get away with either of these (Here, or Here). You need something very sturdy at these magnifications (You wont regret it).
polarization could be achieved with a separate filter like the one you showed.
Absolutely, I would diffuse the light and then add polarization. I believe this dino-lite will come with the diffuser filter and several others to experiment with.
Eddie Kinlen
M1rror Edge Sharpening Service, LLC
+1(682)777-16221 user thanked author for this post.
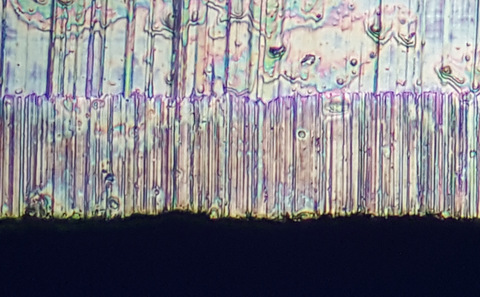
05/16/2016 at 1:42 pm #34023Here is a video I put together that shows how I came to my conclusion about Long Working Distance (LWD), how I modify my “VEHO like” camera for diffused light photography and video and use custom filters. This is how I have chosen to compose the light so I can see all the scratches at this magnification (Supposed 400X on camera, isn’t)
This is a question I forgot to ask, Eddie. I also had the gut feeling my Veho microscope wasn’t 400x (not by far…). But how do you determine the magnification factor of such a scope?
Surely it cannot be as simple as the size of the magnified object (on the screen) divided by the size of the real object. That would mean that if I get a larger monitor (with the same resolution), the magnification of the scope would suddenly increase. So surely the resolution of the scope (and in theory the resolution of the monitor – but in practice that won’t be a limitation) should come into play as well.
Molecule Polishing: my blog about sharpening with the Wicked Edge
05/17/2016 at 12:57 am #34024This is a question I forgot to ask, Eddie. I also had the gut feeling my Veho microscope wasn’t 400x (not by far…). But how do you determine the magnification factor of such a scope?
Mark, this is a very good question and I bet others are asking the same thing…….At first, I had absolutely NO idea either because, I didn’t have anything to compare it to that was accurate. Once I got my metallurgical scope with fixed objective lenses, it became very obvious to me that something was off on my VEHO USB Microscope (400x was close, real close, on my traditional microscope) and like you, my gut said something was wrong. I wanted something better and something accurate so I could measure the objects in my image (See Dino-lite Measurement Video). That is why I purchased a dino-lite.
Then, I learned how to calibrate my dino-lite with the included microscope precision calibration target or “micro-ruler” (It comes with your dino-lite (See Here). Right away, I could see the magnification observed on the dino-lite images compared to the same magnification on the VEHO scope didn’t match. This confirmed again something wasn’t right. It’s not a lot but it is enough you can notice. You can use this target for every microscope you have.
I also went one step further and used a application called ImageJ to measure objects in my microscope photos (See video Here). (Mark- I sent a Private message with additional info)
Eddie Kinlen
M1rror Edge Sharpening Service, LLC
+1(682)777-16222 users thanked author for this post.
05/17/2016 at 4:23 am #34025Thanks Eddie, that ImageJ software looks very nice to me and it should even work with my Veho scope! It clearly shows how large something small under a microscope is. (Though I still wonder how a microscope manufacturer – be it Veho or Dino Lite – can capture this magnification in a single magnification factor.)
Molecule Polishing: my blog about sharpening with the Wicked Edge
05/17/2016 at 4:53 am #34026Thanks again Eddie for posting the link to the cell phone adaptor! Ill try to give a first impression of my pluses and minuses for its use.
Ill start by saying for the $38 bucks its a hard deal to beat for what it does. I did see others listed on Amazon but was so excited I just clicked n bought without my usual review comparisons.
Im running a Samsung Galaxy S6 Edge and didnt even realize until tonight that it has a 16mp camera with auto HDR, pro mode, and output capability in raw format! The digital zoom goes to x8(more on this in a second).The weight on my phone is listed at 4.66oz or just over a 1/4lb. The clamp that attaches equally around the eyepiece did not hold it tightly enough out of box to keep the phone flat(horizontal) when using the “downtube”. When using it clamped to a front eyepiece you would want the phone in landscape orientation but with the phone extended off to the side it swings down. This is probably fixable by taping the eyepiece temporarily etc….You get the idea…its fiddly! I ended up using it up top and adjusted until it was centered and then left it ALONE!
Ok 2 pluses for my phone method….In camera mode it can be voice activated so without touching the wiggly parts I can snap a pic, fine adjust focus, snap another etc. Also I didn’t do it tonight but I’m sure with wireless webcam app I can view on my big screen computer system which should be pretty awesome!
Last final negative is the lack of measurement software available natively while in use which brings me to the next question….What magnification is it when you have a x10 eyepiece, a x40 objective,…and do a x8 digital zoom on your 16mp camera??? What about if the eyepiece is x25? x8000
 Here is the best shot of my calibration slide. Independent of software this is how I know the size of what Im looking at…for now:
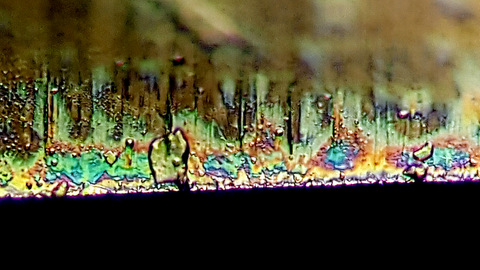
Id be lying if I said I wasn’t stoked about these results for first try with still new equipment. I did use a filter but it was not a polarizer, also had good success with diffusers tonight and external light sources. Here’s round 3 results and first attempt with a decent camera, possibly HDR(Im not sure which ones I tried it on), image stacking, and post processing to remove glare. Subject was a brand new commercial razor blade:
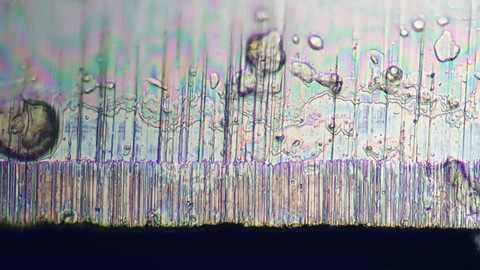
Image cropped down to zoom in…
Final image is of another razor blade, this one was a brand new disposable twin blade. You can see the apex is much less jagged but am I mistaken or is that massive heat damage discoloring the entire area behind the edge? Sure is pretty tho, wish I would have image stacked the entire picture!

Attachments:
You must be logged in to access attached files.
05/17/2016 at 8:24 am #34032Holy Crap, That’s Awesome! My stuff (Eyepiece Camera and 90X USB Scope) and the 100X dry lens came in today and the first video example is rendering now. I will say this…at 2000x it is like you are looking at the moon up close. It is a whole new world of crazy. At that magnification even vehicles passing by my trailer shakes the camera. Can’t wait to share. LOL!
Eddie Kinlen
M1rror Edge Sharpening Service, LLC
+1(682)777-162205/17/2016 at 9:18 am #34033Here it is…. Having too much fun right now!
Eddie Kinlen
M1rror Edge Sharpening Service, LLC
+1(682)777-162205/17/2016 at 9:52 am #34034Images from new Dino-lite AM4113ZTL (With and Without Polarization) All images calibrated.


Eddie Kinlen
M1rror Edge Sharpening Service, LLC
+1(682)777-162205/18/2016 at 2:57 am #34043All I can say is WOW! This is really, really, really, small… Every movement counts at this magnification. My new conclusion is that video is the way to go to present these microscopic details, unless you intend to print your photos or put them in a magazine or book.
EDOF (focus stacking) works, however, for presentation on digital media like a computer or the internet, I think Video is the better choice to see these details at a microscopic level, simply because, we are at a severe limitation in our depth of field at these extremely high magnifications..
Absolutely Clear photos with EDOF (Focus stacking) at these magnifications is difficult to achieve unless you have the perfect alignment of a steady work surface, adjustable light with polarization, and increased magnification. The higher the magnification the more difficult it is to control these variables. Especially, when looking at objects that reflect a lot of light like a knife bevel or diamond plates. These variables are hard to keep consistent at this microscopic level (800x or 2000x) without sophisticated equipment which at this present time is outside the bounds of my budget.
Helicon Focus 6 works and so does Adobe Photoshop for focus stacking. However, like others have observed. Recent technology and sites like YouTube have made it a lot easier than ever to make a video and post it for collaboration and documentation. With focus stacking if everything is in alignment (Adjustable Light, magnification, and polarization to reduce glare) you can achieve great results. I am not giving up on EDOF, however, after careful consideration of my observations, and “tinkering” with the EDOF technology for the last month, I think I am headed in the direction of video to show these complex details.
If I was planning to print my images, it would be an absolute must to take advantage of EDOF for focus stacking. However, because I plan to document my observations over time and have a lot of surface area to see and cover, I think am going to pursue video recording of my images further. Video capture of knife edges and bevels will allow better observation of the details because you are not set to a single fixed point at a limited depth of field. This will also allow me to cover more surface area on not just a single point on a blade edge or a single diamond on a plate but potentially the whole blade or area of diamonds at any one point in time.
I would like your thoughts on this too. Respectfully, MirrorEdge
Eddie Kinlen
M1rror Edge Sharpening Service, LLC
+1(682)777-1622 -
AuthorPosts
- You must be logged in to reply to this topic.