Custom Variable Angle Guide Scale
Recent › Forums › Main Forum › Sharpener and Accessory Maintenance › MODS › Custom Variable Angle Guide Scale
Tagged: Guide Angle
- This topic has 4 replies, 2 voices, and was last updated 10/11/2017 at 10:15 am by
Mark76.
-
AuthorPosts
-
10/09/2017 at 2:19 pm #41518
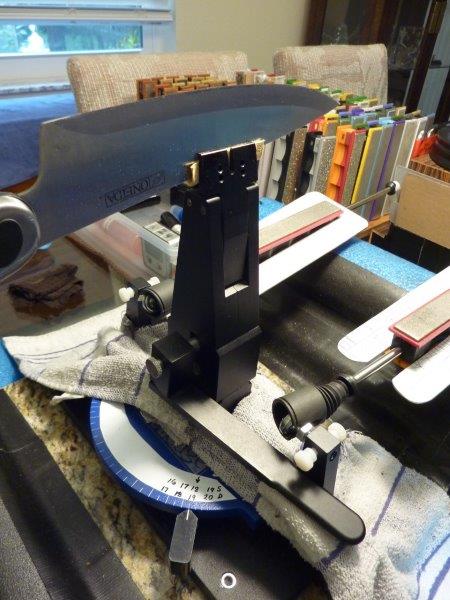
I came up with this “Custom Angle Guide” because the permanent angle numbers on my Gen 3 Pro don’t coincide with the size/shape of my knives. These numbers do reflect the true angle for a certain width knife when clamped at the correct depth in the correct manner. For me my wider kitchen knives never matched with these permanent angle numbers. A second issue I deal with is when I start with diamond platens an angle notch or hash mark means one value then as I work through my grit progression, I sometimes switch to thicker whetstones, then that original click/notch or hash mark value is now 1° less.
If you look at the permanent angle guide on the current model Gen 3 Pro, 20° is about the center/middle hash mark. With this particular knife I now have clamped you can see that the center/middle mark is 13-1/2° when I’m using the Diamond Platens.

When I swap out to the Shaptons Stones that same mark is now 12-1/2°. To complicate it more when I clamp a different knife similarly these same angle hash marks may coincide with a different angle value for that different knife. Every different knife I clamp the hash mark values can change.I decided I needed a floating scale angle guide I could customize to work for each individual knife I’m sharpening. I came up with this inexpensive, simple, idea to use self sticking “Dry Marker White Board” film. When I clamp my knives in the orientation that gives me “my sweet spot” I place a diamond stone on the guide rods and take a reading with my “Digital Angle Meter”. This measured angle is the angle where the handle notch matches the hash mark. I adjust the micro-adjustment screws to the closest, lowest full angle, (or 0.5 degree angle) value, in that handle position. Then I write the angle value number there where the handle is pointing. Each individual hash mark to the right is 1/2° higher and each mark to the left is 1/2° less. I label the guide accordingly for each knife. Diamond stones, Glass Platens (used with the Diamond Lapping Films), and leather strop paddles are all similar in thickness so the written number angles are a matching guide for these three medium paddles. The thicker whetstones are 1° less angle value at that same handle position. I write both sets numbers down at the beginning, and label the number scales, so I don’t forget which thickness paddle I used initially to calibrate my WEPS with that particular knife I’m sharpening. Of course these are all rough angle guides and I still adjust the micro-adjustment screws with each grit paddle change using the “Digital Angle Meter” for preciseness and accuracy.

When I switch over to the thicker Shaptons Whetstones as I work up into the finer grits in my sharpening progression that same hash mark is now equal to 1° less, due to the stones added thickness. To maintain the same sharpening angle for this knife, I have to move the adjustment handle 2 clicks or 2 hash-marks to the right to go up the 1°, because I switched to the thicker stones.To confuse matters further, but really simplifying things, when I finish with my Shaptons Whetstones I continue my progression to the leather strops. I reduce the angle setting, for any knife, 1-1/2° to 2° when stropping to avoid rolling the apexed edge. Since the strops are the same thickness as the diamonds, I have to move my angle adjustment handle to match the click notch/hash-mark that is 1-1/2 to 2° lower than the set bevel angle. Since I’m coming down from the thicker Shaptons whetstones I have to look at the angle scale I wrote that coincides with the thinner handles to adjust the angle, in this case it will be 5 or 6 clicks to left to reduce from Shaptons increments to Strop increments at 1-1/2 to 2° lower angle setting.
When I finish I just wipe the angle guide clean with the dry eraser. I mark it again appropriately to match the next knife I’m sharpening.
I’m hoping eventually WE will be able to incorporate a LCD Angle Guide that will allow us to be able to set and calibrate the angle scale to each individual knife, with a built-in stone thickness offset adjustment. The technology exists. Application, availability and expense are the limiting factors.
Marc
(MarcH's Rack-Its)Attachments:
You must be logged in to access attached files.
10/10/2017 at 1:35 pm #41541I want to try to simplify what I’m doing with this mod.
I clamped a Oneida Chef’s knife to sharpen. I know nothing about it; first time I’m sharpening it. I chose to clamp it in the bottom holes just because it’s relatively wide and balanced the length, that is clamped it in the center, “D”, with the standard alignment guide, so it’s equidistance to the tip and heel.
I marked it with a sharpie to find the sweet spot. I adjusted, that is, I slid the angle lever to get in the ball park where I was removing the sharpie almost totally with that angle position. I also tilted the tip up or down a little, as needed, to position the angle so the sweet spot was correct along the full length as close as I could get it. Up to this point I’m doing everything by eye, inspecting the sharpie removal under the USB scope, not caring what the angle lever is measuring.
Now that I’ve determine the clamping position is the best one, for me, for this particular knife, in this clamped position, I put the “Digital Angle Meter” on the stone, for the very first time. I get 19.3° on the right and 19.1° on the left side. Using each side micro-adjustment screws I zero both to 19.0° and lock down the adjustment screws.
At this point I mark the white board (my “Custom Variable Angle Guide Scale”). with the “Dry Ink” Marker. Where the angle adjustment handle points to the “mark” is recorded/written at 19°. We know from the WEPS user guide each hash mark is a 0.5° increment. So I label the marks on either side so I can have a reference to allow me to change the angle lever position and know what the angle setting corresponds to that lever arm position. When I go to strop and I need to lower the bevel set angle by 1-1/2 or 2° to prevent rolling the apex, so I’ll slide the angle lever it 3 or 4 clicks to left.
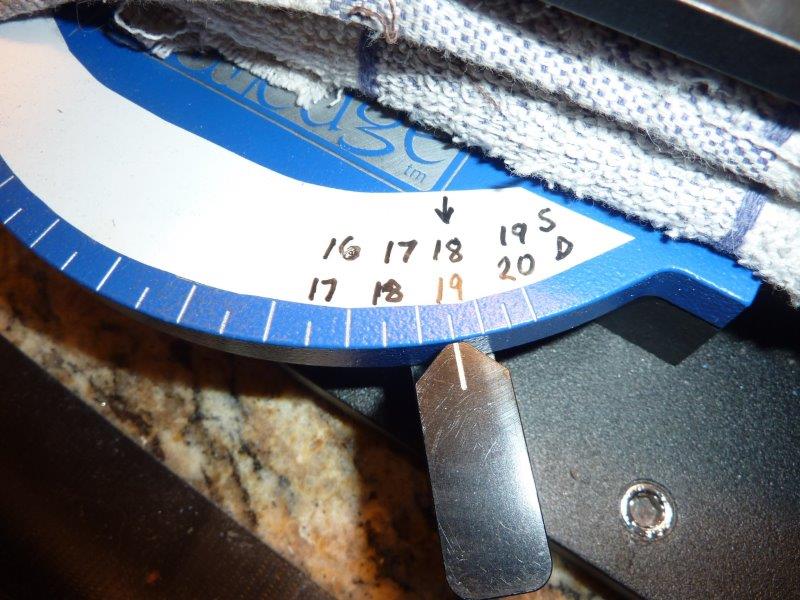
The value of this hand written scale is just to help me keep track of where I am because the Gen 3 painted scale in this situation doesn’t correspond to this knife’s geometry, and is of no use to me.
An added value to my mod is when I work through my grit progression, with some knives, I switch from using Diamond Stones to Shapton Whetstones. At the position that I marked that corresponded to a measured 19° angle will now measure only 18° when I switch to the thicker whetstone. Hence the double scale. You’ll notice I labeled the scales off to the side with “D” for diamond stones and “S” for Shaptons. As soon as I switch to Shaptons, in order to maintain the same 19° bevel angle setting I am sharpening this particular knife at, I need to slide the angle adjustment lever 2 clicks to the right to be at 19° for the Shaptons. When I know all my sharpening settings data; Vise/jaws hole position, Alignment position, sharpening angle, etc. I mark these in my sharpening log to reference for future touchups.
This scale, I’ll wipe clean when I finish with this knife because the angle positions will change with each different shape and style knife I am sharpening.
I hope that simplifies the practicality and usefulness of this mod. If you’re getting older like me and also suffer with “C.R.S.” then you’re probably already writing everything down!
Marc
(MarcH's Rack-Its)Attachments:
You must be logged in to access attached files.
10/10/2017 at 8:29 pm #41550Sounds good Mark. I also sometimes use the angle cube. But what I don’t understand is why you need the Custom Variable Angle Guide Scale. Wouldnt’an angle cube best enough? Or is this to ease your work and ensure the angle cube setting will be right, already?
Molecule Polishing: my blog about sharpening with the Wicked Edge
10/11/2017 at 5:23 am #41561I use this hand written scale just to indicate the angle value, that was measured with the “Digital Angle Cube”. The printed scale has no bearing on what angle I am sharpening a knife at, at any given time, because those printed angle numbers do not correspond to the angle I’m working with. In the progress of my sharpening I have to change angle settings by moving the adjustment arm to accommodate the different thickness stones. Then I change the angle adjustment arm, again, to finish with the strop. That’s three different arm positions for each knife.
Each and every stone grit I’m using on the knife, I verify the set angle, accuracy, with the “angle cube”, then micro-adjust as necessary. I have found that the thickness of my each of the stone grits can vary from 0.1º to 0.3º. I have the equipment, WEPS, to sharpen a fixed angle repeatable and accurately, so I use the tools I have to verify I’m utilizing this accuracy, potential. By simply writing the angles next to the painted hash marks then I can glance down and see what angle I’m using.
When I’m sharpening the third or forth knife in a day and all these knives are being sharpened at a different set angles, I find it very easy to forget what angles I’m working with. As I said, especially when changing the angle adjustment lever arm, is done several times during the process to accommodate different stone thicknesses. When I switch grits and check the angle with the “angle cube” I do get a reading but now I glance down and verify what reading I’m working with.
For example: I just decreased the grit from 200 grit Diamond to 400 grit Diamond. I place my “Angle Cube” on the stone. I get a reading 17.7°. Third knife of the afternoon, was I working at 17.5° or 18.0°?? I’ve forgotten, long day. All I do is glance down to verify that it was 17.5°. Earlier I decided to set the bevel at 17.5° after matching the bevel with the sharpie! That was the closest angle for this worn knife’s bevel, I found with the marker, after finding the sweet spot. If I don’t write it down I will forget. Especially when the first knife was sharpened at 20°, and the second knife I sharpened at 18°. Now I’m at 17.5°. The numbers run together in this old brain.
When I switch from 600 grit Diamond to 500 grit Shaptons, to continue the sharpening progression, (I’ll often step back a grit, when changing abrasives, just to insure I’m removing previous scratches, completely). Because the Shaptons are thicker stones than Diamond Stones, to adjust the angle to 17.5°, first I have to move the angle adjustment lever two clicks, (1º) to right to reach 17.5 º for the thicker Shaptons. Moving the lever arm adjustment is better then trying to adjust one full degree with the micro-adjustment screw. Depending on the beginning position of the micro-adjustment screw, (i.e., how far screwed in or screwed out it is), I don’t always have enough screw length to accommodate the angle changes I need to make. So I don’t mess with the micro-adjustment screw until after I move the lever arm the 2 clicks to make the 1º change. Then I make my micro-adjustment with the “Digital Angle Cube” to verify accuracy.
I like to keep the micro-adjustment screw with only a few full turns of threads exposed to insure a tight secure rod arm attachment to adjustment end brackets for strength and stability. If you had only a couple rounds of threads, threaded into the angle adjustment end, and you are using a scrubbing motion while profiling with 100 grit diamond stones it puts more pressure on that short amount of threads than I care too.
Lastly, when I determine with the Shaptons I’m as sharp an edge as I’m looking for, it’s time to finish with the leather strops. When stropping with WE it’s generally accepted to lower the set bevel sharpened angle by 1-1/2º to 2º to prevent rolling the apex when stropping.
2º less than what I was sharpeneing at I read the number and move the level arm to the labeled position. The old way I’d have to think about it..I’m 17.5º with Shaptons, but that’s same level arm click position is really 18.5º if it were a Diamond Stone I was using. Since Strops and Diamonds are similar thickness, then I need to lower it 1-1/2 or 2º below the set angle which is now, oh sh*t, I have to look it up or measure it with the cube because I forgot the angle, third knife of the day ….right it’s at 17.5º no it’s really 18.5º, because were going back to the thinner stones, so I have to move it 1 click or each 1/2º and it’s at 18.5 but I want to be at 1-1/2 or 2 less than 17.5 so that’s 3 or 4 clicks plus the 2 extra (needed to get back to 17.5)….it is just easier to read the numbers on the white board that I marked at the onset.Bottom line: I just find writing it down makes my life easier to keep track of where I’m setting my angles. The white Board lets me mark my own angle scale usefully and appropriately. I’m not trying to convince you to use this white board marker. I just am sharing a solution to an issue I have dealt with for some years and this little simple tool or mod has simplified my sharpening process.
Marc
(MarcH's Rack-Its)Attachments:
You must be logged in to access attached files.
10/11/2017 at 10:15 am #41569Now I get the point. That’s very useful!
Molecule Polishing: my blog about sharpening with the Wicked Edge
-
AuthorPosts
- You must be logged in to reply to this topic.