Need Help with Basics of Using Lapping Film
Recent › Forums › Main Forum › Techniques and Sharpening Strategies › Advanced Techniques and Sharpening Strategies › Need Help with Basics of Using Lapping Film
- This topic has 114 replies, 12 voices, and was last updated 08/27/2017 at 11:32 am by
sksharp.
-
AuthorPosts
-
07/16/2017 at 6:09 am #40158
I don’t think scratchless, perfect mirror finishes are possible. It just depends on how strong your magnification is. You probably need to qualify “scratchless, perfect mirror finish” at ___x magnification.
It’s possible to attain a mirror bevel that shows no scratches under different lighting, upon close up inspection with a loupe.
Of course at SEM kind of magnification it will all be really rough.
1 user thanked author for this post.
07/16/2017 at 7:12 am #40159Hi Marc:
Any new developments on this subject? I’m having a very busy summer hosting two reunions, so haven’t spent more than an hour or two at the WEPS.
I did do a Henckel chef’s knife last week which did something freaky. I had a beautiful bevel established after 1000 grit, with no apparent defects. With the diamond stones, I check for defects and progress with my ‘scope after each grit. I then did about thirty strokes with my relatively new 1500 grit stones and was absolutely shocked when I checked it with my USB ‘scope. I see a chunk missing from the edge which measures about 120 microns deep and about 100 microns wide. That’s about 0.005″ deep and 0.004″ wide, with very discrete boundaries, shaped as though someone took a big bite out the edge. It couldn’t possibly have been there for the previous grits and there’s nothing I did with my 1500’s to cause this, so I assume it was a defective crystalline pocket which just let go. Maybe a case of being too brittle? Not tempered correctly or completely?
07/16/2017 at 8:17 am #40160I’m curious, Tom, do you remember the kind and direction of your stroke you used last before you detected the damage?
I sent you a PM.
Marc
Marc
(MarcH's Rack-Its)07/17/2017 at 1:24 am #40175I try to stay with edge-leading strokes until I move to film, but it’s possible that I was alternating direction of strokes in this case. I’m less vigilant with the higher grits, especially if I’m in a hurry.
07/17/2017 at 2:28 am #40177Yeah, I also find it a very interesting subject. I usually don’t examine the edge after each grit with my microscope, but now I will try to do this more often. If anyone has more/better ideas about how this may occur, I too am very interested…
Molecule Polishing: my blog about sharpening with the Wicked Edge
07/17/2017 at 7:53 am #40180I try to stay with edge-leading strokes until I move to film, but it’s possible that I was alternating direction of strokes in this case. I’m less vigilant with the higher grits, especially if I’m in a hurry.
The reason I ask is I have had experiences in the past loosing edges in a similar fashion when using edge trailing strokes. The first edge deformation I experienced, I didn’t post a photo of that one. I attributed it to “my fault” due a collision with the edge. Now I’m doubting that because I remembered the collision was at a different position on the blade and is usually much narrower and more localized than the edge failure I experienced. Here is that Photo:
It more resembles the edge loss I experienced previously using “Edge Trailing” Strokes. But I really can’t say for sure. I just removed this entire bevel with perpendicular scrubbing strokes and started over.
I do take a very long time doing the polished edges because it takes a long time to visually scan the whole length of the bevel on both sides of the knife with the scope at high power, (250X). I generally only photograph areas I feel need improvement so I have a comparison as I continue to localize my efforts to refine those spots.
Tom, is the Henckel Knife with the suspect edge failure the same one you wrote about some time back that has the very hard steel?
Marc
(MarcH's Rack-Its)Attachments:
You must be logged in to access attached files.
07/17/2017 at 8:32 am #40183Marc, I am having a similar issue, except that mine starts with the very first use of DLF in my progression. The last stone I use is the 1500; then I switch to the 9micron DLF. When I do this, the scratches from the 1500 are fairly quickly removed, a mirror finish pops out, but another new set of fine scratches is created. I’m banging my head against the wall trying to get this new set of scratches polished out, with no luck so far.
As somebody with advanced terminal cancer, there will be dark days when I complain about things you say for no apparent reason. Please consider this my apology in advance for such times. There will be days that what I say is clearly wrong, making no sense: on these days I will often be argumentative. Please do not "let me slide" at such times, but rather call me out, point out what is factually wrong, and demand I explain my position. Please also consider this my apology in advance for such times.
07/17/2017 at 8:47 am #40184RLDubbya, what you’re experiencing is exactly what I’ve experienced doing the exact same progression. Polishing is a long slow process with some steps backwards to reach the mirror results. A fresh clean 9µ DLF will impart new visible very fine narrow spaced scratches, especially when you first start using it. Continue along and follow as you would any stone to use it until you are comfortable with the results. Then progress down to 6µ, then 3µ and so on. Each new grit film will first lay down new, finer, narrower, scratches and as you continue the effort to polish and the shine will come through.
I have decided, for me, that a fair amount of pressure may is needed to get the results I’m looking to get. It may be necessary to clean the black residue from the film surface with rubbing alcohol during the polishing if you feel it’s just sliding and not polishing.
Keep at it. I learn something new and helpful to my technique every time I do something, again and again. Now that I have a basic understanding of what it’s all about I can take the time to really observe, learn and appreciate what exactly, it is, that I’m doing.
Marc
Marc
(MarcH's Rack-Its)07/17/2017 at 9:00 am #40188I think we are reaching some physical limits of the knife and lapping film materials plus the process variations in pressure and stroke direction. Clay had taken some 2000x photos of the film and they are not all created equal.
Do any of you know if any of the other sharpening mediums (super fine expensive stones, etc) exhibit the same effect when trying to approach the limits of high polish ?
07/17/2017 at 9:06 am #40189I think we are reaching some physical limits of the knife and lapping film materials plus the process variations in pressure and stroke direction. Clay had taken some 2000x photos of the film and they are not all created equal. Do any of you know if any of the other sharpening mediums (super fine expensive stones, etc) exhibit the same effect when trying to approach the limits of high polish ?
I think you hit it right on the head. Plus each of us do it a little differently so we can’t compare the results, necessarily form one’s experience to another’s.
For me it’s a matter of pushing it as far as I can, then maybe backing off and accepting those results, now as all I can get out of that knife. Then trying again maybe with a little different spin the next time or on the next knife.
Marc
(MarcH's Rack-Its)07/17/2017 at 10:50 am #40191One thing that is important to remember when you’re chasing a true mirror is that airborne dust particles, including silica, can be as large as 30 microns. Dust easily settles on your stones, strops, films etc…, and can create pretty big scratches.
-Clay
07/17/2017 at 11:13 am #40192One thing that is important to remember when you’re chasing a true mirror is that airborne dust particles, including silica, can be as large as 30 microns. Dust easily settles on your stones, strops, films etc…, and can create pretty big scratches.
I find it’s also a challenge to wipe the polished bevel clean, during the film polishing process , in order to inspect my progress with the microscope, with out dragging some debris across the bevel, sometimes imparting fine scratches. The USB microscope, even though it has slippery Teflon tape applied to the contacting edge, can also scratch the polished bevel.
Marc
(MarcH's Rack-Its)3 users thanked author for this post.
07/17/2017 at 11:26 am #40193I use microscope lens cleaning wipes from Zeiss (https://smile.amazon.com/ZEISS-Lens-Wipes-Pre-Moistened-Eyeglass/dp/B0191YLW34/ref=sr_1_3_s_it?s=hpc&ie=UTF8&qid=1500312322&sr=1-3&keywords=zeiss+lens+cleaning+wipes) because I found that paper towels have enough fiber to scratch my very polished edges.
-Clay
07/19/2017 at 9:19 am #40204It’s possible to attain a mirror bevel that shows no scratches under different lighting, upon close up inspection with a loupe. Of course at SEM kind of magnification it will all be really rough.
Snecx you’re correct, I can photograph just what I’m trying to show. I don’t do it with the intention to make it appear better than it really is, I do it just to show the point I’m attempting to make.
Here’s several photos taken of the same EDC knife I’m attempting to polish. I have varied the angle I held the USB microscope against the knife to adjust the focal length and allow me to focus on just what I’m trying to photograph clearly, and focused. The photos are taken at 250X.
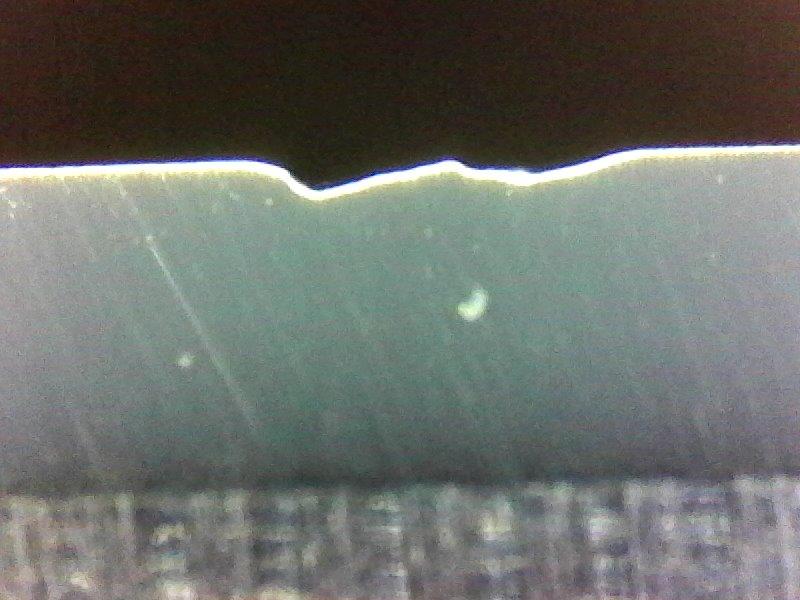
Photo of shiny bevel:

Photo of scratches I’m trying to polish out:
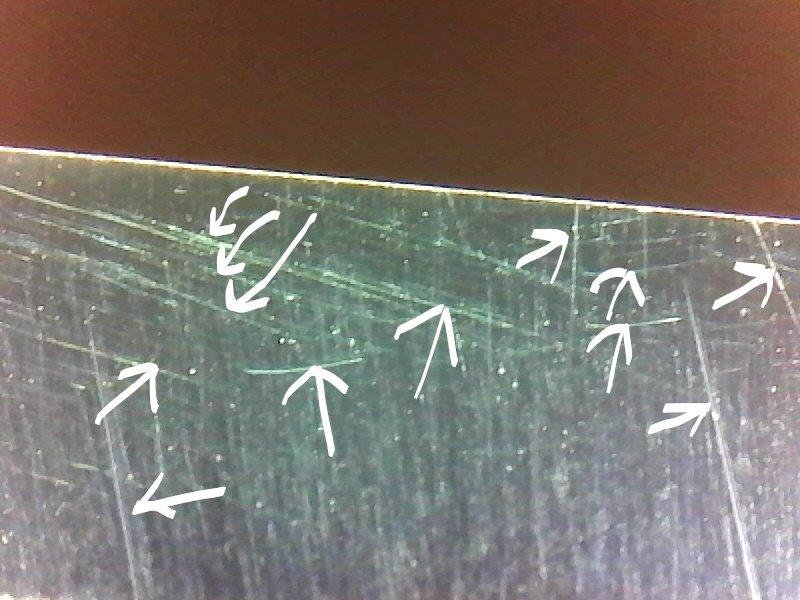
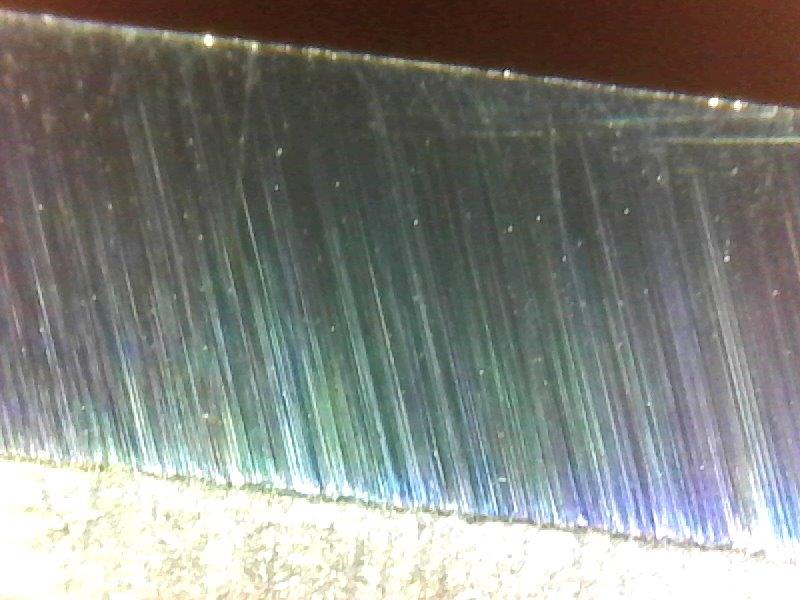
Here’s the actual underlying scratch pattern imparted by the DLF, notice the close, tightly aligned parallel pattern:
Marc
Marc
(MarcH's Rack-Its)Attachments:
You must be logged in to access attached files.
07/19/2017 at 12:04 pm #40216Good illustration Marc, nice job.
-
AuthorPosts
- You must be logged in to reply to this topic.